Cleaning rusty dies

Status
Not open for further replies.

LiveLife

Member
Joined
Jan 10, 2010
Messages
32,940
Location
Northwest Coast
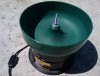
I usually take apart my reloading dies and tumble them in walnut media and NuFinish polish to remove light surface rust. After about 1-2 hours, they come out shiny and lightly coated with polish to go back on the press.

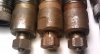
A friend brought over his set of dies that were really rusty! At first glance, I said, "Oh my ... those look really bad." I wasn't sure how well they would come out, but I decided to take on the project.

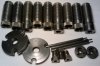
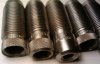
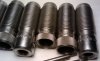
These are Lee carbide 9mm/40S&W/45ACP dies with more than 10 years of use and neglect, hence the rust, even here in sunny California. I will post more detailed step-by-step pictures as the severe rusting required the use of a rust remover and some more tumbling.

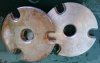
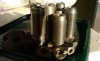
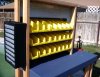
Before tumbling (Note: I did not tumble aluminum/rubber parts):

attachment.php


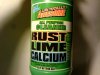
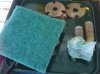
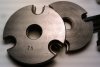
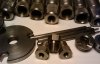
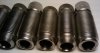
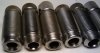
After tumbling 10 hours + scrub with rust remover + 2 more hours of tumbling:

attachment.php

attachment.php
 

Attachments

  • DieF1.jpg
    DieF1.jpg
    53 KB · Views: 1,358
  • DieF2.jpg
    DieF2.jpg
    29.1 KB · Views: 1,048
Here are more detailed before pictures:

attachment.php


These decapping/resizing dies were especially bad.

attachment.php


The top of this #19 shellplate was completely covered in a thick layer of rust! :eek:

attachment.php


The #19 shell holder was especially deeply pitted with rust.

attachment.php
 

Attachments

  • DieB4.jpg
    DieB4.jpg
    38.2 KB · Views: 1,261
  • DieB2.jpg
    DieB2.jpg
    46.5 KB · Views: 2,475
Last edited:
"...lightly coated with polish..." Clean that off. It's abrasive.
Neglect for sure, but not use. None of 'em look terminally rusted. The insides are far more important than the outsides though. Got an inside micrometer? Look for any pitting first.
 
I initially tumbled the dies, shell plates, shell holders and other parts in the Cabela's 400 (Berry's 400) vibratory tumbler with walnut media and 2 capfuls of NuFinish (Yes, they were all tossed in together and tumbled at the same time - I thought the 3 sets of dies with shell plate/holders might bog the tumbler down, but it ran like a champ). I ran the tumbler after adding the polish in the new walnut media for about 10 minutes to make sure there were no clumps - stirring the media with a stick while tumbling also helps break up the clumps.

This is after 2 hours of tumbling. Usually, my dies will come out clean and shiny but these dies were really rusty! I added another capful of NuFinish and continued to tumble for another 8 hours (I added another capful of NuFinish to the media after 4 hours).

attachment.php


attachment.php


Some rust came off the shell plate, but most of the rust is still there.

attachment.php


I used some dental picks bought from Harbor Freight to help scrape off some really bad crusting of rust and to clean out the threads.

attachment.php
 

Attachments

  • DieS3.jpg
    DieS3.jpg
    30.6 KB · Views: 597
  • DieS2.jpg
    DieS2.jpg
    46.5 KB · Views: 1,538
Last edited:
This is how they looked after 10 hours of tumbling.

attachment.php


attachment.php
 

Attachments

  • DieS4.jpg
    DieS4.jpg
    36.2 KB · Views: 1,061
Last edited:
I thought about soaking the dies in WD40 and doing a light wire brushing but decided to try something else. Disclaimer: I normally tumble the dies, clean with WD40 and oil with BreakFree/Synthetic motor oil. Use the liquid rust remover with caution and outdoors.

I picked up a bottle of rust remover called "LA's Totally Awesome Rust/Lime/Calcium All Purpose Cleaner" from the Dollar Store (The product is made in USA and carried by Walmart also). Using a small stainless wire brush and green scrub pad, I used the product straight without diluting and sprayed the rusted areas of the dies. The product generates some fumes, so I recommend you use the product outside. The product worked fairly quickly and I had a container of water to rinse immediately after scrubbing each die/part.

attachment.php


attachment.php


The product worked very well even for heavily rusted shell plate #19 (all the rust came off).

attachment.php


Dies/parts after scrubbing with rust remover and good rinse in water.

attachment.php
 

Attachments

  • Awesome.jpg
    Awesome.jpg
    51.4 KB · Views: 960
  • Awesome2.jpg
    Awesome2.jpg
    70 KB · Views: 584
  • Awesome3.jpg
    Awesome3.jpg
    47.1 KB · Views: 956
  • Awesome4.jpg
    Awesome4.jpg
    47.3 KB · Views: 958
After using compressed air to dry all the dies/parts, I put them back in the tumbler with 2 more capfuls of NuFinish (I added the polish and tumbled to remove the clumps before adding the dies/parts).

After 2 more hours and light wiping with a shop cloth, this is how they look.

attachment.php

attachment.php


Shell holder #19 came out very well.

attachment.php


This was a shock as shell plate #19's thick layer of rust came off completely.

attachment.php


attachment.php
 

Attachments

  • DieE1.jpg
    DieE1.jpg
    32.5 KB · Views: 1,135
  • DieE2.jpg
    DieE2.jpg
    45.4 KB · Views: 874
  • DieE3.jpg
    DieE3.jpg
    48.5 KB · Views: 1,512
  • DieE4.jpg
    DieE4.jpg
    52.8 KB · Views: 2,218
All in all, compared to how they started, I am happy with the outcome. My friend hasn't seen the dies yet, but I probably tell him something like, "You know, they were really rusty and not all of the rust came off ... but here they are!" :D

attachment.php


Close ups of dies. Now, where's my Dremel with the buffing wheel? :rolleyes:

attachment.php


attachment.php


attachment.php


attachment.php
 

Attachments

  • DieE5.jpg
    DieE5.jpg
    58.1 KB · Views: 539
  • DieE7.jpg
    DieE7.jpg
    45.3 KB · Views: 565
  • DieE6.jpg
    DieE6.jpg
    45.8 KB · Views: 1,775
Bought a couple that were rusty. Took them apart and hit them with a wire wheel bench grinder with bronze wire. The insides got dremelled, blown out with air, and oiled lighty--completely. They looked good as new after the tender lovin care.
 
Sunray said:
What do the insides of the dies look like? The outsides don't matter!
I agree. These dies were actively used to load continuously the past 10+ years and the carbide inserts were shiny when I checked them. They worked fine to load as I regularly shoot with this friend, he just wanted the outside of the dies to be "cleaned up".

Insides were checked before tumbling and they were fine. As to the bullet seater stems, they were dirty, but not rusty. He said he did clean the inside of the dies regularly and oiled them, but never did anything to the outside once the rusting started (he figured outside of the dies won't effect the quality of rounds loaded). Apparently, the residual oiling inside the dies kept the rust from forming, but the outside of the dies exposed to the elements in the garage did a job on them.

06 said:
Took them apart and hit them with a wire wheel bench grinder with bronze wire. The insides got dremelled, blown out with air, and oiled lighty--completely.
When I first looked at them, I was afraid I had to use the wire wheel or go crazy with the Dremel, but used the easier/lazy route of tumbling them. It took a quick brushing/scrubbing with a rust remover and couple more hours of tumbling to get them where they are now - still a lot less work. I am contemplating whether to do a final polish with the Dremel, just to surprise the friend. :D
 
Last edited:
Vinegar & ATF III really work a number on rust. For this project a soak in vinegar would have worked great. I usually fallow the vinegar bath with some soda to neutralize the acid.

If you have a stuck bolt, hinge, or a surface you cant bath the ATF is a great catalysis.
 
On a side note: I made a home made rust buster solution once of ATF, brake fluid, and a bit of diesel fuel. It worked great--need to make up some more. Be careful if using on a painted surface as the brake fluid will mess it up.
 
I had a decapping die that was rusted. I soaked it in a solution of water and citric acid (bought in powder form from a Hobby Lobby) for several days. The die now looks like new. I'll post before and after photos tonight when I get home.
 
Looks like your friend owes you big time now
Naw, he just owes me 6 caps of NuFinish and $1 for the Rust Remover (he's been a good friend over the years and he even gave me a puppy :eek:).

However, he will owe me for my new rifle cartridge sorting/reloading bench. I built it with a bin sorter (it is removable) to sort cases by weight and 3 rows of bins allow me to keep them segregated (sorted by weight, deprimed/polished, resized/trimmed/ready to load - in 8 different case weights).

When he saw the bench, he said "I gotta have it!" ... I am building another one for me. :rolleyes:

attachment.php
attachment.php
 

Attachments

  • Bench2.jpg
    Bench2.jpg
    22.6 KB · Views: 2,996
  • Bench1.jpg
    Bench1.jpg
    29.3 KB · Views: 769
Side note on tumbling parts:

One of my tumblers (old Midway version, I believe) has a thin plastic bowl and has ribs molded in inside. Don't recall what I was cleaning, but it caught on one of the ribs and wore a hole through the bowl. When I came out the next morning, I found a pile of corncob on the floor.

My other tumblers have smooth (and thicker) bowls, so no problems with those.
 
EddieNFL said:
My other tumblers have smooth (and thicker) bowls, so no problems with those.
Good info. Yes, check your tumbler bowls to see if they have any ribs. The Cabela's 400 (Berry's 400) tumbler I used has smooth/thicker bowl. Inspection of the bowl surface showed no damage even after 12 hours of tumbling 3 sets of dies/parts with 2 shell plates and 2 shell holders.

Maybe Berry's MFG should add to their capacity specs, "Will also tumble 3 sets of dies with accompanying shell holders/plates.":D

attachment.php
 

Attachments

  • Berry400.jpg
    Berry400.jpg
    40.7 KB · Views: 534
Last edited:
Naw, he just owes me 6 caps of NuFinish and $1 for the Rust Remover (he's been a good friend over the years and he even gave me a puppy :eek:).

However, he will owe me for my new rifle cartridge sorting/reloading bench. I built it with a bin sorter (it is removable) to sort cases by weight and 3 rows of bins allow me to keep them segregated (sorted by weight, deprimed/polished, resized/trimmed/ready to load - in 8 different case weights).

When he saw the bench, he said "I gotta have it!" ... I am building another one for me. :rolleyes:

attachment.php
attachment.php
bds

Sweet bench. You sound like a real friend.
 
Here is the rusted decapper die. It's on the left.

IMG_0502.jpg

And here is the same die after soaking for a few days in citric acid. Nothing else was done to it. The discoloration you see on it is Breakfree that has some grease on that was picked up while screwing the die in and out of the press.

IMG_0515.jpg
 
Yes, I am a full time civil servant - the reloading/shooting hobby helps me stay grounded and sane.:D

If I have to clean up another really rusty set of dies, I may look at citric acid option, the die came out looking nice!

This was a first for me as 1-2 hours of tumbling in walnut and polish have gotten all of my dies with light surface rust clean and shiny in the past. I have never tumbled dies so rusty before. I knew about ATF based rust removing formulas but when I saw the rust remover product at the Dollar store with big "RUST" on the bottle, I wanted to try it (I have used their regular Awesome cleaner and it does a great job - I keep it next to my Simple Green bottle). I figured water rinse was less messy than removing ATF from the dies.

For those who have not tried cleaning/polishing dies in the vibratory tumbler, it has worked very well for me. I decided to post this thread to share that it is an easy/lazy way to keep your dies clean and protected (with the thin layer of residual polish) on a regular maintenance basis. Although I probably won't clean dies this rusty on a regular basis, I am glad the dies came out looking great in the end with a little extra work. If you oil your dies, wiping the dies off with paper towel will help (otherwise, the walnut media will simply clump/clog in the dies).

BTW, the slight brown sheen you see on the photos are not residual rust, it's reflection from the clamp light I used and the pics were taken with my smartphone. All the dies have a clean finish like the dies on the outer edge of the pics. I may post more pics with better lighting using mr regular camera.
 
Last edited:
Status
Not open for further replies.
Back
Top