Finished my WFT project

Status
Not open for further replies.

Rangemaster

Member
Joined
Mar 5, 2013
Messages
108
Location
Nev-AH-Dah
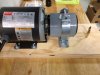
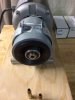
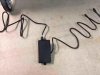
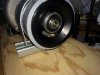
Finally got all the parts the other day to build my Worlds Finest Trimmer project.

Always want a way to control brass shavings and trim brass with only using one hand.
 

Attachments

  • ImageUploadedByTapatalkHD1389925486.500244.jpg
    ImageUploadedByTapatalkHD1389925486.500244.jpg
    106.9 KB · Views: 163
  • ImageUploadedByTapatalkHD1389925499.261909.jpg
    ImageUploadedByTapatalkHD1389925499.261909.jpg
    84.5 KB · Views: 150
  • ImageUploadedByTapatalkHD1389925511.038352.jpg
    ImageUploadedByTapatalkHD1389925511.038352.jpg
    82.7 KB · Views: 137
  • ImageUploadedByTapatalkHD1389925520.955177.jpg
    ImageUploadedByTapatalkHD1389925520.955177.jpg
    108.8 KB · Views: 124
I'd be interested in knowing what size motor you used, what the foot pedal came from, and as cfullgraf asked, what exactly is coupling the motor to the trimmer. How quick/easy is it to remove the coupling device from the motor, in case someone had 2 separate WFT's that they wanted to be able to mount.
 
Here is the details

1) Motor 1/4 hp Dayton 120v motor 1700 rpm ( about the same speed as a cordless drill )
2) 3/8" to 1/2" bore set screw coupling ( amazon) make sure it's at least 2" long
3) The power cords I got from a used computer store, 1 extension cord and one power cord. I put the extension on the motor which doesn't allow anyone to directly plug in the motor.
4) Router foot pedal ( harbor freight )
5) 3/4" plywood ( Home Depot ) sandwich together. Bought a remnant scrap piece for like nothing.
6) The housing that covers the bit is: 3" PVC electrical coupling, 2 - 3" to 2" ABS reducers just pushed into the coupling so they are easy to remove.
7) Last the housing strap is a electrical 3" strut strap and a little piece of 7/8" strut. The strap could use a little bit more forming since the outer size of the coupling is 3-1/2".

The total cost was just short of $120 for everything.
 
I'd be interested in knowing what size motor you used, what the foot pedal came from, and as cfullgraf asked, what exactly is coupling the motor to the trimmer. How quick/easy is it to remove the coupling device from the motor, in case someone had 2 separate WFT's that they wanted to be able to mount.
Just use a nut driver to remove the both and nut off the housing strap. And then a Allen key to loosen the set screw on the coupling.

It takes about two minutes to change out.
 
Here is the details

2) 3/8" to 1/2" bore set screw coupling ( amazon) make sure it's at least 2" long

The total cost was just short of $120 for everything.

Is that used to reduce the output shaft of the motor to 3/8" for the chuck of the WFT? Maybe I'm not using the proper search terms on Amazon, but is this the part you're talking about http://www.amazon.com/Ruland-FSR24-...934580&sr=8-1&keywords=3/8+set+screw+coupling If that's the case, I'm thinking if I were to buy a WFT2 I wouldn't really need a reducing coupler. It'd be a simple as finding a piece of pipe stock (fairly strong piece) with 1/2in I.D. and drill and tap it for set screws to secure it onto the motor shaft and the WFT2 chuck.
 
That's great! I might have to steal this idea when I get my WFT 2.

Only thing I may do different is mount a 1/2" drill chuck on the end and not worry about the brass catching. I think versatility for me would be more important than a catcher.

You can get a tapered 1/2" drill chuck for $15 and not need the adapter. You would have to grind the spindle shaft down to the proper taper diameter, but that would make a very versatil motor.
 
Is that used to reduce the output shaft of the motor to 3/8" for the chuck of the WFT? Maybe I'm not using the proper search terms on Amazon, but is this the part you're talking about http://www.amazon.com/Ruland-FSR24-...934580&sr=8-1&keywords=3/8+set+screw+coupling If that's the case, I'm thinking if I were to buy a WFT2 I wouldn't really need a reducing coupler. It'd be a simple as finding a piece of pipe stock (fairly strong piece) with 1/2in I.D. and drill and tap it for set screws to secure it onto the motor shaft and the WFT2 chuck.

Right, if you got the WFT2, you would need a coupling with 1/2" bore on both sides.

The original WFt has a 3/8" shaft and the motor has a 1/2" shaft.

You will not find a piece of pipe with a precision enough bore.

The parts will wobble. You could machine one on a lathe using a piece of round stock but even just using a 1/2" drill would make a hole a bit too large. The best hole would be drilled a bit small and reamed out with a precision reamer.

Here is another source for the couplings.

http://www.mcmaster.com/#rigid-shaft-couplings/=qaesff

A clamp on coupling will not damage the shafts like a coupling that the set screws dig into the shaft. The latter will have a bit more positive clamping though.
 
That's great! I might have to steal this idea when I get my WFT 2.

Only thing I may do different is mount a 1/2" drill chuck on the end and not worry about the brass catching. I think versatility for me would be more important than a catcher.

You can get a tapered 1/2" drill chuck for $15 and not need the adapter. You would have to grind the spindle shaft down to the proper taper diameter, but that would make a very versatil motor.
I thought about using a drill chuck adapter, but you still need the coupler. Unless you find a motor with a 1/2" - 20 thread pattern that will thread right into the drill chuck.
 
Very sweet! I applaud you sir.
I am not familiar with a WFT trimmer. Where do the shavings go?

Generally, the chips are captured in the housing until the trimmer stops turning. Then they spill out of some holes in the housing.

Some chips do get flung out of the holes if the cut free from the case at rage same time as one of the holes is lined up with the chip.

Rangemaster's plastic shield would do a good job contains the chips for easy clean up once in a while.

With my drill powers WFT, I keep it spinning between cases until something forces me to stop it. I put the trimmer over the trash can and slowly stop the rotation of the trimmer. Virtually all of the chips accumulated in the Trimmer housing drops in the trash can.

Word is caution, too much buildup of chips can get a chip on the shoulder stop in the trimmer and affect the trim length.

P.S. Rangemaster's design looks good. My motor and coupling are to be delivered on Monday.
 
We'll I just ran 100+ 223 cases in a few minutes.

Much much easier with a fist full of cases. As you can see now, no mess all the brass shavings are contained.
 

Attachments

  • ImageUploadedByTapatalkHD1390078587.289668.jpg
    ImageUploadedByTapatalkHD1390078587.289668.jpg
    101.9 KB · Views: 33
We'll I just ran 100+ 223 cases in a few minutes.

Much much easier with a fist full of cases. As you can see now, no mess all the brass shavings are contained.

Great job.

Just a note, the attached picture shows some brass chips in the cavity for the case. If they get on the shoulder stop, the trim length will be affected.
 
Status
Not open for further replies.
Back
Top