Homemade camo job

Status
Not open for further replies.

BigShep85

Member
Joined
Apr 28, 2011
Messages
286
Opinions welcome! (something you don't hear every day)

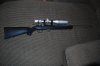
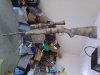
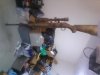
Well the rifle is a marlin .22 W/simmons scope and it had a stainless barrel and matching stainless scope, it was too bright for my taste so I took it upon myself to cover it up a little. The first photo is the gun originally way too bright. The second photo was the pattern I liked most but I felt it was too light in color for the area I hunt (deep woods) so I darkened it more. The third photo is the finished product. Overall I am very happy with it.
 

Attachments

  • 20111011_9.jpg
    20111011_9.jpg
    143 KB · Views: 75
  • Photo06021853_1.jpg
    Photo06021853_1.jpg
    84.9 KB · Views: 117
  • Photo06022051.jpg
    Photo06022051.jpg
    55.7 KB · Views: 113
Looks good. I like the second pattern most too but you gotta go with what works. What did you use and how do you think it will hold up?
 
Looks professionally done. You did a great job. What kind of paint did you use?
 
I think thoat is very nicely done. I've just played with some of my plastic rifles (KT's) using a digital pattern, but I may move on to trying something like yours.

SU16Loaded2.jpg
 
Durability?

Durability is yet to be determined, I had it out hunting once now with no problems or wear marks but I feel very confident in it. I used spray paint from wal-mart actually, they sell camo paint for outdoor items (boats, tree stands, ladders, etc) and it is an outdoor paint so I think it will work fine.

I did it in layers base being army green, two coats, with light brown being next. I held a pine bush branch on the stock and barrel items when putting on the next coat so as to leave the outline of the branch in green on the new brown surface. Then performed the same action with the dark brown over the light brown. This gave me the product in the second photo you see, when it was too light for me I took the dark brown and just laid an over-spray on the entire rifle until it was dark enough. They way I see it if it rubs off overtime I can just spray it down again as I had plenty of the paint left over for touch-ups.

Very simple to do and it can be done with alternating layers for different areas. Dark brown first followed by light brown then the green for a greener camo, or light brown last for fields or desert. Also different items besides a pine bush can be use like sticks, wheat grass, leaves, anything to change up the pattern.

Thanks for the feedback
 
I like the digital browningguy

How did you pull that off? Did you tape off the pattern and paint it in layers?
 
I like the lighter one best as far as looks goes... but look isn't the most important.
 
Hey man, that looks pretty sharp! It looks a whole lot better than how she started out life.
 
I like the lighter one too......but both look good. I used to paint my bows, long before you could ever buy a camo model.
 
On the digital the base gun was black plastic. I taped off the areas I didn't want painted at all with sticky backed plastic sheets cut in the digital pattern and sprayed the whole gun dark earth. After that dryed overnight I applied additional digital pattern cutouts over most of the gun to leave it dark earth and resprayed with dark green. If you wanted more than three colors you would just apply more patterns and repeat. I used the Krylon Fusion camo paint, it's been on about 2-3 years now and although it doesn't get drug through the mud it gets shot quite a bit and has held up very well.
 
Thanks

Thanks, that is actually Krylon "Garage Camouflage" paint. That's not even the garage it is the kitchen painted in the before mentioned Krylon "Garage Camouflage" paint.

I am a jack of all trades :cool:

Also painted that in layers
 
Big shep, dunno where you are, but do that to a mechanic's coverall and a face covering, you could DISAPPEAR in the TX hill country...

I am impressed! I'm not bubba enough to do that to a good lever gun- maybe a beater sks- but def. impressed.
 
Status
Not open for further replies.
Back
Top