
I am reposting the following from the Ruger Old Army Club portion of the Black Powder forums since it did not seem to garner any interest there and maybe this is the more appropiate place to share the information.
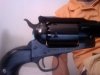
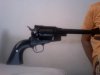
Ok am I missing somthing here or not. I just fitted a New Model Blackhawk grip frame (a 55 dollar aluminum ebay special) to a Ruger Old Army.
I left the newer version trigger spring mounted and put the old trigger return spring and plunger on top of it.
When all is assembled it's just held in place behind the trigger but a little higher resulting in a lighter trigger and the new version cylinder return spring prevents the trigger from being pulled too far back after the hammer is released.
It's a lighter crisp release with less overtravel great.
The newer grip frame has more area milled out that allows that trigger plunger and spring to fit in with the spring pin behind it.
I removed the old style cylinder latch spring and used the modern spring and plunger that mounts in the grip frame for the newer model cylinder latch. It's a fit and it works fine on the Old Army.
Putting it together was different but not too difficult. It's easy for the cylinder latch spring and plunger to miss it's seat (hole) and bend over to the side and of course the trigger spring and plunger has to be positioned also.
Everything seems to hold in place after assembly.
Some lessons I learned I also ordered a trigger and cylinder latch for the new model to see if I can match it or modify it easily but no the holes for the pins in the trigger and cylinder latch of the New Model Blackhawks are of different diameter and drilled in different places.
Retrofitting those are either almost undoable or too much work to be worth it. I was hoping to be able to just hack saw some parts of the new trigger off and adjust the cylinder latch with a little bit of filing but they are very different.
The good news is that the cylinder hands (pawl) of the New Model Black Hawk are good enough to work with. If the other catch in the hand is filed flat you now have a hand that will fit the Old Army alll you have to do is some standard hand fitting.
How do I know because I did it and it works fine in fact the new hand is thicker and rugged.
The Old Army is now 100% coil springs except for the new trigger return spring but that is not used it just acts as a trigger overtravel stop.
Don't fret if you can't find an XR3RED grip frame for your Old Army it seems the new one can be made to fit. If this does not work out (I think it will though) I can forsee moding the grip frame to take the old style trigger sping and plunger would not prove difficult.
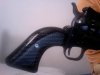
The grips I had on the XR3RED fit fine also.
UPDATE UPDATE UPDATE !!!!
Although I did not experience any problems with the above I could not rest with the idea that the trigger return spring and plunger was unsupported in that small space so I removed the new model trigger wire spring that was acting as a trigger overtravel stop completely
I used it's retaining pin to secure a small piece of brass tubing with a 3/32 inch hole drilled on the very end of it close to the edge (this is important to allow free movement of the hammer strut) inside that extra space in those newer XRN-3RED grip frames.
The new model trigger spring retaining pin through the tube acts as a stop for the old model trigger return spring and secures the tube in place quite well.
The old model trigger return spring and plunger fits nicely into that tube which holds it in place good as well as providing support around the plunger and spring.
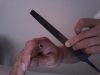
Cutting the brass tubing was very easy with a tiny rigid pipe cutter. After a quick minor tiny filedown of a small area of the tube the 3/32 bit drilled through both ends of the tube quickly with my little cordless drill using a bed post for support.
You can keep your old style latch spring or use the newer one mounted on the Newer Grip Frame either will work.
I decided to make my Old Army all coil springs so I used the newer grip frame mounted cylinder latch coil spring and plunger.
Thats it no "extensive modification to grip frame" just simply remove the trigger return spring and drop in a part (a drop in part that is easy to make at that.)
I am currently using a black aluminum one but maybe I will finally get to try out a New Model all steel grip frame used for cheaper without getting ripped and price gouged for an original.
I my opinion this setup is better than the original both aesthetically since the trigger return and plunger are not seen but up and hidden and functionally allowing for a better slightly lighter trigger pull. It is also now centered behind the trigger and not kind of off to the side like the old setup.
I will post pics and instructions if requested by anyone otherwise I will not bother.
Ok am I missing somthing here or not. I just fitted a New Model Blackhawk grip frame (a 55 dollar aluminum ebay special) to a Ruger Old Army.
I left the newer version trigger spring mounted and put the old trigger return spring and plunger on top of it.
When all is assembled it's just held in place behind the trigger but a little higher resulting in a lighter trigger and the new version cylinder return spring prevents the trigger from being pulled too far back after the hammer is released.
It's a lighter crisp release with less overtravel great.
The newer grip frame has more area milled out that allows that trigger plunger and spring to fit in with the spring pin behind it.
I removed the old style cylinder latch spring and used the modern spring and plunger that mounts in the grip frame for the newer model cylinder latch. It's a fit and it works fine on the Old Army.
Putting it together was different but not too difficult. It's easy for the cylinder latch spring and plunger to miss it's seat (hole) and bend over to the side and of course the trigger spring and plunger has to be positioned also.
Everything seems to hold in place after assembly.
Some lessons I learned I also ordered a trigger and cylinder latch for the new model to see if I can match it or modify it easily but no the holes for the pins in the trigger and cylinder latch of the New Model Blackhawks are of different diameter and drilled in different places.
Retrofitting those are either almost undoable or too much work to be worth it. I was hoping to be able to just hack saw some parts of the new trigger off and adjust the cylinder latch with a little bit of filing but they are very different.
The good news is that the cylinder hands (pawl) of the New Model Black Hawk are good enough to work with. If the other catch in the hand is filed flat you now have a hand that will fit the Old Army alll you have to do is some standard hand fitting.
How do I know because I did it and it works fine in fact the new hand is thicker and rugged.
The Old Army is now 100% coil springs except for the new trigger return spring but that is not used it just acts as a trigger overtravel stop.
Don't fret if you can't find an XR3RED grip frame for your Old Army it seems the new one can be made to fit. If this does not work out (I think it will though) I can forsee moding the grip frame to take the old style trigger sping and plunger would not prove difficult.
The grips I had on the XR3RED fit fine also.
UPDATE UPDATE UPDATE !!!!
Although I did not experience any problems with the above I could not rest with the idea that the trigger return spring and plunger was unsupported in that small space so I removed the new model trigger wire spring that was acting as a trigger overtravel stop completely
I used it's retaining pin to secure a small piece of brass tubing with a 3/32 inch hole drilled on the very end of it close to the edge (this is important to allow free movement of the hammer strut) inside that extra space in those newer XRN-3RED grip frames.
The new model trigger spring retaining pin through the tube acts as a stop for the old model trigger return spring and secures the tube in place quite well.
The old model trigger return spring and plunger fits nicely into that tube which holds it in place good as well as providing support around the plunger and spring.
Cutting the brass tubing was very easy with a tiny rigid pipe cutter. After a quick minor tiny filedown of a small area of the tube the 3/32 bit drilled through both ends of the tube quickly with my little cordless drill using a bed post for support.
You can keep your old style latch spring or use the newer one mounted on the Newer Grip Frame either will work.
I decided to make my Old Army all coil springs so I used the newer grip frame mounted cylinder latch coil spring and plunger.
Thats it no "extensive modification to grip frame" just simply remove the trigger return spring and drop in a part (a drop in part that is easy to make at that.)
I am currently using a black aluminum one but maybe I will finally get to try out a New Model all steel grip frame used for cheaper without getting ripped and price gouged for an original.
I my opinion this setup is better than the original both aesthetically since the trigger return and plunger are not seen but up and hidden and functionally allowing for a better slightly lighter trigger pull. It is also now centered behind the trigger and not kind of off to the side like the old setup.
I will post pics and instructions if requested by anyone otherwise I will not bother.
Last edited:
")