Lyman pistol kit finally finished

Status
Not open for further replies.

davepool

Member
Joined
Oct 20, 2007
Messages
583
Location
phoenix
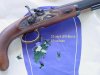
Took 8 months, but it's done. First attempt at this, next up is a Pedersoli flintlock. This Lyman was a nice kit but the lock assembly needed a lot of work, it's smooth as butter now. I polished all the metal cause i could not get a cold blue finish i liked, going to try the express blue 4V50 Gary used on his traditions kit when i do the flintlock

Blood red dye/stain mixed with sanding sealer, 4 coats of dye mixed with clear gloss lacquer, 5 coats of clear gloss lacquer and lots of wet sanding and steel wool between coats, Final polish was with Mothers billet polish and 3 coats of carnuba wax.

DSC01736_zps5c6de45a.jpg

DSC01734_zps57d8c12e.jpg

DSC01740_zps697c2082.jpg

DSC01743_zpsfebbcfec.jpg

DSC01763_zps4dbf4094.jpg

DSC01764_zps5f143755.jpg

DSC01769_zps64a99f11.jpg

DSC01796_zpsb3f0af95.jpg

DSC01794_zps5f671178.jpg
 
Dang! They really look different "In the white." Great Job all around. Those things are accurate too. The Pedersoli Lepage percussion pistol is also in the white and it is surprisingl easy to keep it free of rust.

attachment.php
 

Attachments

  • lyman25oh.jpg
    lyman25oh.jpg
    50.9 KB · Views: 150
Shoots pretty good ( see MECs target, mine looked that at 25 yds but i used a rest cause i suck at off hand pistol shooting ) i got all the basic inletting and fitting done first and assembled it and took it to the range, if it wasn't a good shooter i doubt i would have put that much effort into the final finishing.

I took lots of photos cause it will never look like this again....kind of like my wedding photos :)
 
You sure put a lot of TLC into that kit. Beautiful end product. You should be very proud of that gun.

I'm doing a CVA flintlock Mountain pistol now and I know mine will not look that good when I finish. I can't take 8 mos. if I want to finish it and shoot it before my 72nd birthday. Plus I don't have the patience.
 
This is up next, gonna do some mother of pearl and brass wire inlay, and polished blue/black on the metals, maybe some kind of fancy grip cap.

DSC01511_zps0e947410.jpg
 
That thing looks nice, do you have any pictures of it before you started?

You did a good job.
 
Looks nice, and I'm glad to here she can shoot too.
I bet she can turn some heads at the range.

I'm not familiar with adding dye to a wood finish other than an initial stain.
What type of Dye is it you used in the sealer and lacquer?
Same dye in both?
Was it marketed for this use (mixing in sealer and lacquer) or were you experimenting?
Was it a powder or a liquid?
 
Like the Great Plains rifle, Lockwork is like an original except that the leaf springs are replaced with coil. My rifle and pistol didn't require any work on the locks. Even though the Pistol does not have a set trigger (or triggers), it does imitate the larger rifle lock by having a fly. A very careful shooter can manipulate the trigger so that the sear rides up on the fly serving the purpose of a hair trigger.
This requires the same care (or probably more) than using an arm with double or single set triggers ie: down range and on target at all times with the knowledge that it could go off at any time. Mine is a .50 caliber and ive stuck with the recommended maximun weight -or in the case of substitutes- volume of powder with patched balls. Lyman/Investarms recommends against using bullets mainly because , carried around, they might walk forward and behave like a bore obstruction when fired. Some shooters have learned that extra heavy loads tend to split the stock.
 
Looks nice, and I'm glad to here she can shoot too.
I bet she can turn some heads at the range.

I'm not familiar with adding dye to a wood finish other than an initial stain.
What type of Dye is it you used in the sealer and lacquer?
Same dye in both?
Was it marketed for this use (mixing in sealer and lacquer) or were you experimenting?
Was it a powder or a liquid?
It's a alcohol based liquid dye/stain made by H.Behlen called Solar-Lux, instructions said it could be mixed into the sealer and lacquer to vary the tinting. I wanted it to have a dark almost blackish color, so i mixed it in both the sealer and lacquer.

I had a bunch of scrap walnut laying around, so i made up 7 different "story boards" experimenting until i came up with the final technique

I also experimented with different finishing polishes, from standard wood finish polishes to auto polishing compounds, i was really surprised to find that Mothers Billet mag wheel polish gave the highest luster
 
Last edited:
That thing looks nice, do you have any pictures of it before you started?

You did a good job.
This is the only before photo i can find, i already have a lot of work completed in this photo. I know i have photos of when i took it out of the box, but i can't remember what i named the file ( i hate getting old :)).

DSC01509_zpsca7c8a8f.jpg

I was going to do a step by step photo essay of the work, but sometimes i get lazy :)
 
Like the Great Plains rifle, Lockwork is like an original except that the leaf springs are replaced with coil. My rifle and pistol didn't require any work on the locks. Even though the Pistol does not have a set trigger (or triggers), it does imitate the larger rifle lock by having a fly. A very careful shooter can manipulate the trigger so that the sear rides up on the fly serving the purpose of a hair trigger.
This requires the same care (or probably more) than using an arm with double or single set triggers ie: down range and on target at all times with the knowledge that it could go off at any time. Mine is a .50 caliber and ive stuck with the recommended maximun weight -or in the case of substitutes- volume of powder with patched balls. Lyman/Investarms recommends against using bullets mainly because , carried around, they might walk forward and behave like a bore obstruction when fired. Some shooters have learned that extra heavy loads tend to split the stock.
I took the lock work apart and filed,sanded and polished all the moving parts just like i did the external metals, this thing runs like it's on ball bearings.

The trigger had a lot of lateral slop, so i made a shim to fit between the trigger arm and the housing, virtually zero side to side movement now.

I thought about lightening the trigger pull by taking 1 or 2 coils off the spring, but that's an experiment for another day....and when i get a spare spring in case i screw it up :)
 
Funny thing. It IS Backwards compared to the factory gun in my picture but when you look at it from the rear,it looks like it should be that way to eliminate glare.
 
Funny thing. It IS Backwards compared to the factory gun in my picture but when you look at it from the rear,it looks like it should be that way to eliminate glare.
And that is exactly why i put it in that way, to eliminate glare. I looked at a lot of photos online of this pistol as a finished pistol from the factory and according to those mine is in backwards.

Look real close at the first photo and you can see the small groove i filed in the front sight and put a dab of red enamel there. With the rear sight in backwards and the convex area of the rear sight blackened the red dot is really easy for my old eyes to pick up, looks weird but it works for me.
 
It's not the tool , but the skill with which you use the tool :)
I love my dremel

how did people build repair and maintain firearms without them?

serious question if anyone knows I know all about small files etc but they dont seem to last any time at all anymore
 
Status
Not open for further replies.
Back
Top