New 44 Remingon Magnum Project

Status
Not open for further replies.

blarby

Member
Joined
Feb 25, 2011
Messages
5,202
Location
Calapooia Oregon
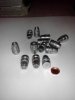
So, I finally got 1000 gas checks to try out my new project.

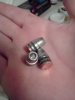
These end up being a 215 grain GC'd hollowpoint with the check, and the high speed black lube ( not pictured ).

I'm just excited to finally be on the way with a project I've had all of the tooling except the checks for since last fall.

Thanks again to JShirley for making this project possible with the mould- your contribution will never be forgotten !

I got interested in this one because my 44 Mangle 'em by taurus has a 4" BBL, but only three inches of which are rifled thanks to the porting chamber.

As a possible result/connection- it fires lighter bullets substantially better than heavy ones. 240's aren't bad- but it flings 200 JHP's like cupid on valentines day.

I've wanted to be able to cast a decent hollowpoint at a lighter weight, but be able to drive it at the velocities needed for that cavity to do its work.

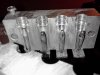
I'm going to start with these initial loads :

Unique : Whole grain intervals from 8 to 10 grains, using a standard large pistol primer by CCI. I just like this one because I have a mountain of it- and I try it in everything.

H110 : Half grain intervals from 21.5 to 23.5 grains, using CCI Magnum Pistol Primers. IF pressure checks out, I may consider tracking this one a little further, but again- its an experiment- we'll see where it goes.

Initially using a liteball mix of 1% antimony, 2% tin, 97%- at the upper end I'm going to need the harder composition to withstand the velocities... I think. Thats why its an experiment !

I have a small batch of pure lead ones for use once we get to the expansion testing... we'll see once we get there !

If I can't find acceptable results in here, accuracy wise, I'll consider looking elsewhere- but I'm sure I will find something worthwhile.


Here's to what we all doo this for ! Woo hoo !

( I know those bullets pictured aren't very pretty- but they should demonstrate the concept well enough that I dont mind sacrificing the ugly ones to find the load I need first. )
 

Attachments

  • new44.jpg
    new44.jpg
    55.2 KB · Views: 138
If you think those are pretty I can only imagine what you'll think of these (not my pic):

mold2.jpg
 
Blarby,

We need pics of the mold as well.....details, details,...:D

Is it a 1,2, or more cavity? Pull pin or Cramer? Inquiring minds want to know. LOL

As for your alloy I did some testing a while back with a similar HP design, well more like that awesome MP up above there. I ended up with a 1.5/1.5/97 for my 45 Colt with velocities running around 850 - 1000fps on the top end.

I then went to blend up a batch of a little bit harder which by the calculator I was using should have come out around a 1.75/1.75/96.5 for the 41 and 44, but something didn't get weighed out properly I guess as it came out softer than the first stuff did. I just haven't had time to re-blend it and test since then.

I am however VERY interested in that bullet you have there as well as how well it shoots. I might also be interested in swapping some of mine out for a few of yours if your interested.

Anyway be sure to post up the results and the other details as well.
 
Ask and ye shall receive.

1stly- the bullets in their ready to load state.

2ndly- Sorry for the pic of a dirty mould "work in progress". Antiseize is a great compund, but makes for some messy pics. I didn't clean it to take pics, thats a workin' beast.

As a tilt pin design from NOE, you can really crank 'em out. Even though a few HP cavities can get warped in the process, the overall speed here is far surpassing anything I though possible in an HP configuration. Bad HP? into the pot you go. This was right after the re application, so its even a little messier'n usual. After the first 2-3 casts, everything is 100% out of the cavities.
 

Attachments

  • new44hp.jpg
    new44hp.jpg
    49.4 KB · Views: 71
  • Mould.jpg
    Mould.jpg
    124.1 KB · Views: 75
Last edited:
If that was directed at me- Thanks !

I'm also going to try 6 with no gas check, loaded at 8 grs of unique to see what I've been missing out on for plinkin fare :)

Tomorrow is range day- I'll have plenty of targets and results posted if not thursday evening, friday morning for certain !
 
Yep, I think your going to like those bullets with or without the GC.

As for the anti seize, I get enough on me at work I don't even want to have it on everything here at the house. Shoot a quarter inch spot of that stuff goes longer than the Eveready rabbit.

Does it give you any issues while pouring, with it being on the pins? is your fillout still good? Just looking at it I would think you would have some issue for sure.

I have been using the Bullplate and not had any issues, just a dab on a Qtip and then over all the pins and under the sprue plate and away I go.

Oh yea, did your mold come with different pins like some of the MP's do, where you can swap them out for a small, or large HP or solid? That part I REALLY like about the MP's, I just wished I had a small lathe so I could modify some of the pins to something either in between or a bit more taper, and keep them all even. Of course I am not arguing about the quality of either, they both make awesome products.
 
I use a qtip to get what the first two casts doesn't remove from the moulding surface- it gets 95% of it.

It helps a lot on the pins, believe me.

Mine only came with two sets of pins- the HP pin, and a FN pin which turns the bullet into a 226gr SWC.

When I miss some in the cavity- you can smell it instantly- thats about the only interference I get.

Never put bullets that have touched antiseize back in the pot........ You will work hard to get that out, lemme tell ya. NEVER AGAIN !

I shake those quite well with gasoline, and dump 'em in the tumbler first.
 
Last edited:
Ok, here are the first four.

21.5 to 23 gr - shot at 10 yards

I'll admit, I'm not a shooting champion- but good enough to see the results.

on the 22- is the best shot I have ever made with this pistol. That left a grin....... :D
 

Attachments

  • 215.jpg
    215.jpg
    63 KB · Views: 27
  • 22.jpg
    22.jpg
    61.8 KB · Views: 28
  • 23.jpg
    23.jpg
    67.1 KB · Views: 29
  • 225.jpg
    225.jpg
    59 KB · Views: 21
Last edited:
And here is the last one of the h110's

23.5.

I think If I was going to use H110 I would use something between 22.5 and 23.0.

Really wish I hadn't shanked the last one on the 23, could have made a difference.

But, my hand was getting numb from the cold, and the magnum, at this point.
 

Attachments

  • 235.jpg
    235.jpg
    69.7 KB · Views: 19
Now for the things I absolutely did not expect.

8 grs of unique, with and without a GC.


I guess I could have been shooting these some time ago........

Absolutely no leading whatsoever without the GC. The shank where the GC would go is in essence an entire additional lube ring- wonder if it made a difference.

This was the lightest load of the day- and the most pleasant to shoot both pulling the trigger, and seeing the target.

I wonder if this charge has enough to make the HP do its thing- that'll be the next test.
 

Attachments

  • 8nogc.jpg
    8nogc.jpg
    67.3 KB · Views: 23
  • 8.jpg
    8.jpg
    56.8 KB · Views: 25
9 and 10 grains.

As shown- I shoulda stopped at 8. But this is backyard science, right ?

Although, I must say- punching it out on that 9 was quite entertaining.
 

Attachments

  • 9.jpg
    9.jpg
    56.3 KB · Views: 23
  • 10.jpg
    10.jpg
    58.1 KB · Views: 22
Not bad at all. In looking at the groups I think I might give that 9gr Unique load some serious consideration.

I have some pics posted up in my photobucket account, but due to them upgrading and me having a ice age PC I can't get to them right now. In my casting album there are some pics of groups I shot with my 45 Colt using around 10 or so grains of Unique, plus some AA-9. If you have some of it or #5 or #7 you might give either of them a try also they do VERY well with cast loads.

Here is a couple of groups I shot with some of my first 454 loads, using the Lee C452-300RF running around 1550fps. It sounds a lot worse that it really is from the heavy Raging Bull.
Did a little shooting

As for your wondering about expansion, if your in the 1000fps range, using the alloy you mentioned above, they should roll back nicely. Here is a link to another post when I tested my 1.5/1.5/97 alloy from my 45 Colt. It might give you some idea of what to expect,
HP Alloy Test
 
I am truly considering that 9 gr .... I want to see what it looks like without the GC as well.

If I can get groups like that, without leading, without a GC- I'll be a happy man.

Sad thing is, once you drop the hardness to get better "prettier" expansion, thats when the smearing starts- thats why I wanted the GC's.

Honestly though, if they hit at 1000 FPS, go in an inch and a half whole, and shatter into 20 pieces during the next 3-5"- I'd be just as happy with that :D
 
Having an issue locating a local source of 55 gal or 40 gal drums for filling with water for HP testing.

I noticed you did some testing of your own there, 41- what size container of "sandy loam" did you use ?

Did you make sure it was just moist, or was this basically mud ?
 
Having an issue locating a local source of 55 gal or 40 gal drums for filling with water for HP testing.

I noticed you did some testing of your own there, 41- what size container of "sandy loam" did you use ?

Did you make sure it was just moist, or was this basically mud ?

For a container I used some 5'ish gallon buckets they toss at work. They have a nice screw on top which makes it easy to keep the dirt in place. The dirt is just what they call the sandy soil in the area of our farm in E.Texas. Basically what most call sugar sand, and when it's very dry I call it talc.

I fill up the bucket with damp sand, not wet where you can see any water simply like what you might find digging down an inch or two below dry topsoil. As I fill the bucket I use the shovel to break it down and I pick it up a foot or so and drop it on it's bottom to settle it as I go, so that it is pretty packed when done.

The screw on lids will take plenty of shooting as all you need do is duct tape over the holes on the inside or while you have the bucket upright, wipe off the dust and put a stick on target over the holes. Might have to tape them on as well once in a while, but they work really well for plenty of testing or target practice. Once done shooting or testing out a bullet, I simply set the bucket on the tail gate of the truck or atop a 55 gallon barrel in the field and using a piece of expanded metal I scrape the dirt out a little at a time using one of the little garden spades or a wide paint scraper. If I miss a bullet the expanded metal will catch it, if not the first time through then later on when I sift it again.

If the dirt in the bucket is a bit dry I sprinkle some water on it to just get it damp. Too wet and the bullet will sail right on through, as the water acts a bit like a lubricant. Whats cool is after shooting you remove the top and you can follow the dry sand right to your bullets.

The buckets full of sand will stop up to a 300gr 44 magnum at 25yds, but they will sometimes if shot in behind one another break on through the bottom of the bucket. At 50 yards it will stop even my 300gr 454 loads at 1550fps. But for most handgun velocities at 25yds it works out VERY well for capturing bullets especially for cast when you want to reuse your alloy.

If you look at the bottom link under my handle below, and look under the Casting album, and Alloy Testing, you will see a few pics of what I use and how the dirt looks in them. They have updated that site and due to my archaic PC here I can't get to them to upload them right now.

Hope that description helps.
 
Status
Not open for further replies.
Back
Top