Photo Experts: getting decent bore pictures

Status
Not open for further replies.

Geneseo1911

Member
Joined
May 6, 2005
Messages
1,016
Location
South of I-80, PR of IL
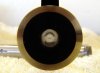
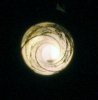
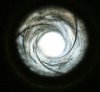
I'm trying to get decent pictures of my pistol bore to post for advice as to whether I'm looking at copper fouling or rust. The trouble is, I know very little about photography. I'm the guy with the point and shoot that has never left the "auto" setting.

Is there any tips you all can give me? I've seen some fairly decent bore shots posted up on here before, but I'm not sure whether I have no technique or I'm not using the right hardware.

My camera is a Canon Powershot A560. It doesn't have a macro setting (that I'm aware of), and the only way I've been able to get clear shots of paperwork or ID cards is to put them about 4' away and zoom in, but I couldn't get this to work for the barrel.
 
Your camera has a macro setting. ON the round button around the "joystick" button on the back of the camera, the left side is marked with a flower emblem. This is the macro button. When you push it, it should display a macro icon on the screen.

First, make sure there's some light coming down the bore. Disable the flash. A tripod or other mount where you don't need to hold the cam will help.

You'll notice that your shutter button has 2 places in its travel. Press the button halfway, and the camera autofocuses. Complete the press and it shoots. This is useful to you!

With macro selected, frame up the photo you want, but an inch or 2 farther back than what you actually want. Press the shutter button to the autofocus point, and wait till the camera indicates that it's ready. Now move the camera closer to the barrel by an inch or 2 such that the point its focused on is now an inch or 2 into the bore. Finish pressing the shutter button, and hold REAL still while the shot is shot.

With a little practice, it'll work alright. May have to play with the brightness a touch to get what you want.

Hope this helps rather than confuses....

J
 
Well, I feel like a dummy for not knowing about the macro setting. I wish I had known that two years ago.....

Thanks chilmau for knowing more about my camera than me. Your tips worked perfectly, and got me taking decent pictures within a few shots. And thanks to Justin for the link.
 
Canon Powershot A560

that's a great little camera... I loved ours, untill my wife decided to carry it in a soft side cooler with the cold drinks....

needless to say.... not all pull top water bottles seal 100%

After many attempts at drying the thing out... it was still a total loss :(
 
I'm getting there; this is light years better than my best previous efforts. Hopefully I can get a diagnosis from these and a couple others. I'm also excited to be able to take decent pictures of my guns now that I know how to use the camera!

232323232%7Ffp53666%3Enu%3D333%3A%3E%3A53%3E648%3EWSNRCG%3D339%3B588655336nu0mrj


232323232%7Ffp537%3B6%3Enu%3D333%3A%3E%3A53%3E648%3EWSNRCG%3D339%3B586294336nu0mrj
 
Nice workin' little camera there. :)

Those shots actually look pretty good..... You'll get the hang of it!

J
 
You might try proceeding as 7X57chilmau suggests in Post #3 while shining a light on a spot of white paper placed on the breech face and aligning the camera straight down the barrel. As Kodak said, "This is just a starting point......"
 
Another tip. Use the self timer. Get the shot staged how you want, then hit the button. This will give you much clearer shots because you won't jiggle the camera when you push the button. Disable the flash and use indirect light. Pics will really look good.
 
Very informative thread! Thanks for the link, Justin. Everyone's tips are very helpful!
 
1) Tripod....the more stable the better. I have a crappy telescoping model I got at a garage sale for $4....but it works fine.

2) lighting....for certain shots, you need diffused lighting from the opposite end....for other shots, you can do with direct diffused lighting. Avoid direct lighting as that tends to cause reflections. A camping spotlight can be easily diffused with a piece of 20lb stock printer paper and a ruber band. Seriously.

3) Macro: always buy a camera based on how good it's macro is. The closer to the lens you can use the macro, the better.

I used a Nikon Coolpix L3 (cheapo point-and-shoot camera) without flash, muzzle end diffused LED lighting and my cheapo tripod to take this photo....the camera was about 4" from the barrel, macro on.
The goal of the photo was to show the very odd and very massive copper pieces fused to the rifling lands.
CUFOULING.jpg
 
Mustang Steve that is really cool.

Here's one of my MkIII 22/45:

attachment.php
 

Attachments

  • 2245 rifling.jpg
    2245 rifling.jpg
    48.6 KB · Views: 119
Last edited:
Great pic Dentite, I really like the contrast.

The thread shows a red X, but copy/pasting the properties of said X works to see it.

That pic was why one doesn't run 60rds of Blazer brass through a SCCY CPX-1 in 15 minutes. It only happens with Blazer, which is odd....I can tell it's happened as well since the bullet will consistently veer off in relation to where they fused.
 
Dentite, weird but cool! (had same problem of not seeing image in thread, but did some right-clickey magic and took a look-see.)
 
Thanks guys. My image hosting service might be having a problem. I uploaded it to the site and hopefully that will fix the issue.

It does look a little weird with the thick bull barrel and the small .22 bore, but I thought it was an interesting pic.
 
My trick was to use a digital camera, a flashlight, and something to support the barrel where I could leverage the camera from a table with my wrist in a manner to allow adjustments on the x, y, a z axes. I would watch the monitor on the camera to see what I was about to take a picture of, and then I took the picture of what I wanted to.

Good bore shots in < 1 minute.
 
The Cannon 590IS (cheapy camera) seems to take really good macro pictures (flower mode). This was taken with an older Sony. haven't tried it with the Cannon yet.

DSC00206.JPG
 
How about these? 1st one is from a Springfield 2nd Allin conversion and the other is fron a 50/70 Sharps Carbine. (Both original)
Both were done with a mask that allowed no outside light into the lens. I built a "cone" from black construction paper that fit over the lens on one end and over the barrel on the other. The exposure was with the smallest f stop available (I think it is f32 on my macro lens). Shutter speed was experimented with to get a decent exposure with the amount of light used. I found that using a white card or patch and bouncing the light into the breech worked much better than trying to use a bore light. The bore light proved too strong and tended to wash out the picture.
A bigger challenge was trying to get bore pictures from a muzzle loader. A small bore light has to be dropped down the barrel and has to be filtered to cut down on the glare.
I haven't experimented yet, but a pinhole lens might give even better results.
You want as small an apeture as possible. The smaller the apeture, the longer the exposure as this will give the greatest depth of field.

Well fiddle!! Give me a few minutes and I will see if I can get teh pictures to attach.
 

Attachments

  • Bore.jpg
    Bore.jpg
    28.4 KB · Views: 17
  • SharpsBore.jpg
    SharpsBore.jpg
    56.1 KB · Views: 20
Status
Not open for further replies.
Back
Top