craftsman
Member
I picked up an 80# pull, with both aluminum shaft and later all-plastic bolts. As mentioned in earlier posts, they are target point tipped, and about 6-3/4 in. overall in length. Set up my plastic, broadhead backstop, put it (foolishly) near the front gate (chain link fence, with the aluminum slat privacy panels) ... stepped back about 15 yards, took aim and let one fly.
The bolt penetrated this 4 in. thick backstop, and cleanly pierced the slat (about 2 inches behind the backstop), by about an inch and a half. I packed everything up and put it away until I can get to the archery range, which it will be much safer! LOL
Did some web searching - there are NO commercially made broadhead bolts available for the Pistol Crossbow. The shaft for the commercially made target bolts are 1/4 inch diameter (both aluminum and plastic shaft).
*** Enter the craftstore! **** Gotta love that place!
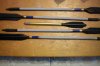
12 in. long 1/4 in. diameter wood dowels sell for about $2 per dozen. 1/4 in. diameter glue-on field points are available online for "youth archery". Bought a dozen of them. Made a fletching jig out of a wood block (dremel tool to make a groove for the shaft). Bought a few strips (1/8 in. by 3/4 in x 2 ft) of balsa wood. Used the commercial bolt's fletch to make a template - but made the over-all length 4 inches due to the near doubling of the shaft length.
NOTE - once you have the first bolt fletched, ensure that the fletching can cleanly pass through the front guide of the pistol crossbow. You may have to trim it a bit.
Used Elmer's brand exterior carpenter's glue (thin layer, let it get tacky for a minute or so) on the inside of the fletch. Mark off 5/8 in. from the back of the shaft, place the shaft in the groove. Place the fletch on either side of the shaft, balanced on the jig (pistol crossbow bolts only have two vanes). Be sure that the back end of each vane does not exceed the 5/8 inch mark. Use rubber bands to hold vanes in place. You might need to insert toothpicks beneath the front and back of the shaft so position the vanes on the center of the shaft diameter (eye-ball it). Wipe off excess glue. Let dry for about 5 hours or longer.
Once dry, remove the rubber bands. Add glue to fill in any gaps betweeen the vane and shaft, and put a bit on the front and back ends, smoothing it down. Let dry again. Once the second drying has completed, take 100 grit sandpaper to smooth off any dried glue. Sand the outside edge of the vane to a point (taper away from the shaft). Sand the back end of the vane smooth. Sand the front end of the vane (right side top) to make an airfoil (like an airplane wing). Rotate the bolt 180 degrees, and do the same on the other vane. Having this airfoil effect will enhance the bolt's flight, causing it to spin as it flies.
After the sanding is completed, paint the vane and shaft (I used flat black for the vane, to match the commercial bolts, and primer gray for the rest.)
Once the paint is dry, put the front tip of the bolt into a pencil sharpener to pit it. You may have to sand it a bit more, so that the pointed shaft fits properly into the glue-on field point. An archery "hot glue" can be purchased online for this purpose. If there is any non-painted wood showing, I used a permanent marker to fill in that gap.
You now have an awesome looking filed point bolt for the pistol crossbow, which should cleanly dispatch any small game the the target bolts can't handle.
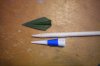
I found some 5/16 inch glue-on Muzzy brand 2 vane broadheads ($22 / 6) !
5/16 inch by 12 inch (10 per pack) wooden dowels at the good old craftstore!
Same process as above (but since the shaft needs a longer taper - I twisted a small ... 3 in. x 5 in. piece of paper, into a tight cone, inserted it into the broadhard back end, and allowed it to expand to fill the void. Secured that with a wrap of masking tape. Marked the end of the broadhead with a pencil, completely circling the paper cone. Removed the now perfectly fitting paper cone, cut off the excess paper from behind the masking tape, and sealed the paper with clear nailpolish from the wife. Two coats, and now I have a perfect form to use on the 5/16 inch diameter shafts, to sand the tip down so I'll have a perfect fit for the broadhead tips. (Used a dremel tool to make my life easier, since this is longer, and the pencil sharpener is not making a long enough taper.)
The end resulting hunting bolt will be able to take out a deer (if the shot is properly placed). 85 lb. pull pistol crossbows are supposed to be available, and I am told that if you give the string several twists before connecting it on the prod, you may be able to get an additional 10 or more pounds of pull.
The 12 inch long broadhead and field point bolts extend past the front of the pistol crossbow by a few inches. That's fine for me. If you don't want that, you can cut the shafts down a few inches shorter before putting on the points.
The bolt penetrated this 4 in. thick backstop, and cleanly pierced the slat (about 2 inches behind the backstop), by about an inch and a half. I packed everything up and put it away until I can get to the archery range, which it will be much safer! LOL
Did some web searching - there are NO commercially made broadhead bolts available for the Pistol Crossbow. The shaft for the commercially made target bolts are 1/4 inch diameter (both aluminum and plastic shaft).
*** Enter the craftstore! **** Gotta love that place!
12 in. long 1/4 in. diameter wood dowels sell for about $2 per dozen. 1/4 in. diameter glue-on field points are available online for "youth archery". Bought a dozen of them. Made a fletching jig out of a wood block (dremel tool to make a groove for the shaft). Bought a few strips (1/8 in. by 3/4 in x 2 ft) of balsa wood. Used the commercial bolt's fletch to make a template - but made the over-all length 4 inches due to the near doubling of the shaft length.
NOTE - once you have the first bolt fletched, ensure that the fletching can cleanly pass through the front guide of the pistol crossbow. You may have to trim it a bit.
Used Elmer's brand exterior carpenter's glue (thin layer, let it get tacky for a minute or so) on the inside of the fletch. Mark off 5/8 in. from the back of the shaft, place the shaft in the groove. Place the fletch on either side of the shaft, balanced on the jig (pistol crossbow bolts only have two vanes). Be sure that the back end of each vane does not exceed the 5/8 inch mark. Use rubber bands to hold vanes in place. You might need to insert toothpicks beneath the front and back of the shaft so position the vanes on the center of the shaft diameter (eye-ball it). Wipe off excess glue. Let dry for about 5 hours or longer.
Once dry, remove the rubber bands. Add glue to fill in any gaps betweeen the vane and shaft, and put a bit on the front and back ends, smoothing it down. Let dry again. Once the second drying has completed, take 100 grit sandpaper to smooth off any dried glue. Sand the outside edge of the vane to a point (taper away from the shaft). Sand the back end of the vane smooth. Sand the front end of the vane (right side top) to make an airfoil (like an airplane wing). Rotate the bolt 180 degrees, and do the same on the other vane. Having this airfoil effect will enhance the bolt's flight, causing it to spin as it flies.
After the sanding is completed, paint the vane and shaft (I used flat black for the vane, to match the commercial bolts, and primer gray for the rest.)
Once the paint is dry, put the front tip of the bolt into a pencil sharpener to pit it. You may have to sand it a bit more, so that the pointed shaft fits properly into the glue-on field point. An archery "hot glue" can be purchased online for this purpose. If there is any non-painted wood showing, I used a permanent marker to fill in that gap.
You now have an awesome looking filed point bolt for the pistol crossbow, which should cleanly dispatch any small game the the target bolts can't handle.
I found some 5/16 inch glue-on Muzzy brand 2 vane broadheads ($22 / 6) !
5/16 inch by 12 inch (10 per pack) wooden dowels at the good old craftstore!
Same process as above (but since the shaft needs a longer taper - I twisted a small ... 3 in. x 5 in. piece of paper, into a tight cone, inserted it into the broadhard back end, and allowed it to expand to fill the void. Secured that with a wrap of masking tape. Marked the end of the broadhead with a pencil, completely circling the paper cone. Removed the now perfectly fitting paper cone, cut off the excess paper from behind the masking tape, and sealed the paper with clear nailpolish from the wife. Two coats, and now I have a perfect form to use on the 5/16 inch diameter shafts, to sand the tip down so I'll have a perfect fit for the broadhead tips. (Used a dremel tool to make my life easier, since this is longer, and the pencil sharpener is not making a long enough taper.)
The end resulting hunting bolt will be able to take out a deer (if the shot is properly placed). 85 lb. pull pistol crossbows are supposed to be available, and I am told that if you give the string several twists before connecting it on the prod, you may be able to get an additional 10 or more pounds of pull.
The 12 inch long broadhead and field point bolts extend past the front of the pistol crossbow by a few inches. That's fine for me. If you don't want that, you can cut the shafts down a few inches shorter before putting on the points.