Reloading bench suggestions

Status
Not open for further replies.

Monkeyleg

Member.
Joined
Dec 25, 2002
Messages
5,057
Location
Decatur, AL
At our old house, I used a couple of old cabinets for a reloading bench in the basement. Nothing pretty, but they did the job.

Our new house doesn't have a basement. I can put a reloading bench in my office, but it would be on a wall such that anyone looking down the hall would see it. Or I can put it in the garage, although that would mean my wife wouldn't be able to park her car in there, and also that I'd be subject to high heat and somewhat cold temperatures (we're in northern AL now).

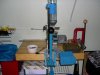
I've seen a couple of ready-made benches that aren't too awful looking. One is a Stack On bench that you can see here. It looks industrial, but it's better than the others I've seen.

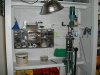
Another is a Waterloo bench, which you can see here. Aside from the bright red, it's not really awful.

Is there anything you've found that works for a reloading bench that doesn't look like it belongs in a machine shop or shed?

Thanks for any replies.
 
Monkeyleg:
If you have a Harbor Frieght Co near you, take a look at their benches. Their pricing is much cheaper and most of the gun rags have an ad with a 20% off coupon. A buddy of mine bought one a month ago and he's real pleased.
 
I like keeping my reloading equip in the garage (shed). I can leave my stuff strewn on the bench if I want w/o the mrs. asking to put my "toys" away when I get done playing.

I managed to break the tall 200 rd mec shot bottle once. It dumped shot everywhere.

My equip has been kept out in the shed for years here in humid Illinois,....no problems ever with moisture etc. Just keep powder lids screwed on tight.

Keep pillowcases over my presses when not in use to keep dust off.
 
Keep pillowcases over my presses when not in use to keep dust off.

Now THAT'S a good idea!!! Wish my poor fried brain would remember it for more than 5 minutes though. I'll have forgotten it before I get back upstairs.
 
I also kept my equipment covered, which kept off the dust.

The problem with having the bench in the garage is humidity and temperature. In the summer the garage will get well over a hundred degrees inside during the day, and it doesn't cool off until well after midnight. Much too hot to reload, although it's also too hot to go shooting.

I don't know how cold the garage will get, but I would imagine it wouldn't be comfortable.

I finally have a room that's all mine that's in the house. I just need to find a bench (or a sturdy desk) that wouldn't make the room look like a machine shed when visitors peek down the hall.
 
I picked up a nice workbench with 5 drawers at Sears that works great for me. It was a floor model and had someblemishes and was reduced real good.
Mt Shotgun reloader is set up on top of a tool chest side cabinet with 5 drawers and I keep the bottom drawer full of pistol ammo for ballast.
 
Here's what I did. This is in a closet in my den. It's far too hot here in Florida to enjoy loading in the garage. I tried. Although you can't see under the shelf, it's lagged to the wall and is rock solid. Right now the Dillon is in the working position mounted on the new Lee mount. The Lee press is on the mounting block and stored there on fabricated brackets. I have a fluorescent light that I'll mount this week. I've had several different setups and I like this the best by far. I built another cabinet mounted to the wall in the same room for all the goodies.
 

Attachments

  • Reloading Setup.jpg
    Reloading Setup.jpg
    252.9 KB · Views: 35
My Most recent build

Think vertical...my last build is this cabinet, is only 16 inches deep, made with 1 sheet of OSB cut for free at HD, and some scrap framing lumber.

I painted the inside white and the most expensive part was the closet bi-fold door and hinges.

I'm sure it could look like a piece of furniture using better materials.
These are early pics, I have added a lot of hooks to put needed tools in easy reach, and an undercabinet light fixture.

I am unable to post pics, so here's a link:
http://thehighroad.org/showthread.php?p=6619573#post6619573


A pic of the press:
 

Attachments

  • CabPress1.JPG
    CabPress1.JPG
    35.2 KB · Views: 35
Last edited:
I built this bench about 30 years ago and haven't seen any reason to change it.
It's built out of plywood, 2x2 and 2x4 boards. I wasn't going for looks, so I just painted it but the bench can be made as fancy as you want, or most any size you want.

The idea behind it is the bench doesn't have to be heavy or bolted down. The seat is attached to the top so when using the reloading press you are pulling/pushing against yourself, so the bench is built light weight and inexpensive. I also built it with Sheetrock screws for easy take-down.

Shopdesk.gif

Reloadingbench.gif

Loadingbenchfrontview.gif

Loadingbenchsideview.gif
 
I like the melamine laminate, I have some salvaged solid oak wood flooring I was thinking of using to make the table top, over double layer OSB or ply, otherwise I was going to make a top out of doweled and joined 2x4, but I thought it would be too soft, either that or I was going to get a free desk off of craigs list and just cut it down to fit.
 
I like the melamine laminate, I have some salvaged solid oak wood flooring I was thinking of using to make the table top, over double layer OSB or ply, otherwise I was going to make a top out of doweled and joined 2x4, but I thought it would be too soft, either that or I was going to get a free desk off of craigs list and just cut it down to fit.

All of that would be overkill if you have a beam under it like I do. The top you see is only Formica covered 3/4" thick plywood, but my presses are bolted through the 3 1/2"x4 1/2" immovable beam. The construction is a simple as it gets....and doesn't approach the difficulty of "doweled and joined 2x4's" construction, yet is stronger.
 
Um, don't know about that strength, when I say doweled and jointed, think about a laminated beam 4x24, my daddy didn't teach me how to build rinky dinky, but it would be heavy.
 
Some nice looking benches.

GW Staar - what kind of flooring is that in your picture and where did you get it?
 
On reloading benches:

I've had good luck with using solid core doors for bench tops. I have gotten them from second hand lumber places, or as throw aways from remodel guys, etc. If they're new, they can be pretty nice.
You can make them any size you wish, within limits, of course.

I use 2x4's or 4x4's for legs, and usually a 2x6 upper leg frame. I screw the top to the leg frame with countersunk/filled 3 inch const screws. Depending on the size and leg arrangement, you can put lower shelves between the legs; and I like to make a drawer at the kneehole for tools, misc items, etc.

The pic is an early one I made from a salvaged door from work. I filled the hinge inlets to make the top flush, and used the drawer glide units from the local store. This one is about 87" long by 36" deep, so plenty of room for shelves and misc. [too much, actually, sigh....]

I put steel plate reinforcements under the press to support the boltdown. It's probably not necessary to use 1/4" like this one, lol. Do the top and bottom so the bolts can't pull through the wood. I have since added a RockChucker to this bench, to the left, with same steel reinforcement. It is heavy, but that's the idea.

I've overstayed my welcome, so good luck with your choices, -West
 

Attachments

  • Savage.JPG
    Savage.JPG
    230.8 KB · Views: 22
Some nice looking benches.

GW Staar - what kind of flooring is that in your picture and where did you get it?

Those are foam tiles from Sam's Club. they've been carrying the stuff for 2 or 3 years. You don't have to have all the colors, its reversible and the other side is all grey.

Here in NM it gets damn cold in the winter. My whole reloading room/weight training room was an attached garage and it stays 15 degrees warmer with the foam tiles over the cement floor, with by house thermometer set at 68. And you can't believe the comfort on tired bare feet.;) I spend 10 times as much time out there in the winter than I use to.

There are cons. In the hottest summer months I have to replace 6 to 8 tiles a year as a few get physically bigger, and bulge. So dimensions don't stay stable forever. I don't care...it is well worth it. I keep a couple of bundles for replacements.

The bigger Sears stores carry a similar product...appears to be made by the same company, and looks like non-slip steel plate.
 
Um, don't know about that strength, when I say doweled and jointed, think about a laminated beam 4x24, my daddy didn't teach me how to build rinky dinky, but it would be heavy.

LOL! I didn't even consider laminating them that direction. You can do that alright, but it won't resist the press arm's torque one bit more, and you'll spend a lot more time and money doing it. That is unless you got a custom lever that's an inch and a half thick, 6' long and you got a world champion wrestler to pull it for you....and you better find a good way to hold the back down....boy, that's what I call overbuilt...go for it.:D
 
The stiffer the better. Glued and screwed really works well here for 3/4 ply and up. 2x4's are perfect for a solid bench frame topped w/ 3/4" and double layer glued in the press location 8-10" all directions. Kiln dried indoor grade studs are best for stability and planned use. Please pre-drill all fastener holes also for consistent results or splits may occur with dry wood.

Attaching to wall studs should be an option if you can swing it. If you're building a bench, you can swing it, it's worth it. Huge difference in stability on an otherwise iffy bench or carpeted space. If in living space, put drink coasters or the like against wall where screws go through, and cinch them tight to prevent movement that would scuff your walls. Crushing carboard works well too, but use a couple layers to get it tight and keep the bulk of your bench rail from coming in contact with your wall. Paper beer drink coasters are the best I've found so far against latex household paint. You can get them tight enough to stay still and loose enough not to gum up your paint much. Final tighten by hand, and give 1/4 more turn than you think necessary.

Beyond that, build what you need and leave room for your knees for comfortable press operation.
 
Last edited:
Status
Not open for further replies.
Back
Top