Replacing a Remmie 1858 Cam

Status
Not open for further replies.
Joined
Jan 13, 2012
Messages
1,855
Location
Michigan
I picked up an Armi San Paolo 1858 Remington clone with known issues as a project and a learning experience. I’ve never had to do much with these other than clean them and maybe replace a spring so I wasn’t sure how big of a job I would end up with. The bolt would not drop and the hammer would not catch at half or full cock.

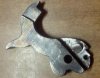
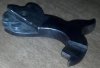
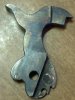
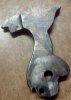
After disassembly and inspection I determined that the sear & cam were excessively worn on the hammer. I took a file and hacksaw blade to the sear and I suspect it may be more from “Bubba” Gunsmithin’ than honest wear but there was not much cam left and it didn’t seem to have a prayer of a chance to grab the bolt. The cam on this hammer was not “Replaceable” since it was part of the hammer, and not pressed in.

ASP is no longer… and parts are not that easy to come by so I decided to replace it anyway. I haven’t noticed anyone discuss doing this so I thought I’d share the relatively simple process I went through to successfully replace the cam. Hopefully it is at least a little bit interesting to someone.

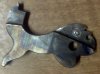
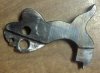
Here is the original Hammer with the "fixed" sear but the cam too far gone


attachment.php
 

Attachments

  • 01 hammer.JPG
    01 hammer.JPG
    23.1 KB · Views: 163
  • 02 hammer.JPG
    02 hammer.JPG
    28.6 KB · Views: 33
Last edited:
So I committed to this project when I ground off what was left of the cam

attachment.php


Then I prepared to make a replacement cam out of a ¼ in Grade 8 bolt

attachment.php
 

Attachments

  • 03 ground.JPG
    03 ground.JPG
    20.3 KB · Views: 163
  • 04 bolt.JPG
    04 bolt.JPG
    15.9 KB · Views: 161
I sanded down a ¼ in drill bit by running backwards with sandpaper and took maybe 10 thousandths off it so the cam would be a press fit. Then drilled out the hole for the cam on my drill press.
 

Attachments

  • 05 hole.JPG
    05 hole.JPG
    29.6 KB · Views: 20
  • 06 bolt installed.JPG
    06 bolt installed.JPG
    14.7 KB · Views: 26
I cut off the cam at an angle.

attachment.php


Then filed a flat on top for the almost final shape.

attachment.php


For the record the revolver functions fine now, bolt drops properly etc.
 

Attachments

  • 07 new cam.JPG
    07 new cam.JPG
    27.1 KB · Views: 159
  • 08 cam finished.JPG
    08 cam finished.JPG
    20.3 KB · Views: 160
Thanks for the kind words, but for anyone who thinks this job would be beyond their means, the most advanced tool I used was a drill press to drill the hole in the hammer.
 
Malachi - Ok, not rocket science, but surely craftsmanship!

What did you use to cut off the Grade 8 bolt at an angle? That's NOT easy.
 
Nice work. S&S Firearms carries Euroarms parts. Another method would be to file the cam flat, drill it out and install a replacement cam.

Long after the pop guns wear out, we'll still be shooting our BP revolvers because folks like you know how to keep them running!
 
mykeal, after I confirmed the fit between the bolt and the new hole I drove the bolt back out with a punch and put it is a vise. Then I used slow strokes with a hacksaw and cutting oil until I was clear through.
 
Howdy

Great work. Be sure you polish the angled surface of the cam so it will not wear down the bolt. A lot of these come from the manufacturers pretty rough and they accelerate wear.
 
Dixie Gun Works sells replacement cams.....

Yeah, I saw some generic replacement cams at least a couple of places online, but as simple of a part as the cam is it didn't seem like making one would be any harder than fitting a generic one. Then shipping of a several dollar part can cost more than the part itself.
 
Good job! Dont forget to heat treat it next time. If you didn't, there will be a next time!! Still, since you know how now, it'll be easier!! Welcome to the club !!!!!
45 Dragoon

p.s. last step before you install for the last time. I'm sure you know that, but wanted to let others know. Thanks, good post !!
 
Hardness...

I started with a grade 8 bolt (which is hard enough to make it noticeably more difficult to work with). I was optimistic that the cam would retain enough hardness to last. Time will tell, but I suspect it may be harder than the one I replaced. Of course that may not be saying much.
 
Howdy Again

The bottom line is, you have two pieces of steel rubbing against each other. The cam and the bolt leg. The harder one is going to wear out the softer one. So either the cam will eventually wear, or the bolt will. Take your choice. Polishing the contact surfaces of both to a mirror shine will help slow down the wear.
 
Driftwood,
Agreed, and true.

As you could easily guess, since I made my initial cut with a hacksaw it started out very rough. I filed and followed with 180 grit sandpaper, then 240, then 400. That is as fine as I had, but I should probably go smoother.
 
Status
Not open for further replies.
Back
Top