Report on PPS50/22 as promissed

Status
Not open for further replies.

Old Dog Man

Member
Joined
Jan 10, 2012
Messages
346
Location
Texas
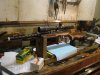
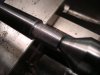
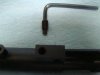
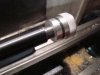
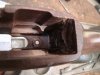
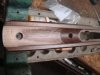
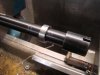
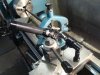
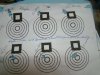
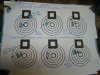
Well I got my PPS50/22 the first on had to be sent back, that's why it's taken me so long getting back with you. The front lug that holds the trigger group to the reciever was not properly copper brazed and come loose. Mitchells Mausers replaced it right away, good service. It is in fact the one imported by Puma a while back. Anyway I liked the looks and design except I changerd a few things to improve on what it was, more to my liking. I didn't think the set screw holding the barrel in the reciever was suffent to take the pounding the bolt would create, so I made a bushing to go in front of the chamber and used Lock-tite retaining compound to secure it in place. If that doesn't work I can always drill and pin it to the reciever like the older 22's were. I didn't like the steel bushing in the end of the forward end of the tube, because it would let the barrel vibrate, so I threaded the barrel and made a screw-on bushing with and "o" ring on the outer dia. to fit inside the tube. There was only one screw holding everything to the stock, so I drilled the back end behind the trigger guard and installed another action screw and glassbedded everything in place, and floated the tube forward of the front screw. The trigger was over 8# I fixed that to 3# but still have a little creep (get that later) but works ok. The built in scope base is so thin I was afraid the scope might flop off at the range so I installed Leupold 2pc base and used Burris Signature rings. I couldn't get the scope boresighted using the original base with the crosshairs adjusted all the way up and left I was still way off fron being anywhere near boresighted. So by using a base with windage adjustments and rings that have bushings that can add or subtract for elevation I got it dead on. Had fun doing it and shoots great. Pics. Al
 

Attachments

  • PPS50 22LR PICTURE.jpg
    PPS50 22LR PICTURE.jpg
    117.7 KB · Views: 17
  • PPS50  22LR.jpg
    PPS50 22LR.jpg
    78.5 KB · Views: 10
  • PPS50 22LR (2).jpg
    PPS50 22LR (2).jpg
    85.3 KB · Views: 5
  • PPS50 22LR.jpg
    PPS50 22LR.jpg
    83.7 KB · Views: 6
More Pics of PPS50/22

Here are some more pics hope this is not boreing. Pic 1 shows rear action screw added. Pic 2 shows front action screw bedded and tube floated. Pic 3 shows support ring locktited in front of chamber. Pic 4 shows checking crown after recutting, had to run live center in crown when threading, so re-cut. Al
 

Attachments

  • PPS50 22LR (5).jpg
    PPS50 22LR (5).jpg
    94.5 KB · Views: 6
  • PPS50 22LR (6).jpg
    PPS50 22LR (6).jpg
    95.1 KB · Views: 4
  • PPS50 22LR (11).jpg
    PPS50 22LR (11).jpg
    93 KB · Views: 5
  • PPS50 22LR (3).jpg
    PPS50 22LR (3).jpg
    124.8 KB · Views: 6
More Pics. of PPS50/22

Here we go again with more pics.
Pic 1 shows a target at 25yrds with 3 different shell brands my old Rem. 581 has always liked the Rem. RNG, but the PPS50/22liked the CCI Mini-Mags.
Pic 2 wind was blowing bad 20-25 with gust. and there were 4 Zombie shooters blasting away, boy they had a lot of ammo. LOL
Pic 3 All groups were fired with the PPS50/22. Wind had subsided and Zombie shooters had finally ran out of ammo. The top left groug surprised me most, I had not tested the Aquila's before, not bad at 50 yrds, think I'll keep it. It was a fun experiment and turned out ok. Probably more work than most would want to do, but I liked the concept and thought I could make a shooter of it. Al
 

Attachments

  • PPS50 22LR (1).jpg
    PPS50 22LR (1).jpg
    103 KB · Views: 7
  • PPS50 22LR (2).jpg
    PPS50 22LR (2).jpg
    70.2 KB · Views: 2
  • PPS50 22LR (3).jpg
    PPS50 22LR (3).jpg
    102.5 KB · Views: 2
Last edited:
Status
Not open for further replies.
Back
Top