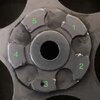
S&W PC .500 mag Extractor

Status
Not open for further replies.

__steve__

Member
Joined
Nov 26, 2020
Messages
166
Location
N Charleston
Where in the world can I find one?

Thanks, that is my question. For a detailed dissertation why, continue reading.
Timing late on one of the cylinder bore locations. When cycled slowly in DA the hammer drops before cyl engaged to cyl stop, and in SA it cocks before it engages to stop. At normal trigger/hammer pull speeds the sheer mass of the cylinder has plenty of momentum to coast its way to position so it will pass but uses inertia to cheat. Three other chamber locations pass the test soundly, and one barely passes, but will pass every time (for now).
One tooth of the extractor (or ratchet) and to some extent, wear on the hand, maybe the reasons for the action anomalies. I am reluctant to send this back to S&W because this was how I received it when I sent it to them for other repairs, and this might be how they returned it back to me.

I can visually witness the hand slip by a now stationary surface when it supposed to be moving it on the very last moment before it engages. I ordered a hand to replace, but that will eventually wear and I will be stuck with the same problem. I can order an extractor but can’t find any. Nowhere sells the 500 S&W extractor.

Anyone know where I can find a 500 S&W MAG extractor.
I understand just bolting on a new one typically presents the need of very minute gunsmithing file rigging but this thing bugs me.

Thanks
 
Last edited:
I am reluctant because it would probably be within their tolerances, furthermore the wait of being without it. I also have another X frame revolver of mine in their possession I sent last there week being looked at for the same reason and far worse - some shot cases had primer swiping indicating lighting off out of battery
 
Last edited:
Swaging the individual ratchet pads to move a little metal is/was a common procedure to adjust individual chamber timing. No need to replace the extractor. There was a tool made by Jack Gutridge offered through Brownells for many years, but no longer. Worked great for that. Consisted of a round bench block with a couple strategically placed holes, a step, a clamping arm, and a punch. You could also use it to swage an offset in the hand. All this before oversized replacement parts were commonly available. Not entirely necessary to have the tool. You just need a way to support the extractor while you swage the individual ratchet pad. Touch up with a needle nose file to fine tune. Just be sure that you clearly identify the offending ratchet pad before swaging.
 
Swaging the individual ratchet pads to move a little metal is/was a common procedure to adjust individual chamber timing. No need to replace the extractor. There was a tool made by Jack Gutridge offered through Brownells for many years, but no longer. Worked great for that. Consisted of a round bench block with a couple strategically placed holes, a step, a clamping arm, and a punch. You could also use it to swage an offset in the hand. All this before oversized replacement parts were commonly available. Not entirely necessary to have the tool. You just need a way to support the extractor while you swage the individual ratchet pad. Touch up with a needle nose file to fine tune. Just be sure that you clearly identify the offending ratchet pad before swaging.
I couldn’t have asked for a better reply
Thank you

Today I was curious about the actual cylinder groove cut tolerances so I did a crude caliper measurement from groove to groove, the edges facing each other:
1.034”
1.037”
1.035”
1.035”
1.035”
I didn’t spend much time making multiple measurements for each, but did a 2nd measurement a few times to confirm precision of method (an error of ~0.001). Not sure how significant this will be, nor do I expect Rolex tolerances, but since the difference between the two readings involves the battery of the failing chamber (towards being late), seems this may also contribute.

Nevertheless, for now this is not a major issue now, but I do have a set of punches my great grandfather owned from the 1940’s that might work well with a crafted block.
 
Last edited:
652ED7A4-3ECD-4075-82C9-0B781358C4A6.jpeg Above is a close up of the extractor, 3 is the gear used for the failing chamber to carry. Doesn’t look different than the other ones.

New hand arrived so I changed it. The old one had some grooving on the main pin where it bears to the trigger. I expected new hand to work but it didn’t. It actually made the problem area a little earlier (but not enough), and it seemed to make others slightly later. But still, same chamber late (with slow action input) and others still pass.

I am not brave enough to tap-forge the extractor notch (problematic area) yet, to give more travel. Not sure I want to wait for S&W to look at it (and maybe do nothing) either.

In the meantime I will ensure enough carry-up momentum while in use. Will post back some day when something fixes this.
 
Did you put dummy rounds in the charge holes when you tested for carry up? If not, go back and retest. S&W standard is to have “simulators” (dummy rounds) in the “charge holes” (chambers) when testing for carry up. The case heads themselves will remove a tiny bit of play between the extractor and cylinder.
Does the gun carry up in single action?
If you DCU on only a single charge hole in double action without simulators, the removal of any extractor play via cartridges in the chambers may fix it.
 
Last edited:
Did you put dummy rounds in the charge holes when you tested for carry up? If not, go back and retest. S&W standard is to have “simulators” (dummy rounds) in the “charge holes” (chambers) when testing for carry up. The case heads themselves will remove a tiny bit of play between the extractor and cylinder.
Does the gun carry up in single action?
If you DCU on only a single charge hole in double action without simulators, the removal of any extractor play via cartridges in the chambers may fix it.
Thanks,
I have tried with factory blanks. There’s less than 0.002” end play. The problem has occurred with real loads which caused unusual primers prints (below), the original reason I began to investigate.

E7344C62-7863-4426-AC9C-64479DCE779C.jpeg

One thing for certain, the timing/carry-up test will for now on be done before and after each use.
 
Last edited:
Status
Not open for further replies.
Back
Top