Saiga free-floating forend

Status
Not open for further replies.
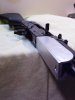
I'm very interested to see the finished project. Did you shoot it for groups before starting? It would also be very interesting to see the increase in accuracy that it might yield.
 
Oops. Sorry Cyanide, I forgot about that. This one goes with the first page, showing the trunnion as seen after removing the factory forend:
 

Attachments

  • 100_0933.JPG
    100_0933.JPG
    99.3 KB · Views: 12
This one shows how I made the two pieces of angle to fit together and form a channel:
 

Attachments

  • 100_0941.JPG
    100_0941.JPG
    109.4 KB · Views: 10
These two show the initial step in fitting the pieces into the receiver -- just getting the width correct at this point.
 

Attachments

  • 100_0943.JPG
    100_0943.JPG
    122.8 KB · Views: 7
  • 100_0944.JPG
    100_0944.JPG
    162.9 KB · Views: 8
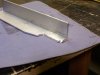
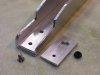
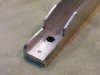
This is a detail of the end that goes into the receiver. You'll see that the inside edges of the vertical portions (seen horizontal here) are chamfered to fit against the angled cut on the trunnion.
 

Attachments

  • 100_0959.JPG
    100_0959.JPG
    124.1 KB · Views: 5
Here is the whole assembly installed. It's very solid.
 

Attachments

  • 100_0970.JPG
    100_0970.JPG
    123.9 KB · Views: 13
These two show how I captured a steel nut for the attachment screw. I didn't want to trust #10-32 threads in cheap aluminum.
 

Attachments

  • 100_0973.JPG
    100_0973.JPG
    148.3 KB · Views: 6
  • 100_0972.JPG
    100_0972.JPG
    144.2 KB · Views: 4
Status
Not open for further replies.
Back
Top