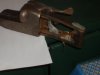
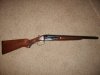
I made myself a blow by blow action report as I went, I even traced some of the parts on my notepad beside the step I am on so I remember which ones went where, I also got a parts schematics which I will send to you it really helped. I did not have to use any fancy tools or a vice, just about 2 hours, nail (used as a drift pin) to helpp seat the hammer pin back in, and needle nose pliers. I also took several pictures before I started as best I could all inside and out to give myself a reference. The pins are not going to be loose, dont worry about that, but they do remove better from one side to the other just like Army machine guns 240/249 if you have ever messed with one of those. The springs going back in wasnt all that hard, you jsut have to hold several pieces at one time inside the receiver and work the pin back in a little at a time, I think it was right to left for reassembly, but I am not sure, the schematic will tell you, I started like a 6d finish nail through the opposite side to help with lineing everything up as I worked the pin back in. I dissassembled from the back forward, I started with all that small stuff at the back, I am not sure if this was correct as i started without any help, or schematics, so you should be able to follow the schematics and get your project complete. Now if this isnt restoration where you are trying to stay original, then I would recommend duracoating the receiver especially the inside so it stays cleaner, I duracoated the whole shotgun I done for my friend but it was rusted all to crap inside and out, the barrel was really pitted I bet i spent 10 hours just polishing with steel wool on a high speed drill motor in the barrel. Anyway I hope this helps.
Thanks

")