Stock repair and refinishing question

tmd16556

Member
Joined
Jun 30, 2019
Messages
644
I’ve decided to start a journey into learning how to clean, repair, and refinish old stocks. I am starting with a low-stakes stock from a Ranger bolt action 20 gauge. It’s not much to look at and has no collectors value. Its sentimental value is that it was the first gun my grandfather bought with his own money. Since then he took the poly choke off with a hacksaw and shortened the stock significantly. I figure it’s a good candidate for learning.

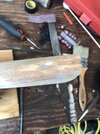
I cleaned off what little finish was there and the wood isn’t too bad. Denatured alcohols made quick work of it. It was finished like you would expect for a shotgun that retailed at $20. Really rough on the inside but mostly solid. I’ll get around to finishing later, that shouldn’t be too hard though.

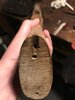
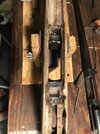
I found two problems to consider. The first is the intersection of a sling swivel and recoil pad screw hole. That just needs filler but I’m open to suggestions on the best filler.
significantly.
IMG_2902.jpeg

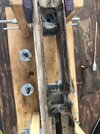
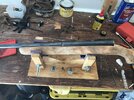
The other is more complicated since it looks like where the front action screw meets the stock. The main recoil lug contact is fine though. I’m sure there’s an ingenious way to patch it, but not sure how.

IMG_2900.jpeg IMG_2898.jpeg IMG_2899.jpeg

I’ve been looking back at some of the stock repair threads by @GunnyUSMC but couldn’t see these exact issues, so I figured it’s a good time to toss it out there.
 
In the butt plate area, is that where the recoil pad screw came through? Might give us a shot of the butt area as well.

I take it you’re concerned with the “D’ shaped area cracking out?

You could go ahead and carve that area out and fit a replacement piece of wood, but I’ve not had such good luck doing that if there is any force applied to the area.

I’m gonna catch hell for this, but I use Devcon for areas were pressure comes from recoil (and is hidden). Or bedding compound. Bedding compound can be dyed and reinforced with fiberglass. The trick is to tie it all together strongly somehow. Maybe pin or small screws. You can use modeling clay to damn up areas to contain the Devcon in the shape you want.

I just did a shotgun forearm this way where they had pulled the mounting screws through the old, soft wood. I ended up having to build a stepped brass sleeve bedded in an oversize hole. I replaced the wood screws with machine screws. I bedded the entire forearm for good measure. Looked like a factory original on the outside.

Granddaddy’s old firearms are a pain, and most of ‘‘em make me pull my hair out, but it is a good learning ground and a great lesson in patience.

I need to pull out a drawing of this shotgun before I go much farther (I’m thinking I’d bed everything I could in this too), but hopefully this might give you some ideas.

oh, BTW, I found for the one I did a used butt stock in good condition from Gun Parts (Numrich Arms). Fit that to the guy and installed a KickEze recoil pad for him. He was happy.

I’l get back with you later.
 
Last edited:
For the damage in the recoil lug area, as @NMexJim stated, you can bed the area just as in glassbeding a rifle so. If you use Devcon, use Devcon Two Ton Clear epoxy with the 30 minute set time. Fast drying or metal type epoxies get to brittle and don’t work as good with recoil.
I know that I have a post or two on repairing Enfield rifle fore stocks. The front screw and magwell are very close to your stock and can be repaired in the same way.
It’s hard for me to see the damage to the butt stock. Try to get some pictures in natural light, but not direct sunlight. And post them as a full picture, not a thumbnail.
 
@GunnyUSMC the photos expand when you click on them.
The pillar looks similar to the one I repaired on a old 8mm mauser. You must fully remove all the oil from the areas that your going to repair for the epoxy to adhere to.
 
@GunnyUSMC the photos expand when you click on them.
The pillar looks similar to the one I repaired on a old 8mm mauser. You must fully remove all the oil from the areas that your going to repair for the epoxy to adhere to.
I know that the pics expand when you click on them, but it’s easier to just post the full image.
A very common mistake that people make is not cleaning the area, they wish to repair, good enough.
It’s not like the oil got in there over night, and it’s not going to come out in one day.
Most often you will only remove the oil from the surface, and some from just below the surface. Once it dries, it will look like the oil is gone, but if you wait or add a little heat, you will see oil come back to the surface.
I cover this in just about every repair post that I create.
 
Harrington & Richardson Model 120. Maybe sold by Sears.


Brownell's sells Acraglas Bedding and a bottle of release agent. The release agent would b applied to any parts you do not want the bedding compound to stick to.

You could see what the difference is between the stock mounting holes and the actual posts would be. If it's too tight, overbore the holes being careful to maintain the bottom bolt holes - you'll need them later for alignment. Preferably flat wood bits.

Coat the posts, the bottom of the action, and anything else that might come into contact w/ the release agent. I mean everything. Post screws included.

Tape the ends of the posts and coat w/ the release agent. Put some of the release agent into the small bolt holes to keep them from binding on either the posts or the screws.

Smear inside the stock holes w/ compound. Insert the posts into the holes. Clear any compound that comes through the screw holes. Punch the tape in the posts. Insert the screws and let the compound set.

Good luck. Go slow. Think it through. Trial run a couple of times.

You might search the internet for a stock. Gun Parts did not have one.
upload_2023-7-11_14-55-43.png


upload_2023-7-11_14-49-41.png
 
BTW, do whatever you have to to avoid a lock-up between the barrel, bedding compound and the stock. You can tape around the posts to give yourself some room. Release agent is cheap. You may have to rap the barrel soundly along a table to get it to separate. This is normal when bedding. Acraglas doesn’t shrink and the fit will be tight.

After you get them apart, you can Dremel smooth any raggedy edges. You can add bedding to areas you might have missed.
 
Here is the buttplate hole from another angle. There’s a little crack radiating out of the old swivel screw hole (where the cut was made).

it looks like bedding that front post and recoil lug will be the solution for the other part.

I looked up the model before and I recall it being a Savage made for Sears. I’d rather avoid new parts since the process is practice for other projects
 

Attachments

  • IMG_2906.jpeg
    IMG_2906.jpeg
    80.5 KB · Views: 15
Ok, so none of this wood looks like maple. I’m guessing it’s very light when you hold it. Regardless, you’re going to have a hard time matching it.

Do you want the stock longer to fit you or is the current length ok? Are you wanting a recoil pad like a KickEze?

https://kickeezproducts.com/

You could use a slip over recoil pad which might cover some of the damage. Or, you could find a wood block that matches as close as possible and glue/dowel that into place. Do you have a table saw or big radial? You can make a jig to help keep cutting square.

Cut off square above the damage and splice in a block long enough to give you the length you need then sculpt it to shape. Not as hard as it might sound. I’ve seen quite a few shot guns with added wood and some of it looks kinda nice. Maybe take the stock to a lumber yard and see if they can identify wood for you. Maybe pine?

If you want a grind-to-fit pad, then you need to account for that length. Buy he pad first. With grind pads, you need to keep the stock tapped off well up above the grip to keep rubber dust from getting into the wood grain. Makes refinishing PITA. I’d wrap all of it. Look on KickEze site for pad installation tips. You can do it all with a sanding block and various grits of garnet paper. Maybe start at 150 and work up. Dremels can help or belt sanders.

I think I can find a picture of a jig to use with a table saw that might help keep cuts square.
 
The last post was a little short, the kids (1 and 5) were coming home so I needed to wrap up quickly.

I’ve already made a fitted stock extension for my use. It’s not pretty (just pine) but will fill the gap and I can either fit a recoil pad or be lazy and use a slip on. My grandfather had extended it with blocks under a slip on. I might even paint the extension to contrast the stock. I want to make it convertible to the short LoP for the kids if all goes well. I bought a grab bag of used recoil pads from Numrich, so I have some to play with too

The screw hole is mostly cosmetic, but I was wondering which fillers to use/avoid. I’ve replaced that hole for mounting a recoil pad.
 
I’ve never filled holes like this. I would assume any wood filler like plastic wood would work. You could even try some sawdust and glue mixed and packed into the hole although the color will be a little off.

Best of luck with your project. Might give us a photo when you are done!
 
I've had drilled out the holes to make them large enough to put a dowel into. If you know what type of wood you can match the grain pretty close. I use West System Epoxy for repairs. With it you can tint the resin to what color your need. You also have choices of thickeners to thicken the epoxy up to what every consistency you need. This stuff is not cheap. It was designed for doing wooden boat repairs so it's extremely durable. You can control your pot life by the use of different hardeners. There is little to no shrinkage due to it's slow hardening times. Takes 3-5 days for it to get full strength and harden. I've even used it for stock finish on a Rem 7 that I did major repairs on. There is thread on here documenting the repairs.
 
I think I’m starting to get the direction figured out on this one. I did a bit my cleaning and sanding out the action side of the stock. The machining was terrible, the wood soft and decades of oil didn’t help. Looking at the crack again to clean it, I pulled gently and the broken part popped right out. It wasn’t going to be much help in that state.
IMG_2909.jpeg IMG_2910.jpeg

That can be bedded with epoxy and the next step is shining the gap behind the real recoil lug. Those weren’t making much contact and there’s about 1/16” of gap there. I’m assuming I can fill this with epoxy as well. Either that or gluing a thin metal or plastic shim back there.

I also figured out the screw hole filler. It’s just slightly larger than a bamboo skewer, so this can go in when I mix some epoxy and before I stain.

IMG_2913.jpeg

While I had the cleaning stuff out, I cleaned up my other “Ranger” stock project too. This is a 22 without any real problems a few shallow dents and some globs of dried linseed oil. It cleaned up nicely and I’ll try to steam out the dents before re-oiling and adding a new buttplate.

The 22 has some decent wood, clearly walnut. The 20 gauge looks like some garbage tree like box elder (any speculation there is welcome).
IMG_2911.jpeg

It’ll be a bit before it’s done. I need to pick up the epoxy and accessories for the bedding part.
 
Dents can be raised by putting a wet cloth over the dent and going over it with a hot iron. The heat and steam will raise a dent.
 
Small places where wood is missing can be improved with Super Glue. Tape off round the hole, put just enough SG to level out in the hole. Sand with a hard block.
 
I think I’m starting to get the direction figured out on this one. I did a bit my cleaning and sanding out the action side of the stock. The machining was terrible, the wood soft and decades of oil didn’t help. Looking at the crack again to clean it, I pulled gently and the broken part popped right out. It wasn’t going to be much help in that state.
View attachment 1161681 View attachment 1161682

That can be bedded with epoxy and the next step is shining the gap behind the real recoil lug. Those weren’t making much contact and there’s about 1/16” of gap there. I’m assuming I can fill this with epoxy as well. Either that or gluing a thin metal or plastic shim back there.

I also figured out the screw hole filler. It’s just slightly larger than a bamboo skewer, so this can go in when I mix some epoxy and before I stain.

View attachment 1161683

While I had the cleaning stuff out, I cleaned up my other “Ranger” stock project too. This is a 22 without any real problems a few shallow dents and some globs of dried linseed oil. It cleaned up nicely and I’ll try to steam out the dents before re-oiling and adding a new buttplate.

The 22 has some decent wood, clearly walnut. The 20 gauge looks like some garbage tree like box elder (any speculation there is welcome).
View attachment 1161684

It’ll be a bit before it’s done. I need to pick up the epoxy and accessories for the bedding part.

The small piece of wood can be epoxied back in place. Or you can fill it will filled epoxy. I had to do this on the Rem 7 stock I worked on. I used some delrin plastic as a pilot that the epoxy would not stick too. Just knocked it out after the epoxy set. One of the the things that I liked about the West System Epoxy is the different fillers you can add to it. As is it's very fluidly and flows like water, penetrates wood grain very good. But you can add different fillers to thicken it up so it will stay on vertical surfaces. One of the fillers is designed for hardware which you can actually machine afterwards if needed. I used it for screw holes that are stripped out. Don't use superglue if you want a perminate repair. Keep cleaning the wood with alcohol to keep leaching then oils out of it, where you need the epoxy to adhere to.

Another nice feature about the West System is that there is a window where you can do another layer without sanding and it bonds like it was a single layer. Work time when doing this is around 30 min depending on temp and hardener used.

Bamboo is extremely strong and when wrapped with fiberglass makes it even stronger. I had to cut some plugs to hide some of my holes. I had some some walnut that I was able to get a close grain match. It shows a little but a lot cleaner than a skew.
 
I finally got around to bedding the action in epoxy. The action came out of the epoxy and everything looks to be in its right place, so I’ll call it a success. I’m glad I did this with an old Sears shotgun first. It is something you have to do to understand. I’ll post some pictures once I get to cleaning up the bedding to accommodate the magazine springs. I put a little more epoxy in there than I needed, but not too much. For now, I can sleep well knowing that I didn’t permanently glue the action to the stock.
 
And here they are. I cleaned up the excess epoxy so the magazine mounting will fit. It cleaned up well enough. I’ll start staining and oiling next. Then the oil finish goes on both stocks.
I forgot to mention that the cheap Walmart modeling clay worked fine, but did smell like bubblegum. That was a bit annoying, but it worked and my 5 year old will think it’s the best thing ever when she gets the rest of the package that I didn’t need.
 

Attachments

  • IMG_2944.jpeg
    IMG_2944.jpeg
    96 KB · Views: 8
  • IMG_2943.jpeg
    IMG_2943.jpeg
    127.1 KB · Views: 9
  • IMG_2942.jpeg
    IMG_2942.jpeg
    151.6 KB · Views: 9
  • IMG_2941.jpeg
    IMG_2941.jpeg
    114 KB · Views: 8
Now with a little bit of stain on the stock to try to cover the blotchy color pattern. That helped a little but it seems to be related to the wood grain pattern. I’m guessing it’s birch but I don’t know woods by look that well. It was made to be inexpensive so you can only put so much lipstick on a pig.

IMG_2948.jpeg

After a first application of linseed oil the 22 cleaned up nicely. Now to work a few more coats in before moving on to recoil pads, etc.

IMG_2949.jpeg
 
Back
Top