barnbwt
member
- Joined
- Aug 14, 2011
- Messages
- 7,340
First, a little background info:
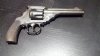
In case you missed my thread on this Belgian take (knockoff) on the S&W 44 Double Action Revolver last week, these were made in great quantity all over Europe from the late 1890's up until around WWI. They were available through mailorder catalogues at a fraction of the price of real S&W's. Because of the cost and availability, knockoffs of name-brand revolvers like these were sometimes more common out in the poor backwaters of the American frontier that still remained. Quality and safety varied greatly, but these Belgians did pass proof pressure tests, and mine was made by one of the more prominent manufacturer known to produce functional (barely) guns.
Here's my earlier thread for reference and initial pictures: http://www.thehighroad.org/showthread.php?t=663948
These Belgians share the overall profile of the Smith's, but contain an older, cheaper, and inferior internal mechanism that locks the cylinder between the bolt (engages notch in cylinder) and the hand (delicate part that times the cylinder) during firing. This design works, but is a very weak lockup that quickly deforms timing parts and throws the gun out of sync after a handfull of full power cartridges .
.
My example was 150$ at Cabela's, and is in pretty good condition for that price; no rust, pitting, or missing parts, and the timing/lockup aren't damaged all that much (maybe barely shootable with low power loads as is). All other functions work properly, if imprecisely. Latch and hinge are snug and unworn.
After my initial inspection of the revolver, I couldn't resist digging in ...
...
First Impressions on Disassembly:
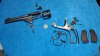
Woof, this gun's innards make the stuff Century does look like a masterpiece ... I've never seen handformed internals before. I'd heard these guns were made in little shops as a cottage industry, but I didn't quite believe it. There is some machining on the mating/bearing areas of the gun like the latch, frame, and ejector bed, but all the internals were made with a hammer and anvil . Definitely "Old World" craftsmanship here . All large or external parts are cast (fairly well, I might add). The ejector cam is a straight rod folded into a loop, with a pin mashed through the overlap and hammered flat! I can see fold lines and hammer peens on the mainspring! As crude and rough as these parts are, I'm frankly amazed the gun felt as smooth as it did when I got it . A heavy, but consistent +15lb DA pull, and short 4lb SA pull should not be possible from parts like these !
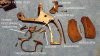
Happily, there appears to be very little corrosion under the hood, only the mainspring has a little red on it, probably because it's a higher carbon alloy. The springs, being 100y/o hand-formed leaves, are probably all a bit tired (at least). The grips have a very good fit with the metal, are serialed to the frame, and appear to be of fairly good wood (walnut?). I think they helped contribute greatly to the preservation of the interior parts.
Disassembly Notes:
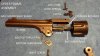
The screws were fairly easy to remove, a small screwdriver was sufficient to break them loose after some penetrating oil had been applied. (I have no idea why so many screws were used instead of takedown pins, since they are all through-fasteners. You'd think tapping a hole and making a screw would be more expensive than just driving a pin.) The one exception was a single screw through the topstrap that holds the Cylinder Retainer in place. Half the protruding flat head had been sheared off by an earlier amateur gunsmith, and I thought at first it was weldment, or something. But a flashlight showed a tiny sliver of the tail end of the screw sticking between the Lower Frame and the Cylinder. The only way to remove the Cylinder Retainer was to get this screw out; so out came the picks, files, left hand drill bit, etc. (it figures the one blind fastener on the gun is the one that's messed up )
)
I centered an awl on the (now flush-filed) screw remnant and made a dimple to start the drill bit. The screw metal was ridiculously soft, even compared to the other screws on the gun . Obviously this poor metallurgy caused the head to shear in the first place. Anyway, the drill bored nearly all the way through the screw before it broke free; the last 1/2 thread left of it, at least. The threads are a little messed up, but I'll be retapping all the threads on this gun anyway because they are about 1/3 the depth of modern machine screw threads, and probably won't take another torquing. Once the screw was out, I was able to tap out the Cylinder Retainer from the slot it was swaged into by tapping the edge of the screw hole with an awl point. This retainer is a simple strip of very brittle steel that was damaged by the screw, and will need to be replaced. Since the retainer just keeps the cylinder from sliding out with the ejector when the frame is opened, this part doesn't need to be strong. It is a simple part that can be easily fabricated from spring steel.
The Ejector Cam Thrust Pin was also a bear to drive out, since the two holes for it on either side of the frame didn't quite align, but were still perpindicular to the frame (meaning the pin was slightly bent as it was driven in, and the punch had to be tilted off perpindicular to drive the pin out :banghead. This pin is non-structural, and only serves to give the ejector cam something to rest on when the frame is closed(I wasn't sure if it was holding something in at the time, or I would have left it alone). Since the original pin was mashed a bit during removal, the holes will be upsized (this time aligned properly) and a larger hardened pin used in its place.
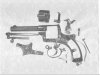
Aside from those sticking points, the gun came down pretty easily (almost as easy as the only other tear-down I've done, my CZ52). I took some shots of the parts so I'd remember where everything went(see below), and threw the lot into some oil. I've got a backpacking trip coming up, so I'll be able to get cracking on the recrafting then. I intend to take some liberties with the "restoration" since these pistols have little, if any, collector value, and are lousy-to-dangerous as far as their original lockup design and timing.
Planned Modifications (I'll do these all myself, slowly):
Disclaimer: Please refer all nay-saying comments to the FrankenRuger thread over at TFL(just kidding, that is someone else's science project). I'm undertaking this endeavor solely out of perverse curiosity and misplaced creativity. At worst I'll only be out 150$ (so long as I test fire it with a string  )
)
-All leaf springs will be changed out with modern equivalents
-All screws/threaded holes will be replaced/retapped with modern screws, or will be changed to staked-in pins
-Load bearing pivots (cylinder axle, frame hinge, latch hinge) will have bronze or brass bushings inserted to add strength (& replaceable)
-Hammer will be modified to strike a separate frame-mounted pin
-Oversized, slotted firing pin hole will be drilled out for a pressed or threaded firing pin & channel unit (hammer is rebounding type, so this arrangement is still somewhat drop safe, right?)
-Tiny rear sight notch will be filed off latch arm, and something better tapped/brazed onto the topstrap
-Grips will be refinished, or replaced with something bigger/better
-Hand will be reformed or replaced entirely to correct timing, and the ejector star will be reshaped if needed
-Current bolt stop (on trigger) will be replaced or supplemented by a second "automatic" spring driven bolt that will engage new timing slots milled into the cylinder (just like the REAL S&W .44 DA). If executed correctly, this would eliminate the primary design flaw with this pistol's lockup mechanism; using hand pressure to restrain the cylinder during recoil.
-Obligatory rebluing/plating of the frames, I'm open to suggestions
-Oh, and I should totally cut the cylinder/star for moonclips
Why is all this worth doing? Well aside from the fact that it's not, I've heard reports of "fairly good performance" from these guns so long as they are still in time. The cylinder, barrel, frame, and latch are all strong enough (+30% pressure proofed at BP levels) to stand up to light-to-wimpy 44-40 or 44 Russian (these guns were chambered in both). The only reason I think this is possible is because the parts are all so crude, that replacments can be easily made. I'll have a gnarly bubba-job on my conscience, and the closest thing to a designed/built from scratch gun I'll probably ever do. (I'm also feeling cocky from how well my CZ52 rebuild went
"There are no stupid dreams...(only stupid people who don't chase them)"
TCB
In case you missed my thread on this Belgian take (knockoff) on the S&W 44 Double Action Revolver last week, these were made in great quantity all over Europe from the late 1890's up until around WWI. They were available through mailorder catalogues at a fraction of the price of real S&W's. Because of the cost and availability, knockoffs of name-brand revolvers like these were sometimes more common out in the poor backwaters of the American frontier that still remained. Quality and safety varied greatly, but these Belgians did pass proof pressure tests, and mine was made by one of the more prominent manufacturer known to produce functional (barely) guns.
Here's my earlier thread for reference and initial pictures: http://www.thehighroad.org/showthread.php?t=663948
These Belgians share the overall profile of the Smith's, but contain an older, cheaper, and inferior internal mechanism that locks the cylinder between the bolt (engages notch in cylinder) and the hand (delicate part that times the cylinder) during firing. This design works, but is a very weak lockup that quickly deforms timing parts and throws the gun out of sync after a handfull of full power cartridges
.My example was 150$ at Cabela's, and is in pretty good condition for that price; no rust, pitting, or missing parts, and the timing/lockup aren't damaged all that much (maybe barely shootable with low power loads as is). All other functions work properly, if imprecisely. Latch and hinge are snug and unworn.
After my initial inspection of the revolver, I couldn't resist digging in
...First Impressions on Disassembly:
Woof, this gun's innards make the stuff Century does look like a masterpiece
... I've never seen handformed internals before. I'd heard these guns were made in little shops as a cottage industry, but I didn't quite believe it. There is some machining on the mating/bearing areas of the gun like the latch, frame, and ejector bed, but all the internals were made with a hammer and anvil . Definitely "Old World" craftsmanship here . All large or external parts are cast (fairly well, I might add). The ejector cam is a straight rod folded into a loop, with a pin mashed through the overlap and hammered flat! I can see fold lines and hammer peens on the mainspring! As crude and rough as these parts are, I'm frankly amazed the gun felt as smooth as it did when I got it . A heavy, but consistent +15lb DA pull, and short 4lb SA pull should not be possible from parts like these !Happily, there appears to be very little corrosion under the hood, only the mainspring has a little red on it, probably because it's a higher carbon alloy. The springs, being 100y/o hand-formed leaves, are probably all a bit tired (at least). The grips have a very good fit with the metal, are serialed to the frame, and appear to be of fairly good wood (walnut?). I think they helped contribute greatly to the preservation of the interior parts.
Disassembly Notes:
The screws were fairly easy to remove, a small screwdriver was sufficient to break them loose after some penetrating oil had been applied. (I have no idea why so many screws were used instead of takedown pins, since they are all through-fasteners. You'd think tapping a hole and making a screw would be more expensive than just driving a pin.) The one exception was a single screw through the topstrap that holds the Cylinder Retainer in place. Half the protruding flat head had been sheared off by an earlier amateur gunsmith, and I thought at first it was weldment, or something. But a flashlight showed a tiny sliver of the tail end of the screw sticking between the Lower Frame and the Cylinder. The only way to remove the Cylinder Retainer was to get this screw out; so out came the picks, files, left hand drill bit, etc. (it figures the one blind fastener on the gun is the one that's messed up
)I centered an awl on the (now flush-filed) screw remnant and made a dimple to start the drill bit. The screw metal was ridiculously soft, even compared to the other screws on the gun . Obviously this poor metallurgy caused the head to shear in the first place. Anyway, the drill bored nearly all the way through the screw before it broke free; the last 1/2 thread left of it, at least. The threads are a little messed up, but I'll be retapping all the threads on this gun anyway because they are about 1/3 the depth of modern machine screw threads, and probably won't take another torquing. Once the screw was out, I was able to tap out the Cylinder Retainer from the slot it was swaged into by tapping the edge of the screw hole with an awl point. This retainer is a simple strip of very brittle steel that was damaged by the screw, and will need to be replaced. Since the retainer just keeps the cylinder from sliding out with the ejector when the frame is opened, this part doesn't need to be strong. It is a simple part that can be easily fabricated from spring steel.
The Ejector Cam Thrust Pin was also a bear to drive out, since the two holes for it on either side of the frame didn't quite align, but were still perpindicular to the frame (meaning the pin was slightly bent as it was driven in, and the punch had to be tilted off perpindicular to drive the pin out :banghead
. This pin is non-structural, and only serves to give the ejector cam something to rest on when the frame is closed(I wasn't sure if it was holding something in at the time, or I would have left it alone). Since the original pin was mashed a bit during removal, the holes will be upsized (this time aligned properly) and a larger hardened pin used in its place.Aside from those sticking points, the gun came down pretty easily (almost as easy as the only other tear-down I've done, my CZ52). I took some shots of the parts so I'd remember where everything went(see below), and threw the lot into some oil. I've got a backpacking trip coming up, so I'll be able to get cracking on the recrafting then. I intend to take some liberties with the "restoration" since these pistols have little, if any, collector value, and are lousy-to-dangerous as far as their original lockup design and timing.
Planned Modifications (I'll do these all myself, slowly):
Disclaimer: Please refer all nay-saying comments to the FrankenRuger thread over at TFL
(just kidding, that is someone else's science project). I'm undertaking this endeavor solely out of perverse curiosity and misplaced creativity. At worst I'll only be out 150$ (so long as I test fire it with a string )-All leaf springs will be changed out with modern equivalents
-All screws/threaded holes will be replaced/retapped with modern screws, or will be changed to staked-in pins
-Load bearing pivots (cylinder axle, frame hinge, latch hinge) will have bronze or brass bushings inserted to add strength (& replaceable)
-Hammer will be modified to strike a separate frame-mounted pin
-Oversized, slotted firing pin hole will be drilled out for a pressed or threaded firing pin & channel unit (hammer is rebounding type, so this arrangement is still somewhat drop safe, right?)
-Tiny rear sight notch will be filed off latch arm, and something better tapped/brazed onto the topstrap
-Grips will be refinished, or replaced with something bigger/better
-Hand will be reformed or replaced entirely to correct timing, and the ejector star will be reshaped if needed
-Current bolt stop (on trigger) will be replaced or supplemented by a second "automatic" spring driven bolt that will engage new timing slots milled into the cylinder (just like the REAL S&W .44 DA). If executed correctly, this would eliminate the primary design flaw with this pistol's lockup mechanism; using hand pressure to restrain the cylinder during recoil.
-Obligatory rebluing/plating of the frames, I'm open to suggestions
-Oh, and I should totally cut the cylinder/star for moonclips
Why is all this worth doing? Well aside from the fact that it's not, I've heard reports of "fairly good performance" from these guns so long as they are still in time. The cylinder, barrel, frame, and latch are all strong enough (+30% pressure proofed at BP levels) to stand up to light-to-wimpy 44-40 or 44 Russian (these guns were chambered in both). The only reason I think this is possible is because the parts are all so crude, that replacments can be easily made. I'll have a gnarly bubba-job on my conscience
, and the closest thing to a designed/built from scratch gun I'll probably ever do. (I'm also feeling cocky from how well my CZ52 rebuild went "There are no stupid dreams...(only stupid people who don't chase them)"
TCB