What clever little things have you "invented or discovered" that you can share?

Trays & Funnels

Try Frankford Arsenal Loading Blocks!

My 500 Magnum case bottoms were way too big for the RCBS loading tray, so I purchased several Frakford Arsenal Loading Trays for each caliber I reload.
image


Also, the plastic funnel that RCBS makes is OK, however the Satern metal funnels you can get that are made for the round you are loading are well worth every dollar! They fit perfectly over the case mouth and stay put (without having to hold) while you pour your powder, AND the powder flakes never stick to the inside due to static in the plastic.
image

Here is a Satern .22 funnel like I use for .22-250 loads.
 
i use the 50 round cartridge trays that come in a box of .45acp ammo for loading blocks.
308's fit in there great.
i like using every other hole and using them for spraying case lube.
 
Last edited:
mine

I use a magnet out of a hard drive to hold adjusting tools to my 550 strong mount. Hard drive magnets are very strong.

140 wt GL1 gear oil as a sizing lube for rifle cases. Been using out of the same pint for decades.

A piece of 3" scrap aluminum pipe, about 15" or so long fastened to the underside of my bench top to store my Dillon primer tubes, primer follower, etc.

On my Redding #3 powder measures I cut off the barrel of a thin ball point pen to put inside the powder reservoir, bridging between the set screws. Make a snug fit then you can tighten the set screws tight enough to hold the reservoir without deforming or breaking it. Stops wobble and bleeding some powders.

I use the wife's static clean sheets to cure static in my powder measures and associated peripherals.
Wipe the outside with them.

CC
 
Last edited:
Hey guys, I have a trick a fellow shot shell re-loader taught me. I didn't see it in a coupe of pages so I thought I would share.

If you have ever re loaded shotshells for any amount of time, you have probably spilled lead and powder all over the place. A way to cure spilled that is to take a baking sheet (the aluminum type, with the lip all the way around), take your loader off of your work bench and mark where the bolts go through the base loader on the cookie sheet. Now drill the holes, and mount the loader back on your bench with the cookie sheet mounted underneath.

I hope that helped!
 
I have formed springs that follow the circumference of the shell plate on my Lee Loadmaster. (The quarter moon pieces of tin were a bitch to remove a shell from.)
 
Some updated pics of my reloading area

I've made a few changes to my reloading area. Here are some pics I thought you might like to see.

In this picture you can see the 2 pieces of plywood my wife and I glued together. This is much stronger and so far has handled all of the torque I've put on it.
3172840188_a46efbe5e4.png

In this one you can see the original wood piece that came with the Workmate when I got it.
3172810898_ecff30c29a_m.png


In this one you can see my scale, trickler, and some Ziploc bags with brass in various states of readiness. Some with primers, some trimmed, etc. These are really handy to separate out a given amount of brass for me to work with.
3171969305_cc9abaedb0_m.png

Cry Havoc!
 
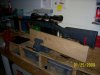
Powered my little lathe type trimmer by screwing it to a plywood base that sticks out a couple inches past the non-crank end. The plywood then clamps into the vise on my drill press table. Then hose clamp a four inch long piece of heavier duty rubber hose one inch onto the shaft where the crank handle has been removed, and in the other end of the hose clamp one inch of a three inch long piece of 1/4" brass rod, (Steel, Plastic, I don't think it matters.) Now chuck the end of the rod into the drill chuck, adjusting the table up to the proper place.(There should be a couple inches of empty rubber tube between the end of the shaft and the end of the rod. This works like a U-joint and shock absorber.)

Then I epoxied to a speaker magnet one of those micro switches with an arm from the lid of a washing machine. This is connected to the middle of a shortened extension cord such that the hot wire is inturrepted by the N/C, and the drill press is plugged into the female of this switch setup, with the male end of the switch setup now plugged into power. The magnet holds the switch on the drill body in the exact place from the drill-lowering-crank shaft to turn on the switch when the lever is cranked. (Against the thumbscrew of the depth stop is a good place to put the arm of the switch, to turn off when the drill chuck is up in "rest position".)

Now check all your adjustments: (1-magnet held on/off switch position. 2-Adjust for throw on trimming lathe. 3-Tighten chuck/vise/shell holder, hose clamps, 4-Power.

Now chuck shell, Turn on Drill Press Switch, (Drill press shouldn't turn on until chuck feed handle is cranked), and Crank chuck feed handle. Drill press should automatically turn on. Gently engage shell. Rubber hose gives shock absorption. Takes about 1 second to trim shell, let chuck back up, and it should automatically turn off! Walllla. (That's French for, "See what I did!")

This is how I do my .30-06. Works perfectly. It took about five shells by hand to decide to concoct this.

Let me know if you like it.
 
I have seen the paper towel-in-the-tumbler at least twice but give a piece of fabric softener cut into 1.5" pieces. Those things are so porous that there's more room for them to trap dust, dirt and debris than the paper towels. It's a trick I stole from an online friend.
 
Do the fabric softener sheets leave residue on the cases that could transfer to the dies or chamber? I had an appliance repairman once tell me that the chemical in the sheet would coat the sensors in the dryer tub and the dryer would controls would not work properly unless the sensors were periodically cleaned.:scrutiny:
 
I'm sorry for not making this point, 308. Use used dryer sheets and not only do they not contain the chemical, they are even more porous and they collect more dust. Good point to ask that one.
 
If you suspend a vacuum cleaner hose end just high enough over your tumbler so that it does not suck up media, and run the vacuum the whole time you are running the vibratory tumbler (with the tumbler cover removed) you will find that there is no dust and the media itself stays clean of all dust.

I do that every time, and my media is quite old and does not have any dust in it at all!
 
this idea may have been posted before and not read by me , but here goes.!I set/hung/mounted mirro's behind my reloading bench. now I can "see" anything that might "hide" behind my tools on the reloading bench plus they reflect more light onto the area
 
Gun vise

Well, not necessarily a vise, but I wanted something to hold my rifles when I clean them, and didn't want to spend the money for a big chunk of plastic. Here's my solution - works well, is very adjustable so the rifle can tilt fore, aft or level, and since my vise swivels, I can also swivel it easily. Also, to store it, I can turn the hooks 90 degrees and it's so skinny I can stick it just about anywhere. Not really reloading, and not very pretty, but handy and I thought somebody might benefit. Neil
 

Attachments

  • 100_0319.JPG
    100_0319.JPG
    149.1 KB · Views: 985
That those cheesy little collet rings that come with inertia bullet pullers are worthless and can be tossed. You can use a press shellholder for the caliber you are pulling and it works much better.

Fantastic! This idea saved me about 100 rounds because my impact puller's collet rings was worthless!
 
Gravel I liked the gun vise- what are those metal holders front and rear? Where did you find them? I may try that on my workbench.

Joe
 
thanks 308. I have been rearranging my tool workbench where the vise is set up so I think I will make up one of those rifle holders for it for cleaning purposes.
Joe
 
Gravel that is/was a GREAT idea. I've been dicking around about making a cleaning vise or buying one, everything I came up with was difficult to build and ended up taking up to much room.

This is so simple and cheap. As the old saying goes KISS keep it simple stupid
 
Back
Top