What clever little things have you "invented or discovered" that you can share?

Great idea. I too just ditched the carpet in there, and paint the concrete. The brass shavings were also driving me nuts.

What did you use for the metal supports?
 
It's mostly wood, painted black. There are 3/4" MDF running up the wall and forward under the countertop, and 2x4s as braces. The counter wall supports were all put up on the wall, and i used super heavy duty toggle bolts and lag bolts to attach the MDF/2x4 supports to the wall. Everything got a healthy layer of liquid nails, and then 1x1/4" lag bolts going up from the bottom to pull it all together before the liquid nails tried. The MDF support is 10" wide to support whatever kind of press I would want to mount there, and is absolutely perfect for the Strong Mount on the Dillon 650.

The flooring is Novalis vinyl plank applied right to the primed concrete. Just about the cheapest flooring out there, looks and wears like wood, installs like a sticker, and is super easy to clean. I love the stuff.

It looks pretty much like this now, except there are a lot more books stealing desktop space... I'm thinking I'll have to put a shelf up just for my books. The empty space to the left is for c-clamping down the other presses that I don't use as often: star sizer, mec 650, swager (when borrowed), etc. I also made a wall-mounted bench out in the garage that I use for tumbling brass. Due to the lead-dusty nature of tumbling, all of that work is done before the brass ever comes inside.

IMAG0041-1.jpg
IMAG0040.jpg
IMAG0190-1.jpg

I also made a toolhead stand out of some 3/4" dowel and 1" PVC couplers.

IMAG0192.jpg
IMAG0223-1.jpg
 
Last edited:
Dillon 550 case feed

Have you ever wanted to stop the auto case feed accessory from dropping cases? You stop the case feed with a piece of stainless steel wire. The same gauge used to lash telephone wire between poles. A four inch piece of scrap should do it! Just use needle nose pliers to bend it into shape. Here is how it works. First put a small circular bend on one end as a finger hold and then shaped the wire around the case feed lever. Form fit it using the needle nose. Work towards the small hole in the front of the case ram. It takes a sharp bend around the face of the ram. There is just the right gauge hole already there. This makes it easy to wrap the very stiff stainless wire around the spring loaded case lever. Once it is held back you can cycle the press without the auto case feed dropping cases. I find it convenient while making adjustments or servicing the press to temporarily block the cases. I can send pictures
 
Last edited:
Lighting case with Key Chain L.E.D.

I found this small keychain LED works well to illuminate the inside of the case for checking the powder level before setting a bullet. Stuck it to my Hornady LNL with foam tape.
attachment.php

-
attachment.php
 

Attachments

  • DSCN0137.JPG
    DSCN0137.JPG
    142.7 KB · Views: 2,213
  • DSCN0139_2.JPG
    DSCN0139_2.JPG
    58.3 KB · Views: 2,209
I have cast a lot of bullets in my life so my wife has alway worried about me breathing the fumes. I have a well ventilated garage but decided a hood would definitely be better So I build one over my lead pot which anyone can do using a bathroom vent fan mounted on an old cake pan. It works very well, can easily be vented outside or into a water bucket. I submitted this idea to Lee and he delined interest oh well. :cuss:

http://yfrog.com/n7leadmeltingfluxinghood0j
Just to steal from this post with another option:

An old cooking range vent hood with built in fan and light works great also for the lead melting fume remover.....vent it however works for your situation.
 
Switch to a thumler's tumbler with stainless steel media. No more reloading dust and completely cleans the primer pockets and cleans the brass inside and out to a mirror finish.

Chargemaster 1500. Now I can seat a bullet while the machine weighs out the next charge. Super time saver.

Giraud Trimmer. Haven't used it yet, but it will be a huge time saver in the next week or two.

Next up is the DIY case lube using 99% isopropyl and lanolin nipple cream from the drugstore.
 
I was totally bored today and remembered seeing somebody with a cartridge counter on their loader so I figured I would try to make one, had an old programmable display in my junk drawer, an old cell phone charger, some cat 5 cable and two micro switches. Should have extended the switch a little more to get contact from a cartridge but I can always change it later. The one on the left resets the counter and the other one counts on contact to star.
The display is programmable and keeps total count in the background and is resettable somehow from the menu, don't have the manual and can't remember how. there's also warning alarms that can be programmed into it, displays are oil, filter, and some other ones. Seems to work.

DSC03654.png DSC03655.png

DSC03656.png DSC03657.png

I just remembered why I didn't extend the switch arm, the base would catch it on upstroke......... duh.
 
Tulammo Primer Flipper

I bought a few sleeves of Tuammo SPP. To my dismay, I found out they are packaged upside down. Great if you use an automatic priming machine with pickup tool. Bad if you hand prime on a ram.

http://s688.photobucket.com/albums/vv241/gloob27x/?action=view&current=flipper.mp4

Made from an empty Tulammo primer tray, bottom clipped and sanded flat, then holes bored out.

*After the fact, I found out that Winchester .22 LR ammo holders have the exact same hole size and spacing. It might be easier to cut two of those down and weld them together, rather than boring out (and deburring!) 100 holes! CCI 22LR trays are not the right spacing.
 
Last edited:
Cidi, I read that you have "little ones" running around, and I see you have found the usefullness of The Wal-mart brand child formula cans! I have a ton of them myself!
 
I just installed the charge bar on my standard autodisk, and sure enough, at very low settings, like light 380 loads, it gets erratic. The thrown weight drifts all over the place, and sometimes it doesn't even charge at all.

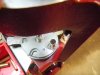
I see why. At the minimum settings, the tiny opening in the charge bar doesn't fall exactly under the hole in the bottom of the hopper. The groove that the bellcrank that moves the disk or charge bar doesn't extend quite far enough to allow the charge bar to move the charge bar directly under the hole in the hopper.

Here's a fix.

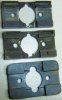
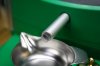
Disassemble the autodisk, and deepen the slot in the body where the bellcrank moves the charge bar or disk. The edge of a standard six or eight inch file does the job nicely. You only need to remove maybe .08 inch of metal on the top of the slot. Here's how mine looks now.

DSCN0771.gif

You may also have to remove a bit of metal where the spring leg of the bellcrank contacts the body. Again, not more than a tenth of an inch or so. Here.

DSCN0773.gif

Now, the gap where the body meets the riser should be minimal, like this.

DSCN0774.gif

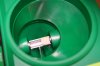
I don't think you can overdo it, but a little trial and error will assure that you don't remove too much metal. Do some filing, and then reassemble the whole thing and check the alignment of the hole in the autodisk with the bottom hole in the hopper. When you finish, it should line up pretty much like this. Nice consistent 2 -3 gr charges now.

DSCN0779.gif
 
I made improvements to the co-ax press jaw shell holder housing.
1) If a case got stuck in the sizer die, pulling it out bent the housing. I fixed that with a beefier housing.
2) If the long jaw adjusting screw was adjusted too high, the housing would run into it, and the housing got bent. Fixed that by making the hole bigger for clearance so the screw passes through.
3) Changing jaws would sometimes be a pain, as the jaw springs flew across the room. Fixed that with springs in a hole, not a trough.
4) The button head screws took a long time to screw in or out with an Allen wrench. Fixes that with a knurled head screw that screws in with finger and thumb.
5) The button head screw was hard to line up with the holes in the wear plate, jaws, housing, and guide block casting. Fixed that with a pointy end on the cap head screw.
 

Attachments

  • Shell holder jaw housing Bonanza, Forster, and Clark  2-24-2011.jpg
    Shell holder jaw housing Bonanza, Forster, and Clark 2-24-2011.jpg
    114.4 KB · Views: 2,735
  • 10-24 Allen head cap screws.jpg
    10-24 Allen head cap screws.jpg
    53.4 KB · Views: 3,179
Anyone come up with a good primer catcher for the RCBS Rock Chucker? I hate the plastic tray that came with it.
I learned on here cut off one of the fingers that holds it in the press. Makes it much easier to take out when it is full of primers.
 
I've been complaining about this "catcher" for years on my Rock Chucker.

I am now assembling the pieces to add a "drain hose" to the bottom well. Drilling a hole and cementing a piece of pvc pipe into it. Then a piece of vinyl hose from Home Depot with the end placed in a folger's coffee container on the floor. Rather than remove the tray, just whisk them into the bottom well and then down the tube. Most of my primers want to fall there first anyway.

Pics when done
 
brass prep

I cut off about a foot of the leg of some old jeans and hem the cut and sew the cut off leg shut. Then fill the leg bag with brass and tie the open end shut. The wash the bag of brass when I do my jeans and run it through the dryer with the jeans. This is a must step if you shoot black powder. Been doing this since the late 70's.
Then I deprime and run through the vibrator or tumbler. I have a gold pan rock screen I use to separate the brass from the corn cob.

I use a separate depriming die I made myself out of a 7/8" bolt. I have it set up in a small press and never take it down. I would not do this again it was a lot of work for what I got when I could have got a depriming die for $20 at the time.

I use a military crimp removal die on all my brass the first time I reload it. Amazing how much new brass has oval primer holes that the above fixes.

I examine all primer pocket holes for uniformity there are a lot of odd shaped holes. Then fix the bad ones.

I re-size new brass before first reload and then trim to length and debur. Then sort by case weight.

I have three presses one for depriming, one for pistol and .22 Hornet (RCBS Jr) and 1 for Rifle (RCBS Rock Chucker) This might seem excessive but two people can work at the same time, One my sons or grand sons can deprime while I do the rest. Even the little guys can deprime to help grandpa.

I use One Shot lube on all my brass.
 
Amlevin - Really anxious to see if you make this work. I have tried several variations and failed.
 
Tags

I use about every imaginable thing to store my casings in, from peanut butter jars, $ store plastic storage containers to 1 gallon gravy cans (from my favorite biscuits and gravy place). They all are in various stages of being processed, and I was loosing track of which steps had been done and which was next. Problem solved. As you can see .45ACP is the most reloaded caliber.
 

Attachments

  • scan0008.jpg
    scan0008.jpg
    251.6 KB · Views: 339
  • scan0007.jpg
    scan0007.jpg
    226.3 KB · Views: 311
Not my idea, but figure it would be helpful to post here if anyone is having trouble with their RCBS Chargemaster combo metering stick powder such as Varget. The first trick is take a McDonalds straw and cover up the threads in the trickle tube. Please note, the second straw is a clear straw from Chick-fil-a, but not necessary. This keeps the powder from clumping in the trickle tube threads. The second is to tape off 1/3 of the opening inside the powder reservoir. This kinda keeps a large amount of powder from entering the trickle tube. Coupled together allows super consistent metering of stick powders.
 

Attachments

  • IMG_0642.JPG
    IMG_0642.JPG
    66.4 KB · Views: 280
  • IMG_0641.JPG
    IMG_0641.JPG
    58.1 KB · Views: 275
I'm sure some of you have had to deal with trying to seat .357's according to recomended OAL's but they just don't get into the canelure for crimp without seating them significantly deeper. What I've been doing for decades is keeping my brass trimmed to just under maximum, that way I have enough to work with and still get the recomended OAL without having to worry about a shallow crimp allowing bullet jump, especially when using slow powders like H110 or 296.
 
Gamestalker ......

There's no need to trim .357 cases, because the "recommended OAL" does not apply to all different bullets. It is published in reloading manuals only to explain the loads being tested. The OAL is required info when referring to chamber pressure with a particular load.

When reloading for an autoloader, it is helpful to see the recommended OAL, because that length should be able to feed from the magazine in the weapon that was used in testing. Your shortened brass now has slightly less case capacity, and will provide higher chamber pressure.
 
Back
Top