
You are using an out of date browser. It may not display this or other websites correctly.
You should upgrade or use an alternative browser.
You should upgrade or use an alternative browser.
Show us a picture of your reloading bench
- Thread starter James THR
- Start date
SwaneeSR
Member
That deer looks like he is posing for the camera. You have a nice setup. Your messy before is about as clean as my bench has ever been.
Sent from my iPad using Tapatalk
Sent from my iPad using Tapatalk
LouisianaJoe
Member
There is some room on the side of the bookcase that looks like a good place to hang them where you will not bump them as much. Another option is screw in some hooks under the shelf and hang them there.
Christobal
Member
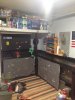
my reloading space


Last edited:
Orcon
Member


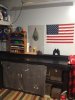
Not as nice as most but it's my HAPPY CORNER !!
I use the flat bench for brass prep/ firearm maintenance/ powder measuring /
etc....
cabinet and shelves under bench stores my reloading accessory's and components
I use the flat bench for brass prep/ firearm maintenance/ powder measuring /
etc....
cabinet and shelves under bench stores my reloading accessory's and components
Attachments
If it makes you HAPPY, then it is as nice as any other.Not as nice as most but it's my HAPPY CORNER !!
I use the flat bench for brass prep/ firearm maintenance/ powder measuring /
etc....
cabinet and shelves under bench stores my reloading accessory's and components
Pic of my bench? Nope, not gonna' do it, y'all would laugh. I have 2 single stage, 2 progressive, & a turret press,along with 2 powder measures (& 3 measures on the 2 progressives & the turret) mounted on a Black & Decker Workmate. Didn't think it was possible, did you?
bbqreloader
Member
My meditation corner of the basement...lol

Last edited:
thomas15
Member
Pic of my bench? Nope, not gonna' do it, y'all would laugh. I have 2 single stage, 2 progressive, & a turret press,along with 2 powder measures (& 3 measures on the 2 progressives & the turret) mounted on a Black & Decker Workmate. Didn't think it was possible, did you?
I think a workmate is a great solution for several problems that handloaders might face. I really enjoy looking at others benches and I think every picture has some good idea that others can use. I know that looking at bench pictures and reading these kinds of threads were very helpful in helping me decide on how to make my bench, which is only 7' long. But I get a lot of pleasure from my bench. So I for one would like to see your bench.
Last edited:
Ole Joe Clark
Member
A photo of my reloading bench.
Have a blessed evening,
Leon

Have a blessed evening,
Leon
DRAINSMITH
Member


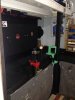
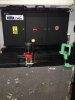
Here is most of my bench.
thomas15
Member
DRAINSMITH,
I like your attitude Son!
I like your attitude Son!
What make/kind of cover is that on the bullet collator on the AP set up for pistol?
Does it help much keeping down the noise?
Does it help much keeping down the noise?
DRAINSMITH
Member
SSSSSH my wife doesn't know one of her cooking pot lids is missing. And yes it cuts the noise level a lot. And unlike styrafoam or card board you can see threw it. I think its for a 9" pot. Just measure the inside diameter and go to the thrift store an you can get one under $5.00.
Thanks.
Had a friend who had that bullet feeder and the noise drove me up the wall...much worst than the case feeder
Had a friend who had that bullet feeder and the noise drove me up the wall...much worst than the case feeder
Steve Cover
Member
I started reloading in 1962 and have gone through several different reloading benches.
Absolutely the best one is the NRMA designed bench.

I believe that plans are still available.
Mine is over 30 years old.
It is super strong, but what I like most about it is that it is a simple takedown into several components by removing the 3/8 inch carriage bolts that hold it together.
This makes transport a lot simpler and getting through doors a breeze.
I flew helicopters for 26 years, and moved quite often.
Having this bench really was a boon to my reloading.
Besides my two Dillon presses I have three MEC presses, a cast bullet sizer, and several other bench mounted tools.
Only using one tool at a time was a problem until I modified the bench with a key system for mounting the tools when I rebuilt the bench about 20 years ago.
(I had originally dyed the bench a dark walnut stain. This turned out to be a poor choice because it hid dropped powder and other small dropped objects.)
To alleviate this I simply added a ¾ inch maple plywood sheet on top.
Before I installed the new bench top I cut out the key slot.
The largest tool footprint was my MEC Grabber, so I designed the key to accommodate it, and thus all others.
I ended up with an 11 x 11 inch ¾ inch thick key block with ¼ inch holes set 1 inch from the edges in each corner.
I glued an additional 11x11 inch piece of 1x12 on top of the plywood key to give the mounting bolts a little more material to work with.
The ¼ inch holes were drilled through the bench and the underside was relieved to accommodate ¼ wing nuts.
These were secured using fiberglass rifle bedding compound and are totally solid.

This is a picture of my bench with a key installed that allows the full use of the bench without having to work around any mounted tools.

Here is a good look at the key slot showing the modifications I made to allow shotgun primers to drop into a catch jar mounted under the bench top.

This is the cut down Plastic Jar with spent primers.
Lid is screwed to the underside of the bench

One of my MEC 600 Jrs. set up for 20 GA. Showing the modification for the primer drop.

Here is how well the MEC Grabber fits the key.
All of the presses are mounted using the appropriate size countersunk screw from below and lock nuts on top.
This makes for a very solid mount.
I have no trouble swaging bullets.

Here is the bottom of my Pacific “O” press showing the countersunk screws.

This is the Pacific press mounted and ready to use.
This is an old press. Pacific was bought out by Hornady in the late 1980s.
Note: all the 22 rimfire ammunition was for a test of modifying the bullets.
Several machinist/gunsmiths offer tools and or dies to form several different configurations and diameters to improve accuracy and performance.
Due to the 22 rimfire drought, this test was put on hold.

Here is my 650 mounted and ready to go through another batch of 500 brass in an afternoon.
Since I reload 29 different metallic cartridges, most of them on the Dillon 650, I need a lot of room.
Tool change out is simply pulling the four ¼ in lug bolts, lifting off one press and setting the other into the key slot.
Tighten down the very same lug bolts and I am ready for the next job.
Note the swing arm lamp.
I have attached one to each corner of the bench cabinet for best illumination of my reloading process.
When not needed they are simply moved out of the way.
As to bench height, I chose to make it comfortable to stand while reloading.
The addition of a bar stool, allows me to sit if I want to.
It is not necessary to build as heavily as I did.
But the key system works very well for me and could be adapted to a smaller bench.
I hope this gives you some ideas.
Steve
Absolutely the best one is the NRMA designed bench.
I believe that plans are still available.
Mine is over 30 years old.
It is super strong, but what I like most about it is that it is a simple takedown into several components by removing the 3/8 inch carriage bolts that hold it together.
This makes transport a lot simpler and getting through doors a breeze.
I flew helicopters for 26 years, and moved quite often.
Having this bench really was a boon to my reloading.
Besides my two Dillon presses I have three MEC presses, a cast bullet sizer, and several other bench mounted tools.
Only using one tool at a time was a problem until I modified the bench with a key system for mounting the tools when I rebuilt the bench about 20 years ago.
(I had originally dyed the bench a dark walnut stain. This turned out to be a poor choice because it hid dropped powder and other small dropped objects.)
To alleviate this I simply added a ¾ inch maple plywood sheet on top.
Before I installed the new bench top I cut out the key slot.
The largest tool footprint was my MEC Grabber, so I designed the key to accommodate it, and thus all others.
I ended up with an 11 x 11 inch ¾ inch thick key block with ¼ inch holes set 1 inch from the edges in each corner.
I glued an additional 11x11 inch piece of 1x12 on top of the plywood key to give the mounting bolts a little more material to work with.
The ¼ inch holes were drilled through the bench and the underside was relieved to accommodate ¼ wing nuts.
These were secured using fiberglass rifle bedding compound and are totally solid.
This is a picture of my bench with a key installed that allows the full use of the bench without having to work around any mounted tools.
Here is a good look at the key slot showing the modifications I made to allow shotgun primers to drop into a catch jar mounted under the bench top.
This is the cut down Plastic Jar with spent primers.
Lid is screwed to the underside of the bench
One of my MEC 600 Jrs. set up for 20 GA. Showing the modification for the primer drop.
Here is how well the MEC Grabber fits the key.
All of the presses are mounted using the appropriate size countersunk screw from below and lock nuts on top.
This makes for a very solid mount.
I have no trouble swaging bullets.
Here is the bottom of my Pacific “O” press showing the countersunk screws.
This is the Pacific press mounted and ready to use.
This is an old press. Pacific was bought out by Hornady in the late 1980s.
Note: all the 22 rimfire ammunition was for a test of modifying the bullets.
Several machinist/gunsmiths offer tools and or dies to form several different configurations and diameters to improve accuracy and performance.
Due to the 22 rimfire drought, this test was put on hold.
Here is my 650 mounted and ready to go through another batch of 500 brass in an afternoon.
Since I reload 29 different metallic cartridges, most of them on the Dillon 650, I need a lot of room.
Tool change out is simply pulling the four ¼ in lug bolts, lifting off one press and setting the other into the key slot.
Tighten down the very same lug bolts and I am ready for the next job.
Note the swing arm lamp.
I have attached one to each corner of the bench cabinet for best illumination of my reloading process.
When not needed they are simply moved out of the way.
As to bench height, I chose to make it comfortable to stand while reloading.
The addition of a bar stool, allows me to sit if I want to.
It is not necessary to build as heavily as I did.
But the key system works very well for me and could be adapted to a smaller bench.
I hope this gives you some ideas.
Steve
Ole Joe Clark
Member
Steve Cover: I use a similar mounting system, with 3/4" x 12" square cabinet grade plywood as my mounting plates. You even have a Pacific "O" press like mine. I used a wooden solid core door for my table top, then I used some laminate flooring to cover it with. I glued it to the door, and I can wipe up spills and such.
I have another bench that I built in the mid 70's when I began this madness. It's stored in a building outside. Don't have room for it.

Have a blessed day,
Leon
I have another bench that I built in the mid 70's when I began this madness. It's stored in a building outside. Don't have room for it.
Have a blessed day,
Leon
Steve Cover
Member
Nice looking setup Leon.
Steve
Steve
SlowFuse
Member
Great post Steve.
Joe I like the idea of using a solid wood door.
Joe I like the idea of using a solid wood door.
Similar threads
- Replies
- 45
- Views
- 4K
- Replies
- 44
- Views
- 4K
- Replies
- 151
- Views
- 23K
- Replies
- 13
- Views
- 2K
- Replies
- 14
- Views
- 2K