Photographing guns

Status
Not open for further replies.
Ala Dan, you'll probably have to read your camera's manual to see if any of the settings allow you to turn off the flash. You should be able to do so. Just check the manual. If ultimately you can't, then take some tissue paper and tape it over the flash so at least it diffuses the light and makes it less intense.
 
It's already been mentioned, but I'm going to reiterate for sake of impact...

Get a tripod. And get a remote release if your camera is equipped to work with one. End of line.

With extreme closeups, especially on things as detailed as firearms, learning to control your depth of field is a must. A very shallow DOF can add visual impact to a particular detail while a very deep DOF allows you more "still life" kinds of shots. As the iris gets smaller, the amount of forground and background that are in focus increases. Most landscape shots are taken with pinhole sized apertures so that everything remains in focus. As the iris gets larger, the amount of focal depth decreases. With a very fast lens (think 3" plus objective bells), a very wide aperture, and a short focal length, you can have focal depths measured in fractions of an inch. Set your camera to manual mode and play with the aperture using something with regularly spaced intervals so you can see the difference. I did my testing standing beside my backyard fence, shooting a paper plate I'd stuck between the pickets about halfway between me and the other side of the yard.

Now you can advance to playing with perspective, and how lense length (zoom) affects the viewers sense of depth in the picture (not to be confused with Depth of Field)l

Pay attention to shadows. A properly positioned shadow can be as dramatic as a poorly positioned one can be detrimental.

Don't fret if the pic doesn't come out "perfect." Play with it and explore the alternatives. Get some basic photo manipulation software. I use PhotoShop Elements and am always monkeying with different colors and crops in pics that ain't the best right out of the camera. Often you can take what looks to be a horrible shot and, with a few selected tweaks, turn it into a wall-hanger.

But, by far, the most important thing to do is experiment in a controlled way. Use one feature and play with it until you can stand the sight of it, then advance to the next. With digital it's a breeze, unlike with film where you have to wait (and pay) to see your results. Once you familiarize yourself with the interplay between aperture (f-stop), shutter speed (ISO), and focal length (zoom), you have the basics.

Brad
 
Number one piece of advice for beginners: get a decent SLR that gives you control over your pictures instead of some crappy point-and-shoot. The most expensive point-and-shoot will never yield pictures as good as the cheapest SLR. What good pictures you do get from them is chance more than anything else. Once you get your SLR, just learn to use it. Do more than read the manual, learn the basic principles of photography, how you can control the amount of light getting to the film/sensor, what different amounts of light do, what depth of field is and how to control it... the list goes on. Start learning about image composition, what makes a good picture, etc. Don't just practice on guns, go out and take pictures of everything. Its understanding and practice that will make your photography better.

Number Two: Once you've got photography down in general, start controlling the environment you're shooting in. Get a light box and some lamps or just go outside on a sunny day and string a sheet between your subject and the sun. This is definitely a second step, though. A crappy picture in good light is still a crappy picture. If you take time to learn how to take a good photo, then add good light, you've got a great picture.

Photography is a lot like shooting: anyone can learn to do it, they just need a little dedication, and the deeper their understanding of the principles behind the final outcome, the better they will be.

As for photo editing... if you must, go with photoshop, but if you learn to take good pictures, you won't need to edit them.
 
I thought I'd bring this back from the dead since I started recently photographing some firearms using the so-called "bathtub method". I've had good results with minimal post-processing. I don't have room or equipment to set up a giant light box studio so this is my only current option. I use a round silver reflector and a diffused flash set to +3.0 for bouncing off the reflector while taking these offhand for maximum light since I almost religiously shoot at ISO100. Unfortunately the nature of a bathtub requires I be very close to prevent things like the drain or unsightly items showing up in the image, giving a very shallow depth of field.

Each image is clickable for more information and options for higher resolution versions.

MSAR STG-556
3064491822_cf6b714495.png 3063651663_b8b1139cdd.png

IWD SG2000
3063649831_3f41902221.png 3063651065_2d5ce8542c.png

Bushmaster AR
3063376555_450384a8be.png 3064214426_a3740ccace.png

Saiga-12
3064213470_63cc5b63f3.png 3064213102_9579403be1.png

Mateba Unica
2983667400_5d894a3726.jpg 2982810031_1279a38cdb.png

DPMS LR-308
3063375601_cc81c3ddfc.png
 
This is a GREAT thread! Agree it ought to be a sticky, or maybe have a permanent link from the library?
 
Mateba Unica - That is a cool looking revolver.

I manage to get some really good pics sometimes, but I cannot do it at will because I really don't know what I am doing.
 
It isn't the camera, it's the lighting. You can have the best camera in the world, but if you don't have good lighting you can forget it. If I was going to be photographing a lot of firearms, I'd invest in lighting equipment first.

Find a good book on doing product photography and study the lighting techniques.
 
I'm using pretty remedial lighting equipment. An SB-600 hotshoe flash and a cheap $20 folding reflector over my head. Using the "bathtub method" gives me a lot of bounce fill that usually requires a bunch of studio lighting and umbrella reflectors. Studio-type lighting would be ideal and allow more options in composition.

The upside is most everyone has a white bathtub and can give it a try.

The downside is you are very limited on angles and you have to be close to avoid unsightly things like the drain plug. This guarantees a shallow depth of field so its more difficult to take pictures of a firearm where every detail is in focus. Plus you're kneeling over in strange positions and it's not good for the limber-challenged.
 
I've had this thread saved under the "Quick Links" tab for qiute a while...

Beautiful work, Cesiumsponge; I'd have never thought of a 'bathtub method' for photographing firearms, especially large ones. Unfortunately, my tub has a textured bottom, so I don't think I could it.

How did you manage to eliminate shadows thrown by the flash/reflected light?
 
My experiences:

It can be difficult to get good pictures of long guns because of the lenses and/or distance needed to get the entire gun in the frame. If you want to do a shot from above and want a flattened perspective, you need a ladder taller than most indoor home ceilings. Sections of the guns sometimes turn out interesting, as Cesiumsponge's work shows, and that's when lighting comes into play. His subject is so interesting, the contrast, lighting, and placement are done so well that you don't notice that the guns are "bent" due to barrel distortion of the wide angle lens he used.

Basic techniques for general photography and art help. Contrast is usually always good. The rule of thirds (Wikipedia has a definition of this) works, too. Direct flash from on camera almost always sucks.

Especially if you have a digital camera, don't be afraid to experiment! You can always erase what you don't like, unlike a film camera. Studio photographers learn to control lighting. If you can only control one light in your scene, turn off all the others. Even if you only have one light for your scene, control it!

If I spent time or money right now to improve my studio photography it would be on learning how to light scenes, or getting more and better lights.

1782470365_87067db18b.png 2539957945_7a9118b653.png
 
Years ago I thought it would be a good idea to get an advanced degree in photography, looking back I should have gone to med or law school probably.

Photographing guns is tricky and requires a lot of experimentation and a lot of hit and miss. Sometimes I can set up a gun to photograph and right off the bat get a fantastic image. Other times I spend hours and probably loose some hair just because I can't get the gun and camera to work together. Long guns are always difficult to photograph and I find it much more enjoyable to photograph handguns.

Setting up: When setting the camera up to photograph I always use a sturdy tripod and a cable release, if you don't have a cable release then use the timer setting. I also use high apertures and long exposure times, this increases the depth of field and allows me time to do some manipulating to the lighting while the image is being exposed, this can be very helpful if what you are photographing is very shiny.

Getting a good RAW image: As far as I'm concerned getting a good in camera image is only the beginning but very important. Back when I learned photography digital was discussed but the mainstream was still film and the darkroom. It wasn't really until I finished school and went back for a graphic design degree a few years later than I really learned digital photography and Photoshop. Now digital is all I use and I have to say it makes life a lot easier. However like film you need a proper exposure and a good negative to work from to get a good final image. Once you have a good capture then using a photo editing program can be extremely helpful in tweaking the image.

Removing color cast and balancing color: One of the biggest problems I see in many peoples gun photos is color cast. Depending on what your light source is you are going to get a certain color cast. In daylight you get a blue cast, in incandescent you get reddish/orange and in florescent you'll get a greenish cast. If you have mix of all these light sources then you are going to drive yourself nuts trying to correct it. Make sure that your camera is set for the light source you are using and try to use only one type of light. Photoshop and other imaging programs can be extremely helpful in removing unwanted color casts from your photos. Sometimes no matter how hard you try a color cast will slip into your photo that shouldn't be there.

Natural light can be used but it can also be tricky. If you photograph in natural light then photograph in the shade, this will provide you with more even lighting. If you photograph indoors then simply make sure your camera is properly balanced for the lighting type you are using.

Cameras: The common misconception is that the more megapixels you have the better you image will be. The truth of the matter is that megapixels have very little bearing on how your image turns out. Unless you plan on printing your images larger than 8x10 megapixels really don't matter a whole lot. If you are only posting images on the web at 72dpi and roughly 640x480 in size then you could get by fine with even a 3mp camera. The resolution comes from the quality of the sensor and the quality of the lens. I've seen absolutely gorgeous and amazing photos taken with 3mp point and shoot cameras. The advantage of DSLR's is that you have a lot more control of the settings and can use different lenses. The point is don't feel that you have to run out and buy a top of the line DSLR if all you plan to do is post gun pictures on the internet.

Anyway there's tons more I could talk about but I'm not going to write a book. The trick to photographing guns, like photographing anything is to do a lot of it and be willing to experiment. Its not going to happen overnight so give yourself time to get it right and be prepared to fail miserably at times.

RugerServiceSix9.jpg

CZ40B-3.jpg

BuckmarkCamper5.jpg

five-seven2.gif
 
Last edited:
I wrote a bit about photographing guns here.

I use white foam core to reflect natural light, and a 4.0 megapixel point and shoot camera. To me, composition is as important as lighting.

attachment.php


ColtNewAgentsmallfile.gif

If the time of day is different, The colors in the same area will be different, as shown below.

RemmyRANDandPLUsailorJerry.gif

ColtOfficersACP.gif

Take a lot of photos from slightly different angles and with the light controlled differently. Chose the one you like the most and delete the rest.
 
Beautiful work, Cesiumsponge; I'd have never thought of a 'bathtub method' for photographing firearms, especially large ones. Unfortunately, my tub has a textured bottom, so I don't think I could it.

How did you manage to eliminate shadows thrown by the flash/reflected light?

I read about the "bathtub method" elsewhere so I can't take credit for it, only in using it.

There are no harsh shadows or light because I put a diffuser on my flash which diffuses the concentrated flash source into a more scattered light, I point it upwards and bounce it off an overhead reflector about four feet above me, and then back onto the subject. Since the flash is diffused already, it spreads quite a bit when it hits the reflector, and spreads out even more on it's way back down. Also any flash light that doesn't nail the reflector is pinging around off the white ceramic tiles and bathtub.

You can use those reflective automotive windshield heat guard things as a cheap reflector.

You can also save an old milk jug and use the milky translucent plastic taped over a flash as a great diffuser. Just make a rectangular box without a lid that'll slip over your flash unit. It should stand off about 1/2" from the flash so it'll throw some light to the sides/top/bottom as well.


His subject is so interesting, the contrast, lighting, and placement are done so well that you don't notice that the guns are "bent" due to barrel distortion of the wide angle lens he used.

I believe Photoshop has a tool that'll correct for basic barrel and pincushion distortion but it's never bugged me enough to even look for the tool. For those people that do architecture or are super picky, this should be a simple fix that is readily available.

The greatest thing about digital is it's absolutely FREE once you have a camera and software. I did film SLR back in high school and didn't touch cameras for about 6 years after because I simply didn't have the money or space for a darkroom and my own gear. With digital, you only pay when you make a print. Memory is reusable, and you can instantly see your efforts, delete what you don't like, and try again. Plus, post processing in something like Photoshop is extremely powerful as an artistic tool and technical correction tool, and you can repeat it time and time again.

Anyone that has done "analog photoshopping" in the darkroom knows that getting multiple prints to develop identically is very difficult, even more so if you're stacking negatives and doing burning/dodging.
 
Edit to a small file for online ! ! !

EDIT TO A SMALL FILE FOR ONLINE ! ! !

One more time in case you missed it.

Resolution on a computer monitor is pretty low. High res. photo files do nothing except tie up bandwidth and take forever to load.

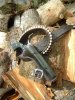
Forum formats don't allow replies until all the photos are loaded on the thread. If you're posting a photo that's six times the width of the screen, you're going to screw up the format for the text. I don't want to scroll across a screen to read a post. And I don't want to wait fifteen minutes to view a photo of your EBR draped across a stack of your dirty laundry. Think about "setting" -- photograph the GUN, not the pile of crap that is your living space.
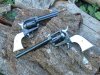
 :neener:

Neutral background.

Guns are pretty high contrast items and so a "dark" background and low contrast lighting works.

Use a tripod.

Use a small aperature so you have depth of field.

If you're photgraphing rifles, long-guns, pose them oblique to the film plane (diagonal in depth) so that you get a compact image/composition.

Edit visible serial numbers out of the photo. Once you post it online, it becomes "public property." You don't need your gun with its serial number appearing in Craig's List.

I did a nice photo of a specific caliber ammo. Now when I Google "images" in that caliber the photo shows up in the search. AND it's NOT from something I've posted, but rather from a thread where someone else pirated the image.

As a matter of course, I remove firearm images from my PhotoBucket acct. on a regular basis to disable hot links to the image from "pirates."

EDIT TO A SMALL FILE FOR ONLINE ! ! !

EDIT TO A SMALL FILE FOR ONLINE ! ! !

Small file, like 640 X 480 pixels and "0" resolution in PhotoShop. :cuss:
 
Just don't post full sized images for people to pirate if you're worried about that. Use lousy compression and throw watermarks on it. You'll always have the original, high resolution image. I don't have originals of any of my material on the Internet. I can guarantee my Mateba images are going to end up pirated to the Internet since such few pictures of them exist. Oleg's Mateba/model poster is all over the place.

72dpi is the standard monitor output so if its for web viewing, it doesn't need to be higher. Setting quality to "0" though is like watching a screen capture from an 8-bit NES game because jpeg artifacts are so bad. 6-8 is usually fine. Just link smaller images to a URL leading to the original.
 
I know there was a thread that had a link to the AR15.com disussion on "Bathtub photography."

I tried to find that thread again on Arfcom and couldn't. That place is such a mess and I can never find what I want.

Does anyone have a direct link to that thread on Arfcom on Bathtub photography?

Or a link to the thread here that linked to the Arfcom thread.
 
Wow, CesiumSponge, are all of those yours? You have some guns that I would like to get or make replicas of. Very nice. I am also curious as to how much money you have invested in all of those weapons put together. That looks like an awfully expensive assortment.
 
Last edited:
Status
Not open for further replies.
Back
Top