Mora HD Companion mods

Status
Not open for further replies.

MDI_Weapon

Member
Joined
Mar 10, 2014
Messages
94
I love the Mora knives and decided to mod this one a little for use in the boonies. The lack of way to add a lanyard always annoyed me a little so I drilled the handle, chamfered the hole and added a simple paracord loop. I really like the blade on the Mora but wanted something a little less flashy (without having to shell out for their black bladed model) so I gave the blade a forced patina by dipping it in boiling hot apple cider vinegar for a few minutes and then giving it a thin coating of Froglube which produced a nice dark gray matte finish which looks fairly good next to the black and olive drab handle. The next step will be to make a leather sheath for it that has storage for a sharpener and ferro rod.
Pic attached. ImageUploadedByTapatalk1394585030.622873.jpg
 
Lookin' good!


Thanks. I looked at your page from your link and you build some great looking gear. I will have to look at it more when I get back to civilization - I am out in the boonies at the moment and it takes forever for a single pic to load.
 
Very good, and a smart knife for general use. The Moras seem to be begging for user modification. They're also an inexpensive source for blades to use in knife making projects.

Well done! Show us more!

Dirty Bob
 
A mod I forgot to mention: the Mora seems like the perfect knife for adventuring out into the sticks but I noticed it has another minor flaw - the spine on the blade is slightly rounded and it makes it very difficult to produce a good spark with a ferro rod or other similar fire starter like magnesium and flint blocks. Before I boiled the blade to give it the dark gray patina, I used a sharpening stone to make about a 2" long section on the back of the blade squared off so it would have 90 degree edges. It now works very well as a striker -- probably at least 10 times the spark it would produce before the mod.
 
I took a break from the leather sheath for the Mora due to an upcoming camping trip and the need for a semi-decent totally un-tactical camp axe. I checked the local Academy Sports and found several "axes" designed to whack zombies but I have an incredibly rare use planned for my camp axe --- namely, chopping wood into firewood and kindling (I know that is a crazy idea as all axes are apparently aimed at solving the zombie outbreak nowadays). Anyway, I then checked Lowes and Home Depot and the local stores didn't have much that impressed me - they either have full sized axes or something more along the lines of a hatchet instead of a compact, packable camp axe. So, I did a quick check online and while there are very nice camp axes from Wetterlings and Gransfors Bruks, I am not dropping $120 on a small forest axe for a short camping trip...

Finally, I dropped by the local Ace Hardware store and found an 18" hickory handled Hunter's Axe made by Collins. The factory edge was as dull as a one pound block of cheddar cheese (not sharp cheddar but the mild variety) and the handle was a bit rough but it had all the right raw materials. For $18 and change, I can stand to put forth a little effort to get it up to par.

Pic of the axe at the starting point next to my small lapdog (she thinks she is a lapdog anyway)....the axe is bigger than it looks in that pic as the handle is an actual 18"...the dog throws everything out of scale.

ImageUploadedByTapatalk1395643330.611583.jpg
 
As usual, I started with the idea that I would keep this fairly basic -- sharpen the blade and be done with it...as if that plan is ever actually followed.

Note: if you pick up one of these axes, look at the edge carefully before buying it. I was in a bit of a hurry when I picked up mine and overlooked a ding in the edge that resulted in a bit more time with the bastard file than would have otherwise been required.

Pic of the factory edge (or almost complete lack there of) and the nasty looking painted on warnings and company name. After getting the axe in the shop and looking over the grain of the hickory handle, I decided that foul black paint would have to be removed...

ImageUploadedByTapatalk1395643892.665224.jpg ImageUploadedByTapatalk1395643907.289609.jpg ImageUploadedByTapatalk1395643919.094132.jpg ImageUploadedByTapatalk1395643933.429072.jpg
 
As with the Mora pictured above, I decided this small axe was intended for use in the boonies and therefore needed a lanyard hole so I could add the usually loop of paracord to the handle. After drilling, I added a slight bevel with a counter sink bit and then smoothed that up with some 400 grit.

After adding the lanyard hole, I decided to remove all the black painted on crap which turned out to be easier said than done. I tried mineral spirits, then acetone and then lacquer thinner and the black paint didn't budge. I finally hit it with stripper and then aircraft stripper and, although considerably faded, it was still clearly there. Color me annoyed. I finally broke down and sanded the entire handle with 180 and then 220 to get rid of the offensive black text on the handle.

From there, I broke out the bastard file and started on the edge using about a ten degree approach on each side so the total would be around 20 degrees. If you have never sharpened an axe this way, wear some thick gloves or use a file with a hand guard as you file towards the edge and one slip usually produces a decent amount of blood loss if you try it barehanded. After getting the edge as sharp as possible with the file, I moved through course, medium and fine diamond stones and then gave it several passes on a strop coated with jeweler's rouge. Surprisingly enough, this inexpensive little hardware store axe will take a shaving sharp edge.

And I just realized the remaining photos are on my camera instead of my phone...so here is the handle during and after lanyard hole drilling.

ImageUploadedByTapatalk1395644706.261013.jpg ImageUploadedByTapatalk1395644717.375932.jpg
 
After the edge was finally sharp, I went back to the handle and gave it a couple coats of wipe on poly (because I felt like being lazy). The current results are shown in the pic. While it works well for kindling and carving feather sticks and the like, I am fairly sure it will also take care of any zombies if the need arises even though it isn't "tactical". :)

Now I have to make a leather sheath for the axe as well as for the Mora.

ImageUploadedByTapatalk1395647464.269511.jpg
 
Last edited:
I've reduced the composite handle (hard material),on a more basic Clipper using a dremel and belt sander, and I like it so far. I took a surprising amount of stock off.

It's going to function as a kitchen knife so the increased grip style options/angles available with a smaller handle are more useful than the possible leverage advantage of the bigger rounder shape.

I would post pics but it isn't much to look at. Haven't really touched up the texture with a finer grit so it looks rough, literally.
 
Thanks - but that one is kind of boring compared to most of the weapons I mod. It leaves me wanting to do much more to it...just haven't decided what quite yet.
 
I've reduced the composite handle (hard material),on a more basic Clipper using a dremel and belt sander, and I like it so far. I took a surprising amount of stock off.

It's going to function as a kitchen knife so the increased grip style options/angles available with a smaller handle are more useful than the possible leverage advantage of the bigger rounder shape.

I would post pics but it isn't much to look at. Haven't really touched up the texture with a finer grit so it looks rough, literally.


Post pics! I don't care what it looks like so long as it works. The slightly larger handles work well for me because I have gorilla mitts for hands but I always like seeing what works for others.
 
I am no axe expert, but I would have thought a ten degree edge would be a mite too fine for a chopping tool. Educate me.
 
Really enjoyed this thread... I make a point of adding a lanyard hole to any folding knife I carry (or other tool I'm using around the water) if it doesn't already have one since I work out of a small skiff... Anytime I need a lanyard I quickly improvise one out of heavy fishing leader material. I had to learn the hard way that around the water any dropped tool is just gone....
 
I am no axe expert, but I would have thought a ten degree edge would be a mite too fine for a chopping tool. Educate me.


Ah - I probably didn't make that clear enough - when filing it, I approached it at a around a 10 degree angle on each side (note that is on each side) If you measure the angle, it is a 20 degree edge profile which would be a bit thin for a full sized axe but is very usable on a smaller camp axe that you may also use for minor carving chores and the like.


Really enjoyed this thread... I make a point of adding a lanyard hole to any folding knife I carry (or other tool I'm using around the water) if it doesn't already have one since I work out of a small skiff... Anytime I need a lanyard I quickly improvise one out of heavy fishing leader material. I had to learn the hard way that around the water any dropped tool is just gone....


Exactly. Lanyards are a must near water. My habit of adding lanyards began after one of my favorite knives went to the bottom of the lake. Unfortunately, it was in an area of the lake that was over 120 feet deep.
 
Last edited:
I've reduced the composite handle (hard material),on a more basic Clipper using a dremel and belt sander, and I like it so far.

I've thought about chopping the hump off of one of the HD/Robusts but I'd be afraid of annoying delamination at the cut since the grip is rubber overmolded.


Cutaway stolen from a BF member:
attachment.php
 

Attachments

  • hdcutaway.jpg
    hdcutaway.jpg
    134.3 KB · Views: 211
I've thought about chopping the hump off of one of the HD/Robusts but I'd be afraid of annoying delamination at the cut since the grip is rubber overmolded.


Cutaway stolen from a BF member:

attachment.php


I know Mora sells the regular blades but I haven't seen the HD blades for sale yet. If they sell them, that will be fairly tempting for a custom handle project...might even have me breaking out the hardware to make some custom micarta handles.

Progress (or at least what I am going to call progress) on the camp axe sheath. It is still a long way from finished and functional. As this is for a camp axe I figured the sheath would end up taking a beating so I used a piece of 10oz scrap leather I had on hand. Certainly not the prettiest piece of leather as it has several scars, insect bites, etc. but it should be exceptionally rugged if nothing else.

ImageUploadedByTapatalk1396203936.547689.jpg
 
I was going to dye the axe sheath a shade of brown but after wet forming it, I remembered why I put this piece of leather in the scrap bin. To put it mildly, that cow must have had an incredibly hard and painful life as I have never seen a piece of vegtan that has so much random scar tissue...black it is.
 
Last edited:
Trial run on a leather sheath for the Mora HD - no bells and/or whistles added yet.

A still very-rough-around-the-edges (although now black) camp axe sheath slightly above and to the right.

As you can see in the pic, I always keep my work bench exceptionally tidy and well organized...

ImageUploadedByTapatalk1396291166.697494.jpg
 
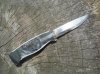
The main section of the Mora sheath is basically done (pic attached) so it is time to start on the bells and whistles for it.

The leather used on the sheath thus far is 8oz vegtan. The Mora weighs next to nothing and the leather wet molding and finishing process made this piece of leather surprisingly rigid so the knife is incredibly secure when parked inside the sheath.

I saved the cutting/folding template for that part of the sheath and will convert it to 1:1 scale .pdf in the next couple days if anyone needs it. The template is very close to being right on the money -- I left just enough excess material on the outer edges to allow room for beveling, sanding and burnishing. I also left just a bit of extra length on the retention strap so it can be made to fit very tightly or it can be fit just loosely enough to where the knife has a very small amount of wiggle room and the strap is slightly easier to snap around the knife handle.

With any luck, the bells and whistles will include:

Method for both horizontal and vertical mounting of the sheath to a belt, molle system or backpack strap.

Mounting loop for a ferro rod

Pouch for a compact sharpening stone or possibly just a second loop for a compact sharpening steel

Area to store one Wetfire tab or maybe just a bit of tightly wound up jute twine

A spot for storing a short length of paracord

Any other suggestions for add-ons?

Note: a microwave and/or toaster oven will not fit on the sheath. I checked the measurements and there just isn't quite enough room for that kind/size of kitchen appliance.

Side note: both the axe sheath and the Mora knife sheath in the pics are made using less-than-amazing quality scrap vegtan leather which is my usual approach when working on a new project. After working out any minor design problems, I will build improved versions out of much nicer leather. As such, the first versions often have scars, dents, etc. in the leather -- which isn't a problem as my prototypes end up in the fire pit.

ImageUploadedByTapatalk1396479964.396146.jpg
 
Last edited:
I got side tracked with work (I hate when that job thing gets in the way of important business) but made some progress on the ferro rod I plan to attach to the sheath. Quick simple and easy ferro rod:
1. Get a small ferro rod blank off of eBay
2. Slice off a section of a round hardwood dowel (pick whatever diameter rod suits you) just a little thicker than the ferro rod
3. Drill a hole in the side to insert the rod into the handle (slice of dowel rod)
4. Use a needle file to make several shallow notches in one end of the ferro rod (helps epoxy hold the rod in the handle)
5. Glue the ferro rod into the handle with two part epoxy, JB weld or whatever
6. Drill a second hole through the wooden section (for a lanyard of course)
7. Optional: dip or spray the handle with truck bed liner (bit of extra non-slip action to grab on to) and let it dry
8. Run a short section of paracord or shock cord through the second hole in the handle and tie it off.

Obviously, you could use aluminum rod, Delrin rod or whatever else suits you for the handle section.

ImageUploadedByTapatalk1397107551.560750.jpg
ImageUploadedByTapatalk1397107568.602344.jpg
ImageUploadedByTapatalk1397107582.125397.jpg

Now that is done, I find the idea of adding a fire piston appealing. May have to make some last second design changes after I build a small fire piston. lol
 
Status
Not open for further replies.
Back
Top