
MachIVshooter
Member
Thought some of you might find it interesting. A majority of form 1 builds are done using purchased tubes and end caps, sometimes incomplete baffles, or maybe freeze plugs. Some guys do turn their own baffles, but I can't say I've seen many DIY monocores, and I suspect the reason is that more of the guys doing them have only a lathe, and not a very big one. But if you have something with decent center distance and a vertical mill, monocores are actually a bit easier. The only issue is that a screw up kills the whole project, not just a small part of it.
Anyway, I wanted to build a fairly lightweight hunting can with a bit more volume than the commercial lightweights like the SiCo Harvester. The Harvester is very light at just 11.3 ounces, and kinda long-ish at 9", but it's slender-just 1.375". I stepped it up a bit, went to 10" long and 1.625" diameter. After all, with cans, more volume=less volume! The monocore material is 7075-T651 aluminum, with 6061-T6 seamless tube for the sleeve.
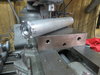
First order of business is chucking up your stock, indicating it true and facing it off. Pretty standard stuff. Then comes the tricky part: Getting a perfectly straight hole 10" deep. The start is absolutely critical here, as even a couple thou wiggle going in will translate to a significatly off-center hole on the other end. Then there's the issue of actually drilling it. Tailstocks are generally used for boring holes, but unless you have a true monster of a lathe, you won't have 10"+ tailstock travel. Mine actually does, but it also takes way too long to plunge in and out with a tailstock, so I use a toolpost mounted drill chuck. I put the extra long aircraft drill in it, and line it up along the piece of stock to be drilled. Then we bring it back to center and go to town. It took about 20 minutes to bore the hole

Once that's done, we bring in the live center for stability and turn our outside profile

Yes, that's a 120 pound chuck winding at 750 RPM. Keep hands clear! Anyway, I turn them down to be a somewhat loose fit in the sleeve except for the last 1/4" or so, which is snug. If you make two pieces of aluminum a tight fit over any significant area, they will gall and bind. Add heating & cooling plus carbon and plasma to the mix, you may as well weld the thing together.
Now, monocores frequently have their sleeves threaded on at the base, but I prefer a retaining nut at the front, so I thread the snout of the core

Next we part off our finished solid core piece and flip it around, re-indicate, face it off, bore and thread for whatever muzzle it's going on. 5/8-24 on this guy

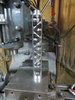
Now we're done with the lathe work on the core, so it's off to the mill, where we start poking holes according to our plan. This would be far, far easier with CNC, of course, but if you have a swivel vise, it's not too bad.

Awhile later, if you didn't break off all of your long end mills, you'll have something like this

Now, this would be a functional suppressor as is, but I wanted to make one that was a bit more durable than a 100% aluminum critter would be, so I made a 17-4 stainless blast chamber that inserts at the rear

Trying to create a radiused profile inside is a bit tricky, especially sine I broke all my long ball nose end mills, so I had to do it blind with the quill right up to the piece. A little ugly inside, but functional

Continued.......
Anyway, I wanted to build a fairly lightweight hunting can with a bit more volume than the commercial lightweights like the SiCo Harvester. The Harvester is very light at just 11.3 ounces, and kinda long-ish at 9", but it's slender-just 1.375". I stepped it up a bit, went to 10" long and 1.625" diameter. After all, with cans, more volume=less volume! The monocore material is 7075-T651 aluminum, with 6061-T6 seamless tube for the sleeve.
First order of business is chucking up your stock, indicating it true and facing it off. Pretty standard stuff. Then comes the tricky part: Getting a perfectly straight hole 10" deep. The start is absolutely critical here, as even a couple thou wiggle going in will translate to a significatly off-center hole on the other end. Then there's the issue of actually drilling it. Tailstocks are generally used for boring holes, but unless you have a true monster of a lathe, you won't have 10"+ tailstock travel. Mine actually does, but it also takes way too long to plunge in and out with a tailstock, so I use a toolpost mounted drill chuck. I put the extra long aircraft drill in it, and line it up along the piece of stock to be drilled. Then we bring it back to center and go to town. It took about 20 minutes to bore the hole
Once that's done, we bring in the live center for stability and turn our outside profile
Yes, that's a 120 pound chuck winding at 750 RPM. Keep hands clear! Anyway, I turn them down to be a somewhat loose fit in the sleeve except for the last 1/4" or so, which is snug. If you make two pieces of aluminum a tight fit over any significant area, they will gall and bind. Add heating & cooling plus carbon and plasma to the mix, you may as well weld the thing together.
Now, monocores frequently have their sleeves threaded on at the base, but I prefer a retaining nut at the front, so I thread the snout of the core
Next we part off our finished solid core piece and flip it around, re-indicate, face it off, bore and thread for whatever muzzle it's going on. 5/8-24 on this guy
Now we're done with the lathe work on the core, so it's off to the mill, where we start poking holes according to our plan. This would be far, far easier with CNC, of course, but if you have a swivel vise, it's not too bad.
Awhile later, if you didn't break off all of your long end mills, you'll have something like this
Now, this would be a functional suppressor as is, but I wanted to make one that was a bit more durable than a 100% aluminum critter would be, so I made a 17-4 stainless blast chamber that inserts at the rear
Trying to create a radiused profile inside is a bit tricky, especially sine I broke all my long ball nose end mills, so I had to do it blind with the quill right up to the piece. A little ugly inside, but functional
Continued.......
Attachments
Last edited:


