Checkering old military stocks

Status
Not open for further replies.
Joined
Feb 5, 2018
Messages
948
Location
Wasilla
I recently started checkering my old swedish mauser 96. This was sporterized a long time ago, so no collector value, but a lot of sentimental value as it was my first rifle at age 12. Anyway, the wood doesnt seem to cut sharply, even with new cutters, and i keep getting little fuzzies that must be cleaned from the cutter nearly every stroke. Is this just the nature of the budget walnut used on old military stocks? Is this even walnut? I let true-oil soak in overnight a couple times as many books have referenced. Should i try a clear coating before the final pass? Any tips to get sharper diamonds?
 

Attachments

  • 0FD8A8EA-E245-49E5-9E9F-A79B817816EA.jpeg
    0FD8A8EA-E245-49E5-9E9F-A79B817816EA.jpeg
    147.1 KB · Views: 157
  • FA30041A-AF84-43B2-86F0-A6F1D02379D5.jpeg
    FA30041A-AF84-43B2-86F0-A6F1D02379D5.jpeg
    107.5 KB · Views: 162
Thank you! I havent brought the diamonds to a point yet, and im hoping they dont “tear out” when i do. I want your critisizm and thoughts guys!
 
Don't know much about checkering other than you do darn good work.

Do know a little about Swedish Mausers and general woodworking though and the Swedes used Walnut and Beech for their Mausers (during WWI, other woods were used but your stock does not appear to be elm, maple, or birch). I suspect that it is walnut but it could be French walnut or even American black walnut if WWI vintage. There is a chance that the stock could be stained beech though but I doubt it given the depth of the stain. Have no idea how beech would affect checkering. Bing image searches or google image searches can show you the difference in the two regarding wood grain which you can compare with the whole stock. There is normally a reddish tint to beech that I don't see normally in walnut absent stain (although do have a blondish atypical walnut stock on a 1917 U.S. Rifle).

Now, certain petrochemicals can affect and soften the surface of any wood--something derived from natural plant sources like BLO or Tung Oil actually strengthens the wood's surface while certain synthetic petro oil based stains or finishes can soften it. If your sporter stock was treated with some of the commonly used hardware store stuff in the past, then that could be softening the wood's surface enough to cause what you are seeing.

There is other thing about Scandinavian military stocks, a THR poster named DeanDallas or something like that, swore that the Finns and maybe the Swedes used pine tar in their finishes for military stocks. He refinished stocks using that process and turned out some very pretty ones. GunnyUSMC is in this exchange and still is a member who has extensive experience in wood stocks. You might try sending him a shoutout or PM. If pine tar was used at one time, I am not sure what effect that pine tar would have on the wood surface and subsequent checkering.

Here is one of the old threads talking about pine tar finishes and few other things, https://www.thehighroad.org/index.php?threads/the-original-pine-tar-finish.756161/
 
Thats looks great. I've never checkered but have read threads about it. IIRC to stop tearing out the wood when pointing you should put a thin coat of finish on and let it dry. Then finish up. Please double check my suggestion and post some pics when your finished. :thumbup:
 
Alaskan Ironworker, that is an excellent job of checkering. I have done a few revolver grips, and can tell you that patience is the watchword here. You've done well in not taking too deep a cut. One trick I use to prevent splintering:

I buy shellac in the aerosol can. It is different from standard shellac in that it is de-waxed. Seal-Coat is also a de-waxed shellac. I apply a fairly heavy coat and let it dry for a half hour. The shellac wicks into the grain and stabilizes the wood so that the fibers get cut cleanly. Shellac has a low solids content, so you won't get a film buildup. You can cut all the way to sharp points. Any shellac left on the wood is easily removed using denatured alcohol.

I'd like to see some pix of the finished job.
 
I wanna see the finished product, so I'm subscribing, 'cause that looks fantastic. Can't tell you anything about wood though.
 
Looks very nice. I have to say that, for me, as much as I like and appreciate checkering, bad or mediocre checkering is way worse than no checkering.
 
Wow ! Great job! I did metal checkering for 21 years and I always thought working with wood was far harder. Many more variables with wood. Is it properly dried, is it hardwood or soft, is it open grained or close grained. ? What about knots or hard spots? On and on. With metal it is easy. Start your lines and go for it.

Again, that looks great to me.
 
I know nothing about metal checkering, but am curious. What is the procedure? What are the tools like? Is it a similar process to wood? can you checker concave surfaces? Also, has anyone out there carved fish scale patterns in wood? Im also very curious about that. We have very long cold winters up here and all these are relatively cheap hobbies to pass the time.
 
I worked for Les Baer for 21 years and all of my checkering experiences involved checkering the convex surfaces of 1911 pistols. The front strap of the frame and trigger guards. I checkered the gun in the picture next to my name.

I have never tried to checker a concave surface. Not sure how it could be done.

To metal checker you need a checkering file (Sold by Brownell's and others) and a 60 degree triangular single point needle file. The checkering files come in four common sizes, 20 lines per inch, 25,30 and 40. I have seen 75 LPI files but I never used one. These files are expensive...$75 for one back in 2014. The process is rather long and time consuming so I wont try to detail it here. Just Google "metal checkering on pistols" and you will see tons of videos on how to do.

I consider metal checkering much easier to do than wood checkering for one main reason; I never broke off a point on one of my diamonds. (I should say "pyramids". Metal checkering usually involves lines that run 90 degrees to each other, leaving nice little four sided pyramids.

Anyhoo I don't think metal checkering was all that difficult. Wood checkering scares me.
 
That 1911 is beautiful! I love 1911s, im not much for anything plastic, even if they do function great. Actually, has anyone tried checkering polymer material like on a glock? Any way, thanks for the input on metal, i have a beat up rossi 92 that i walk with, and i carry it one handed by the receiver alot. I was pondering how checkering on the bottom of the reciever would feel/look. I would possibly wrap a design partially up the sides as well if i could make a nice looking design. Not sure if the metal is thick though. Any thoughts?
 
Hey guys. I finally got time to start the other side of my mauser grip. I have a few new ideas to share that are working well for my checkering projects. I started doing all my layout with a silver welders pencil, and its way easier to see than anything else ive tried, and wipes off easy, but not too easy. Also i switched blades in my exacto knife to a stubby rounded blade. I also finally built a cradle, nothin fancy, but i came to the conclusion its a necessity. Another thing ive read a few places now; if your right handed, work from right to left and vice versa for lefties. Ive noticed its Much easier to keep the lines from gradually arching off course. Last of all, i bought 6 boxes of tylenol pm and some melatonin for my wife and kids! Now my work quality and production rates are way up! Just kiddin... ill keep you posted when i finish
 

Attachments

  • 3520703F-F685-40C6-A435-CD3309A4E9FC.jpeg
    3520703F-F685-40C6-A435-CD3309A4E9FC.jpeg
    68.2 KB · Views: 42
  • 3358F428-E138-4B7B-911D-6177A0E997A2.jpeg
    3358F428-E138-4B7B-911D-6177A0E997A2.jpeg
    65.7 KB · Views: 43
  • F647E904-8485-4ECF-9035-BAFB5ACEB76E.jpeg
    F647E904-8485-4ECF-9035-BAFB5ACEB76E.jpeg
    92.3 KB · Views: 41
Last edited:
I recently started checkering my old swedish mauser 96. This was sporterized a long time ago, so no collector value, but a lot of sentimental value as it was my first rifle at age 12. .....
My first reaction at reading the title, was "oh no". That's some first rate work! Excellently done!:thumbup:
 
Just about got her done. Just gotta touch up the edges and deepen a few spots, but thats a winter project, im outta time again. Thanks for all your input and compliments guys! Heres the final (almost) product. For the record she shoots 5 shots into an inch and a half consistently with my handloads. A sweet and now extra classy rifle!
 

Attachments

  • 78474CD7-8F1D-4171-B47C-C840B1EBA836.jpeg
    78474CD7-8F1D-4171-B47C-C840B1EBA836.jpeg
    82.9 KB · Views: 31
  • 81C06D7B-DB1F-4C25-A0A2-705E513F7AA7.jpeg
    81C06D7B-DB1F-4C25-A0A2-705E513F7AA7.jpeg
    75.4 KB · Views: 32
  • 4B800B09-18E5-421D-B9E0-115C61FFBC38.jpeg
    4B800B09-18E5-421D-B9E0-115C61FFBC38.jpeg
    83.7 KB · Views: 32
As others have said, that looks like a checkering job I'd be proud of...

I've wanted to learn how to checker for years, even saved a couple broken stocks to practice on... Your post may have given me the shove I needed to finally get started. Any suggestions on how to get started and the basic tools I'd need?
 
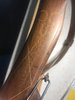
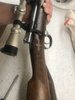
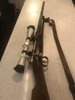
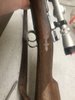
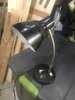
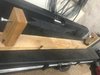
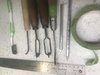
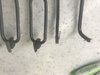
Oh man, where to start... i rounded my collection up at gun shows, and honestly i wish i would have started with all new cutters. At the time i didnt know any better and i fought the old dull used cutters for a few months before i spent the 6 bucks for new ones. Huge difference! Those kits i see on amazon/midway/brownells appear to have everything you need as far as cutters go. I use a 60 degree single cutter, 90degree single cutter, a 90 degree “s-1” cutter,(this cuts on the pull stroke and is very short for working around curves and edges). Then youll need a spacer, or a double line cutter of desired size to lightly make all the initial cuts. After the faint initial lines are all very carefully scribed, then go to your 60 degree cutter, and after youve gone over everything with that, switch to the 90. If you get a crooked line, and you dont own a “jointer” like me, ill place masking tape or a steel ruler as a guide and use a knife to cut a new guide groove, then use the 60 cutter on it as it follows lines better. Other than that youll need a knife,(whater kind your good with, old timer, exacto, bowie), a pencil,( the silver welders pencil works great), a tooth brush for the sawdust, a cradle of some sort, and you NEED a lamp. Lamp position and shadows are your friend. Turn all the other lights off. My cradle is crappy but it took me 10 minutes and cost around 3$. So all in all you can get everything i use for around $100. Don’t forget to reseal the wood when finished, i use tru-oil. I think most people use an opti-visor also, but i dont cause im cheap! Im still learning also, and theres not much info out there on this dying art, so please share your work and tell us what works for you!
 

Attachments

  • 40B1EE20-9455-459D-9A62-44607EAA7B3F.jpeg
    40B1EE20-9455-459D-9A62-44607EAA7B3F.jpeg
    70.9 KB · Views: 13
  • 64ABF9BC-3922-4C9D-B5C7-00594A07B68D.jpeg
    64ABF9BC-3922-4C9D-B5C7-00594A07B68D.jpeg
    98 KB · Views: 13
  • A4B92D08-7B6A-4BA3-8C1D-591A2443C7ED.jpeg
    A4B92D08-7B6A-4BA3-8C1D-591A2443C7ED.jpeg
    87.8 KB · Views: 12
  • F6633E7E-5D44-4845-87FC-A23CD5C1C8E3.jpeg
    F6633E7E-5D44-4845-87FC-A23CD5C1C8E3.jpeg
    59.3 KB · Views: 12
Last edited:
Status
Not open for further replies.
Back
Top