Alaskan Ironworker
Member
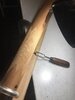
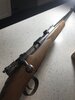
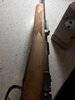
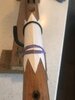
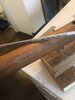
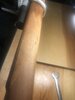
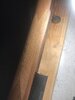
I recently picked up a Ludwig Loewe Chilean 1895 mauser in 7x57, Ive always wanted a 7x57 and I have a fondness for nicely machined small ring mausers. This one was long ago sporterized and had some pitting on the outside of the barrel, but the bore is good and the action is in good shape other than blueing wear. Payed $185. Anyway, I wanted a project. I sanded the crap out of the barrel and stock and cold blued the barrel with satisfactory results for a classy truck/boat gun. Now, it needs some checkering. I hadnt yet attempted a wrap-around pattern on anything for reasons concerning skill level, but I've taken about 10 hours or so taking my sweet time working on this and Im pleased so far. I just finished all the layout lines, (the tedious part) now I need to go over everything once with a 60 degree cutter, then a 90 degree cutter to bring everything to a point, then tidy up the ends and border with a S-1 short 90 degree cutter. I probably have about 150 hours of checkering experience on the handfull of projects I’ve done, and I'm finally really getting in the groove, and Ive doubled the speed and quality on this project.The cradle is key, and really, really take your time on the layout. Once the lines are all lightly scribed with your spacer or double cutter, you’re home free, smooth sailing, the single 60 cutter follows lines very easily.If a layout line starts veering off course, correct it quickly. I use masking tape to correct a listing cut, because its easier to see than pencil or anything else I’ve tried. Lay the tape carefully where you want the new line and cut along the edge lightly with whatever knife you’re most comfortable with. I’ve taken to using a filet knife, because you can kinda roll the cut o to the wood slowly. It only takes a light scratch for the 60 degree single cutter to follow fairly easily. If your line is getting really far off, you may have to space your correction over two or three lines, until you get back on track to using your double line cutter/spacer. If you’re right handed, work right to left; vice versa for lefties. Trust me, it keeps your lines straighter. Also, once you’ve chosen a spacer or double line cutter for the job, you are committed to that individual cutter. Do Not switch double cutters mid project, even if they are labled the same lines per inch from the same factory. They are all a tiny bit different and will turn your project into a headache. You should also only use single cutters when re finishing checkering on other guns for the same reason. Any way, heres a couple pics, will post more when it’s finished. I would love to see anyone elses checkering projects, I havent yet met or conversed with anyone else whos really into checkering, and Im lonely lol.
 mines to shaky just look at my shooting to see that in my videos