I know that a few of y’all have been waiting for an update on this stock so, here’s the first part.
Carbine85 contacted me and took me up on the offer to make the repairs to the stock.
It arrived last Monday and I was able to give it a good inspection today.
The stock is in very good shape other the crack. And yes, I did say crack because it is one crack.
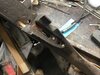
As you can see in the photos, the crack runs from the left rear side of the action going to the rear. One side of the crack runs along the left side of the stock and the other side runs up the middle into the top of the wrist.
View attachment 897299 View attachment 897297
View attachment 897300
View attachment 897298
The hardest part of the repair will be hiding the crack the shows at the top of the wrist. It appears that is where the crack started. I may be able to get it to close after drilling into it.
Here’s the plan for the repairs. Drills hole at rear of the action where the crack starts, down along the crack on the left side.
Next drill into the back of the tang area into the crack.
Next will be to drill down between the trigger slot and the rear action screw hole.
I’ll post some more pics once I have the hole drilled.


 Courage is knowing that if you screw up, you still may be able to fix it.