Inletting a gunstock Blank?

Status
Not open for further replies.

Cob

Member
Joined
Jan 6, 2011
Messages
445
Location
North FL Woods
Any suggestions on where you would start with inletting a rifle stock blank?:confused:

There appears to be three areas that need attention:
Barrel channel (length of top of the blank)
Receiver (top of blank)
magazine & trigger (bottom of blank)

any info appreciated
 
Mr. Cob

Guru1911 here to help: I usually hang out in the gunsmithing section of this forum answering questions, but maybe i can assist you:

1. Contact the tech-boys @ brownell's for their advice.
2. Google search--"inletting rifle stock blanks"

with almost 50 years of general life experiences with big-boy toys, i have never had to deal with a question of this nature.

Keep me posted with what turns up---contact me via private message board.
 
One good method is to start by drilling the action screw holes and inlet the bottom metal first. Then run stockmaker's screws through the holes and screw down the action onto the wood. The receiver should be coated with dykem or a similar marking compound, leaving marks on the wood when you remove the action. Cut away the marked areas and repeat. And repeat, and repeat, and repeat . . .
 
I have done a couple of semi inlet stocks and prefer to bed the receiver first before the barrel is fit to the receiver. After inletting the receiver I fit the bottom metal and lastly the barrel after it's fit to the receiver.
 
Of the few rifle stocks I have made from scratch, one I did entirely by hand using the method VernHumphrey describes. They other I used a router and a homemade jig do do the bulk of the inletting and it was much easier.

I would still advise doing all by hand for the first time so you get a better handle on it for the second go round.
 
After building several, I'd never do another unless the in-letting is done on a mill....use an old stock as a pattern. CNC mill would be even better.
 
After building several, I'd never do another unless the in-letting is done on a mill....use an old stock as a pattern. CNC mill would be even better.

Ditto this.

Unless you have a lot of time on your hands then automated or semi automated stockmaking is the way to go.
 
Thanks membership

Gentlemen: Thanks for your input to assist this fellow. I was tapped out quickly on this subject. I know he will appreciate the help from those who make rifle stocks.
 
Thanks for all of the input... I used a jointer to square the walnut, then used a planer to get it to the right thickness, then cut the outline of the stock blank. I scribed the middle line all the way around it around with a carpenter's marking gauge.
I found that if I ran broad sweeping strokes with a sharp pencil held sideways, across a piece of paper on the bottom of the original stock, I got a perfect image of the bottom of the action. with sharp lines from the original military stock to use as a pattern. This is being transferred to the bottom of the stock blank. and will be a simple guide for drilling holes for the inletting action screws/ bolts.
 

Attachments

  • Progress on 100.00 hunting rifle.jpg
    Progress on 100.00 hunting rifle.jpg
    45.3 KB · Views: 75
BTW, I found a stack of Black walnut wood that had airdried for 7.5 years at a friend's house, and found one cutting from it that had beautiful grain.... there was enough in the one plank to build about 3 rifle stocks, but one part of it was amazing. I twas destined to become a piece of furniture, but i talked him out of it...It really does not show up in the picture that well, but it just looked like it wanted to be a rifle stock... I purchased the 12 inch wide, 3 inch thick, 4 foot long quarter sawn plank for $20.00, using it for a Mosin Nagant 91/30 that i plan on using for hunting in the future.... it will be my under $100.00 huntign rifle (not including time).. I plan on keeping all original parts, will not Bubba'ize them.
 
Thanks again guys for all of the information. That's too bad that'll be Les Brooks last gunstock... His work is amazing, and with the "portable workshop"... He makes it look easy. I saved his link, for future reference.
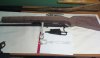
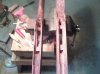
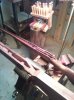
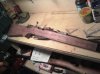
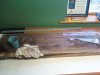
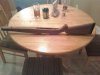
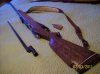
-I started the inletting last night, using a drill press to drill the action screws, then used a router table and a half-round bit for the barrel channel, then used forstner's bit's(1/4"& 3/8") to remove excess wood around magazine & trigger guard, which protrude all the way through the blank, and are helping to inlet the location of the action . Enough wood was left in place so that hand work will finish up with tight fit.(files & rasps)-

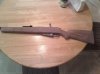
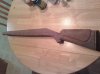
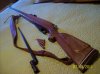
I'm forgoing the cheek piece for simplicity's sake, (Sorry, Mr. Weatherby), and will have a straight comb.

As i started this thing 2 things have happened. I seem to lose track of time when "in progress"... A couple hours would pass by before i realized it..But my wife seems to keep track of time for me, better than timeclock at work.
 
Last edited:
Pics of progress are attached... I'm using combination of hand tools & power tools, taking my time, but inletting is about 70% complete. It's as difficult as i thought it would be.
 

Attachments

  • 0119011300.jpg
    0119011300.jpg
    157.5 KB · Views: 54
  • 0119011301.jpg
    0119011301.jpg
    151.6 KB · Views: 48
Mosin Nagant, Custom Stock

Walnut blank inletting is complete, action fits, and barrel is free-floated. outside forming of the stock will be next. So far i have $12.00 invested in the piece of walnut, + about 30 hours.
 

Attachments

  • 0131011333.jpg
    0131011333.jpg
    165.7 KB · Views: 51
Last edited:
More Progress

I have sort of used a THR as an online journal for progress of this project. Many thanks for all of the information you guys provided. This is my first stock, and am pleased at how it is turning out. It's been cold, so have something to do in the evenings to keep busy. just have some sanding left to do, a little rounding here and there, and install pad and grip, & finishing.:)

This was not bad for a high-power rifle for less than $100.00
 

Attachments

  • Phone Misc. Pics 001.jpg
    Phone Misc. Pics 001.jpg
    128.9 KB · Views: 61
Last edited:
Thanks for posting this. I recently milled some black walnut stock blanks from a tree a took down, and plan to make a stock for my 10/22 and my Mini 14. I'll have to use this as a reference. Looks really good.
 
A pic of the piece of walnut i started from is attached.. If you take your time, and use some of the methods posted in the thread ABOVE, you will be satisfied with the results. - I used a drill press to drill out the holes that went all the way through the stock, then used files and rasps to straighten everything out. a Dremel tool with various sanding discs was used for finer work, along with a 1/2 dozen various chisels, and sandpaper.

I have a Winchester Model 70 that has a comfortable stock, and a Traditions muzzleloader with a stock that fits me well. I traced the two stocks on the white back of christmas wrapping paper (biggest large paper sheet i could find laying around the house), also traced the original military stock, then combined the three patterns together, to make one stock profile pattern that i knew was dimensionally correct.

I then transferred the pattern to piece of scrap plexiglass (obtained for free from a local glass distributor), and cut it on a bandsaw. I used the plexiglass to find the best grain/fit within blank, before sawing it out.
 

Attachments

  • 0109011428a.jpg
    0109011428a.jpg
    37.6 KB · Views: 37
COB - I've done this on and off (making stocks) as a hobby for 35 years. It's a pain and you are doing a great job. One thing I've found helpful for final shaping is a set of stock blueprints that I think I got from Brownells. They just help for figuring out final dimensions, etc. Very nice job - keep us updated on your progress, please.
 
More progress

Recoil pad has been added, custom walnut grip cap turned on a lathe, (actually not really a lathe... used my drill press... I have a small grinder wheel attachment that is made for a power drill, and i took the grinder wheel out, and replaced the 2" round grinder wheel with a small disk of walnut. i then used a file to smooth it out round, then used chisel set to carve some decorative rings in the bottom) ...& white lined both... still final forming & some sanding and left to do, then finishing. - Liberty 1776, i did not realize stock blueprints existed... I saw a couple of sets on Brownell's. I'm too far along at this point to order them.
 

Attachments

  • 0217012117.jpg
    0217012117.jpg
    107.1 KB · Views: 30
  • 0217012116.jpg
    0217012116.jpg
    124.1 KB · Views: 30
Last edited:
Here are pics of completed stock project, with semi gloss finish. custom pistol grip cap, cheek piece added as an afterthought. will glass bed the action next for supert tight fit.
 

Attachments

  • MN 91-30 020.jpg
    MN 91-30 020.jpg
    274.7 KB · Views: 40
  • MN 91-30 009.jpg
    MN 91-30 009.jpg
    264.7 KB · Views: 24
  • MN 91-30 022.jpg
    MN 91-30 022.jpg
    269.5 KB · Views: 24
Status
Not open for further replies.
Back
Top