
coloradokevin
Member
- Joined
- Mar 22, 2008
- Messages
- 3,285
Woohoo! I just finished an 80% lower using the 80% Arms Easy Jig Gen 2. It was a fun and exciting project that I'd recommend to a friend, and like any 80% lower concept, it just oozes freedom and promotes the 2nd Amendment.
A quick background on me, since we all come from different experience levels when it comes to doing projects:
1) I've built a couple of AR-15's from factory bought parts.
2) I'm somewhat mechanically inclined in the sense that I work on my own cars, projects around the house, have some woodworking experience, and reload ammo... I've touched a few tools before.
3) I have absolutely zero machining experience, and no real metal-working experience either. This project was the first time I'd ever used an end mill bit.
The project is definitely something I'd recommend to anyone who is looking to have a very unique AR-15 that is all their own!
Anyway, that's the synopsis, which I included since the rest will be a longer post. For a more detailed explanation, please see below:
Here's the story:
A while back I looked to this forum for advice on completing 80% AR-15 lowers. In the time since I first asked that question I've noticed that the entire 80% industry has matured a bit, and I just had the opportunity to build an AR-15 lower using the "80% Arms Easy Jig Gen 2". Since there doesn't seem to be a lot of this information on this subject readily accessible online, I figured I'd share a review of the process and equipment that I used.
For any of you who aren't familiar with 80% lowers, they kind of represent a relatively new concept in AR-15 building (a concept built around the long held concept that building a gun at home is legal). As I'm certain most of you already know, on and AR-15 the stripped lower receiver is the part of the rifle that is legally considered a gun... it's the serialized part that goes on the 4473 form; the part requiring the background check. The remaining components of these guns are essentially just over-the-counter parts, and you can purchase these parts easily online, at stores, etc.
80% lowers came into existence a few years ago, ostensibly as an affront to strict gun control laws. An 80% lower is basically a partially finished lower that is not yet considered a firearm by ATF standards (because it can't be readily converted to that purpose). In essence, these lowers don't have any of the fire control areas milled out, which obviously means that they can't be bolted together with other parts to work as a gun. The idea behind these lowers is that a gun enthusiast can machine/mill these lowers on their own equipment, and build a gun out of something that is not yet a gun.
Here's how an 80% lower looks when you first get it (a lot of material needs to be removed for the fire control group):

I've been intrigued by the idea of an 80% build ever since I heard of the idea, which was around the time that the first commercial jigs for home builders came into existence. But, I'm not a machinist, I don't have access to a $500,000 CNC machine, and I have a fairly basic home shop (I don't own a drill press, a mill, or anything of that sort). The first jigs seemed to -- at a minimum -- require someone to have access to a drill press. These jigs essentially required the user to drill a TON of holes in the lower as a means of removing material, and the end result often turned out looking pretty darn rough, at least based on the few examples I'd seen in person.
Anyway, a couple of years ago I saw a product offered by 80% Arms called the "Easy Jig". This jig was designed to work with a handheld router with an end mill chucked in it. The idea with this jig was that you could actually mill the lower at home, using less equipment and producing a better result. I ended up getting lazy and never purchasing that kit, and a couple of months ago the folks at 80% Arms released a new "Easy Jig Gen 2". This jig was supposed to be even easier to use, and was designed to allow the user to mill AR-15 lowers, AR 9mm lowers, and AR-10 lowers... I immediately bought one when I saw it on sale during the initial public release!
Here's the process:
The jig comes with detailed instructions, which were quite helpful for someone who hadn't ever milled anything, ever. I took the time to read through the instructions a couple of times, and moved slowly through this build. The company says that lowers can be produced in 30 minutes or so by an experienced builder, but I think I spent about three hours on mine. The first step involved securing the lower in the jig, and drilling a pilot hole all the way from the top of the lower through the area that would eventually be milled into the trigger slot at the bottom.
This part made me VERY glad I'd gone with a router-based jig, because drilling a 1.5" deep hole through 7075 aluminum was probably the single most difficult task on this build. Fortunately, this build only requires one such hole!


As you might note from the attached pictures, I used a modest 3/8" chuck hand drill to drill this hole. The jig comes with a guide that you bolt onto the top to serve as a guide while you drill the pilot hole, and I found that this guide kept the drill straight enough to drill a hole exactly where it needed to go. The jig also has a vacuum hose adapter built into it, so I hooked up my small shop vac to pick up chips. This feature didn't seem real important at first (when I was drilling the pilot hole), but I decided it was pretty essential once I started running an end mill bit on a high-speed router!
After drilling the pilot hole, 95% of the remaining process simply involved milling the lower with a router. The jig is well designed in the sense that the sides of the jig are positioned to properly guide the router through the milling, while avoiding any risk of being cut by the end mill bit itself. As such, the thing really shouldn't wear out from any normal type of use... which is good since I'll probably do another lower someday.
The router itself ends up being setup with a base plate that comes with the jig. The plate from the kit is fairly universal, and it fit on my 30 year old Craftsman router just fine (once I figured out a compatible screw pitch to screw it on with).
The milling process itself was a bit surprising to me. I expected (especially after drilling the pilot hole) that it would be quite a process to mill the material out of the lower. In all honesty, the router moved through the 7075 aluminum with ease. I found that the trick here was to take very small (shallow) bites of the metal on each pass, and then adjust the router after each pass.
The jig itself has three depth gauges milled into it, to aid in setting up the router. The idea here is that you simply hold the router up to the jig, and adjust the depth in each corresponding slot based on some hash marks that are in each slot. This picture isn't the greatest, but it shows those slots at the top of the jig:

In practice I found that the only real need I had for these slots was the indicate when I'd reached the bottom of the hole. The slots proved both essential and precise for this purpose. As far as adjusting the depth of the router was concerned, I found that simply lowering the cut by around 1/32nd of an inch on each pass worked out pretty well.
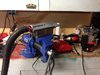
There wasn't any real good way to capture the milling (routing) process itself, since I was working alone, but this photo gives you an idea of how everything interfaces. You use the original pilot hole as a starting place for the end mill, and just make a circular pattern through the jig. This part of the process is surprisingly easy, but takes the most time.
It was during this part of the process that I decided that the Easy Jig's vacuum port was rather essential. I forgot (briefly) to turn the vacuum on after stopping things between passes, and aluminum chips were flying everywhere. But, the vacuum really helped to tame some of that mess.
Even with that said, this is a messy process. I had aluminum chips all over the place by the time I was done, and the vacuum I used probably picked up about 70% or so of the chips produced.
The other rub in this part of the process is the cutting fluid you need to use while milling/drilling aluminum. I used simple old WD-40 for this purpose, and I found that the vacuum picked up a fair amount of it as I milled the lower As such, my vacuum hose is pretty oily at the moment, and I'll need to figure out how to clean that up (PRO TIP: don't involve your wife's household vacuum in this process, ever. I'm damn glad I didn't).

As you mill your lower you'll find that the three different depth-gauge slots in the jig are designed to correspond with the three phases of the project:
1) The first slot gets you to the rear shelf height. At that point you insert a pin into the jig to prevent the router from going deeper into the area where the shelf needs to be. This was a simple and straightforward setup.
2) The second slot gets you to the bottom of the lower, in the fire control group.
3) The third slot allows you to mill out your trigger slot to the proper dimensions.
As long as the user remembers to follow the instructions at each phase of the process, this is a pretty easy and error-proof system to utilize. I definitely moved slowly through the trigger slot area, just hoping to avoid any chip-out issues that might occur (I had no issues here, and I'm not sure if anyone typically does with aluminum - again this was my first time milling aluminum).
After this point you're basically done with the milling process, and you are three holes away from having a completely functional AR-15 lower receiver. The jig itself is designed to align you for the drilling of these three holes (the safety, trigger pin hole, and hammer pin hole), as shown here:

This part of the process was perhaps the most worrisome to me. The alignment of these holes is pretty critical to a healthy/happy fire control group, and I know that using a hand drill isn't the most precise tool for the job.
NOTE: 80% Arms began offering a bolt-on guide for this step since the initial release of the jig. It essentially works like the guide that keeps your pilot hole straight in the first step. I think that addition to the jig is probably a good investment for anyone who is looking to use this jig to complete a lower!
Anyway, I took my time with these holes, and they came out straight. I drilled through opposing sides of the jig rather than pushing all the way through with each hole (so I actually drilled 6 holes instead of 3). I think I'd have been a lot more confident if I had the additional guide I mentioned above, but all is well that ends well, and the lower functioned when it was finished!
At this point the lower was done, and I simply needed to clean out the aluminum chips. To facilitate this process I took the lower up to the kitchen sink, and simply washed the thing. That took care of 98% of the chips.

I did find that there was one small area of concern for me at the end, and that involved the safety detent spring hole. This tiny hole already exists in 80% lowers, and you basically drill through the same channel as this hole when you drill out the safety hole on the right side of the receiver. As such, there were some metal chips in this area that seemed to interfere with the function of the safety detent initially. This was remedied by a very light hand reaming using a drill bit (literally just holding the drill bit and poking it into the hole to clear the chips).
Another issue surfaced when I installed one of my Geissele National Match triggers in the lower at a later time. The trigger simply didn't want to fire in this lower. Initially I thought this was an issue with the milling of the lower, but I later watched a video about this issue that was put out by Bill Geissele himself. Mr. Geissele explained that this issue comes up on about 1 in 10 lowers with that trigger (he was talking of factory lowers), and apparently that problem has more to do with the tolerances of where the safety detent hole was drilled (which wasn't a portion of the milling I had completed). The fix for this issue is apparently a simple issue of taking a Dremel to the channel of the safety (I haven't tried this yet). Regardless, the lower functions flawlessly with a military trigger.

In the time since I built this lower I've had it installed on two different rifles. One rifle is a cheap-o plinker I built as a camp gun, and the other is a precision rifle. I've had no problems with the lower on either rifle thus far. In fact, we just put the cheap rifle through its paces with a Slide Fire stock the other day, and fired a couple hundred very rapid fire rounds without a hitch.
Bottom Line?
The 80% Arms Easy Jig Gen 2 made it practical and relatively easy for a guy with a limited shop and no metal working experience to finish a fully functional lower that is virtually indistinguishable from a factory lower (except for the current lack of anodizing). When you factor in the price of the jig and end mill, this certainly isn't the cheapest means of acquiring a finished lower, but it was definitely one of the most satisfying. Overall I'd say that the quality of the finished product I produced on my very first attempt exceeded my expectations. In fact, when I took the lower to my local engraver (a guy who only engraves guns and does a lot of high-end stuff), he was amazed to see how well the lower turned out. Like me, he has seen a lot of hack-job finishes on 80% lowers, most likely from the use of the older kits. The inside of my first lower is more or less mirror-smooth, and I imagine that it would appear as clean as a factory lower if it was anodized or Cerakoted.
Anyway, I know this was a VERY long post, and if you made it to this point you should be congratulated! Nevertheless, I wanted to share this information with everyone because I know I was having trouble finding it when I was first considering this build. And, while I haven't used any of the (many) other available jigs, I can say that this jig is definitely workable for someone with even a bit of experience working with their hands!
A quick background on me, since we all come from different experience levels when it comes to doing projects:
1) I've built a couple of AR-15's from factory bought parts.
2) I'm somewhat mechanically inclined in the sense that I work on my own cars, projects around the house, have some woodworking experience, and reload ammo... I've touched a few tools before.
3) I have absolutely zero machining experience, and no real metal-working experience either. This project was the first time I'd ever used an end mill bit.
The project is definitely something I'd recommend to anyone who is looking to have a very unique AR-15 that is all their own!
Anyway, that's the synopsis, which I included since the rest will be a longer post. For a more detailed explanation, please see below:
Here's the story:
A while back I looked to this forum for advice on completing 80% AR-15 lowers. In the time since I first asked that question I've noticed that the entire 80% industry has matured a bit, and I just had the opportunity to build an AR-15 lower using the "80% Arms Easy Jig Gen 2". Since there doesn't seem to be a lot of this information on this subject readily accessible online, I figured I'd share a review of the process and equipment that I used.
For any of you who aren't familiar with 80% lowers, they kind of represent a relatively new concept in AR-15 building (a concept built around the long held concept that building a gun at home is legal). As I'm certain most of you already know, on and AR-15 the stripped lower receiver is the part of the rifle that is legally considered a gun... it's the serialized part that goes on the 4473 form; the part requiring the background check. The remaining components of these guns are essentially just over-the-counter parts, and you can purchase these parts easily online, at stores, etc.
80% lowers came into existence a few years ago, ostensibly as an affront to strict gun control laws. An 80% lower is basically a partially finished lower that is not yet considered a firearm by ATF standards (because it can't be readily converted to that purpose). In essence, these lowers don't have any of the fire control areas milled out, which obviously means that they can't be bolted together with other parts to work as a gun. The idea behind these lowers is that a gun enthusiast can machine/mill these lowers on their own equipment, and build a gun out of something that is not yet a gun.
Here's how an 80% lower looks when you first get it (a lot of material needs to be removed for the fire control group):
I've been intrigued by the idea of an 80% build ever since I heard of the idea, which was around the time that the first commercial jigs for home builders came into existence. But, I'm not a machinist, I don't have access to a $500,000 CNC machine, and I have a fairly basic home shop (I don't own a drill press, a mill, or anything of that sort). The first jigs seemed to -- at a minimum -- require someone to have access to a drill press. These jigs essentially required the user to drill a TON of holes in the lower as a means of removing material, and the end result often turned out looking pretty darn rough, at least based on the few examples I'd seen in person.
Anyway, a couple of years ago I saw a product offered by 80% Arms called the "Easy Jig". This jig was designed to work with a handheld router with an end mill chucked in it. The idea with this jig was that you could actually mill the lower at home, using less equipment and producing a better result. I ended up getting lazy and never purchasing that kit, and a couple of months ago the folks at 80% Arms released a new "Easy Jig Gen 2". This jig was supposed to be even easier to use, and was designed to allow the user to mill AR-15 lowers, AR 9mm lowers, and AR-10 lowers... I immediately bought one when I saw it on sale during the initial public release!
Here's the process:
The jig comes with detailed instructions, which were quite helpful for someone who hadn't ever milled anything, ever. I took the time to read through the instructions a couple of times, and moved slowly through this build. The company says that lowers can be produced in 30 minutes or so by an experienced builder, but I think I spent about three hours on mine. The first step involved securing the lower in the jig, and drilling a pilot hole all the way from the top of the lower through the area that would eventually be milled into the trigger slot at the bottom.
This part made me VERY glad I'd gone with a router-based jig, because drilling a 1.5" deep hole through 7075 aluminum was probably the single most difficult task on this build. Fortunately, this build only requires one such hole!
As you might note from the attached pictures, I used a modest 3/8" chuck hand drill to drill this hole. The jig comes with a guide that you bolt onto the top to serve as a guide while you drill the pilot hole, and I found that this guide kept the drill straight enough to drill a hole exactly where it needed to go. The jig also has a vacuum hose adapter built into it, so I hooked up my small shop vac to pick up chips. This feature didn't seem real important at first (when I was drilling the pilot hole), but I decided it was pretty essential once I started running an end mill bit on a high-speed router!
After drilling the pilot hole, 95% of the remaining process simply involved milling the lower with a router. The jig is well designed in the sense that the sides of the jig are positioned to properly guide the router through the milling, while avoiding any risk of being cut by the end mill bit itself. As such, the thing really shouldn't wear out from any normal type of use... which is good since I'll probably do another lower someday.
The router itself ends up being setup with a base plate that comes with the jig. The plate from the kit is fairly universal, and it fit on my 30 year old Craftsman router just fine (once I figured out a compatible screw pitch to screw it on with).
The milling process itself was a bit surprising to me. I expected (especially after drilling the pilot hole) that it would be quite a process to mill the material out of the lower. In all honesty, the router moved through the 7075 aluminum with ease. I found that the trick here was to take very small (shallow) bites of the metal on each pass, and then adjust the router after each pass.
The jig itself has three depth gauges milled into it, to aid in setting up the router. The idea here is that you simply hold the router up to the jig, and adjust the depth in each corresponding slot based on some hash marks that are in each slot. This picture isn't the greatest, but it shows those slots at the top of the jig:
In practice I found that the only real need I had for these slots was the indicate when I'd reached the bottom of the hole. The slots proved both essential and precise for this purpose. As far as adjusting the depth of the router was concerned, I found that simply lowering the cut by around 1/32nd of an inch on each pass worked out pretty well.
There wasn't any real good way to capture the milling (routing) process itself, since I was working alone, but this photo gives you an idea of how everything interfaces. You use the original pilot hole as a starting place for the end mill, and just make a circular pattern through the jig. This part of the process is surprisingly easy, but takes the most time.
It was during this part of the process that I decided that the Easy Jig's vacuum port was rather essential. I forgot (briefly) to turn the vacuum on after stopping things between passes, and aluminum chips were flying everywhere. But, the vacuum really helped to tame some of that mess.
Even with that said, this is a messy process. I had aluminum chips all over the place by the time I was done, and the vacuum I used probably picked up about 70% or so of the chips produced.
The other rub in this part of the process is the cutting fluid you need to use while milling/drilling aluminum. I used simple old WD-40 for this purpose, and I found that the vacuum picked up a fair amount of it as I milled the lower As such, my vacuum hose is pretty oily at the moment, and I'll need to figure out how to clean that up (PRO TIP: don't involve your wife's household vacuum in this process, ever. I'm damn glad I didn't).
As you mill your lower you'll find that the three different depth-gauge slots in the jig are designed to correspond with the three phases of the project:
1) The first slot gets you to the rear shelf height. At that point you insert a pin into the jig to prevent the router from going deeper into the area where the shelf needs to be. This was a simple and straightforward setup.
2) The second slot gets you to the bottom of the lower, in the fire control group.
3) The third slot allows you to mill out your trigger slot to the proper dimensions.
As long as the user remembers to follow the instructions at each phase of the process, this is a pretty easy and error-proof system to utilize. I definitely moved slowly through the trigger slot area, just hoping to avoid any chip-out issues that might occur (I had no issues here, and I'm not sure if anyone typically does with aluminum - again this was my first time milling aluminum).
After this point you're basically done with the milling process, and you are three holes away from having a completely functional AR-15 lower receiver. The jig itself is designed to align you for the drilling of these three holes (the safety, trigger pin hole, and hammer pin hole), as shown here:
This part of the process was perhaps the most worrisome to me. The alignment of these holes is pretty critical to a healthy/happy fire control group, and I know that using a hand drill isn't the most precise tool for the job.
NOTE: 80% Arms began offering a bolt-on guide for this step since the initial release of the jig. It essentially works like the guide that keeps your pilot hole straight in the first step. I think that addition to the jig is probably a good investment for anyone who is looking to use this jig to complete a lower!
Anyway, I took my time with these holes, and they came out straight. I drilled through opposing sides of the jig rather than pushing all the way through with each hole (so I actually drilled 6 holes instead of 3). I think I'd have been a lot more confident if I had the additional guide I mentioned above, but all is well that ends well, and the lower functioned when it was finished!
At this point the lower was done, and I simply needed to clean out the aluminum chips. To facilitate this process I took the lower up to the kitchen sink, and simply washed the thing. That took care of 98% of the chips.
I did find that there was one small area of concern for me at the end, and that involved the safety detent spring hole. This tiny hole already exists in 80% lowers, and you basically drill through the same channel as this hole when you drill out the safety hole on the right side of the receiver. As such, there were some metal chips in this area that seemed to interfere with the function of the safety detent initially. This was remedied by a very light hand reaming using a drill bit (literally just holding the drill bit and poking it into the hole to clear the chips).
Another issue surfaced when I installed one of my Geissele National Match triggers in the lower at a later time. The trigger simply didn't want to fire in this lower. Initially I thought this was an issue with the milling of the lower, but I later watched a video about this issue that was put out by Bill Geissele himself. Mr. Geissele explained that this issue comes up on about 1 in 10 lowers with that trigger (he was talking of factory lowers), and apparently that problem has more to do with the tolerances of where the safety detent hole was drilled (which wasn't a portion of the milling I had completed). The fix for this issue is apparently a simple issue of taking a Dremel to the channel of the safety (I haven't tried this yet). Regardless, the lower functions flawlessly with a military trigger.
In the time since I built this lower I've had it installed on two different rifles. One rifle is a cheap-o plinker I built as a camp gun, and the other is a precision rifle. I've had no problems with the lower on either rifle thus far. In fact, we just put the cheap rifle through its paces with a Slide Fire stock the other day, and fired a couple hundred very rapid fire rounds without a hitch.
Bottom Line?
The 80% Arms Easy Jig Gen 2 made it practical and relatively easy for a guy with a limited shop and no metal working experience to finish a fully functional lower that is virtually indistinguishable from a factory lower (except for the current lack of anodizing). When you factor in the price of the jig and end mill, this certainly isn't the cheapest means of acquiring a finished lower, but it was definitely one of the most satisfying. Overall I'd say that the quality of the finished product I produced on my very first attempt exceeded my expectations. In fact, when I took the lower to my local engraver (a guy who only engraves guns and does a lot of high-end stuff), he was amazed to see how well the lower turned out. Like me, he has seen a lot of hack-job finishes on 80% lowers, most likely from the use of the older kits. The inside of my first lower is more or less mirror-smooth, and I imagine that it would appear as clean as a factory lower if it was anodized or Cerakoted.
Anyway, I know this was a VERY long post, and if you made it to this point you should be congratulated! Nevertheless, I wanted to share this information with everyone because I know I was having trouble finding it when I was first considering this build. And, while I haven't used any of the (many) other available jigs, I can say that this jig is definitely workable for someone with even a bit of experience working with their hands!
Attachments
Last edited:
")