MattShlock
Member
- Joined
- Jan 25, 2013
- Messages
- 787
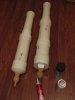
Mid 18th C. full-size swivel gun and coehorn mortar...
")
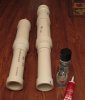
Here is what i have so far for mine. I figure ill start with about the same load as yours.My carbide cannon used a heaping half-teaspoon of calcium carbide, which the kids and I figured gives the optimal blast.
Hearing protection required!
It wont look near as cool as yours but ill still have fun with it.Keep us posted on how it turns out!
Im just wanting to make noise.Bower64
I like the lines of that carbide shooter ya got there. Its got me to thinkin about making a removable mug breech loading propane powered tater launching swivel gun.
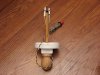
I built 2 one cost more and is more involved with the ignighter and one is just the tubes a cup in the breech and a hole above the cup. I have a little katchup bottle that ill use to fill the cup and then ill just use a small funnel to get the bangsite into the cup. Ill then just hold a flame near the hole to ignite it. This one will be messy and hard to clean im sure.You can use whatever you wish based on how you want to design the cannon. Using a gas, whether propane or otherwise, simply means that you need to design the cannon such that you can easily and conveniently add the gas, in proper and adequate amounts, to the firing chamber. This is why many spud guns use hair spray...it's simple and easy enough to unscrew a cap, squirt hair spray in for a count of however many seconds, and put the cap back on.
So what you really need to ask yourself is "How easy will it be for me to build and operate something that uses LP?"
What I like about using calcium carbide is that it's very easy to measure out identical quantities or to change quantities and get known, consistent results. It's also incredibly easy for me to ready the cannon for repeated shooting the way I designed it. All I have to do is pour a measured amount through the vent in the breech of the cannon and wait about 8 seconds or so. That's it...no fumbling with unscrewing a cap and screwing it back in afterwards. Push the firing button for the Earth shattering KABOOM, then run my ram rod in and out of the barrel three or four times to freshen the air inside, and repeat. It's absolutely that easy.
Periodically I flush the dirty water out of the reservoir through a built in drain valve and add clean water through the vent to refill.
One of the advantages of using calcium carbide, or other gas systems, is that it's inherently safer than using something like gunpowder. With gunpowder, you can directly scale up the explosive result by continually increasing the amount of gunpowder...the only limit is literally the volume of the cannon itself. But this has serious issues:
1. You can quite easily increase the amount of gunpowder to the point where you can blow the PVC cannon apart. (Or even steel pipe cannon.)
2. Chamber pressures can radically vary based on the amount of gunpowder used and how it's packed.
3. You can't build the cannon out of light weight material like PVC when you're burining chemical powders.
Using gas, or in my case calcium carbide which generates acetylene gas, the system is inherently self-limiting in terms of the explosive result possible. Using only air (as opposed to supplimenting by adding Oxygen), there is an optimal mixture range which will produce an explosive result. Too little calcium carbide and you don't generate enough acetylene to get a bang...you end up with a dud. Too much calcium carbide and you generate so much acetylene gas that you end up displacing too much air in the cannon...and you get a dud.
The only way you can blow up such a cannon is to block the barrel. Then the damage is determined by the type of gas you use (hair spray, propane, acetylene, etc) and the air mixture involved.
In addition to the obvious appearance of my cannon, part of my design criteria was to make the cannon as easy to transport, maintain, and use as possible...to the point where my kids (the youngest at the time I built it being 10) would have no problem with the basic mechanics of operation. This meant no clumsy unscrewing of components and such for operation or cleaning.
If I were to build another one, or if I were to have to repair the ignition system on this one, the only change I would make in keeping with the "ease of operations" aspect would be to replace the hardwired ignition system cable with a jack/plug mounted system. This way I could unplug the pushbutton cable from the cannon for both ease of transportation AND to make it easier to replace a damaged/broken cable without having to spend a weekend cutting apart and rebuilding the breech end to replace the hardwired cable. The current hardwired design is one of the major reasons I built two ignitors into my cannon...reliability in case one failed, so I wouldn't have to spend a lot of time doing just this kind of repair.
Do you use bangsite? How much do you use?You know...many improvements to hobbies end up being non-stop, addictive hobbies...
Do you use bangsite? How much do you use?
I watched alot of youtube videos and most were just using really really small amounts. The big bang cannons use like a BB size amount just a pinch and they are pretty loud.
I started with like 12-14 grains (9mm case full) and i couldnt get it to do anything. When i heaped up the 9mm shell i got a little puff out of it but nothing like ive seen on youtube.
The last one i watched they said they used 2/3 teaspoon so i used about that much and wow! it was pretty loud to say the least.
I just want to use the optimal amount without wasting any.