AR15 Recce Build - P1 - Upper

Status
Not open for further replies.

Sylvan-Forge

Member
Joined
Feb 22, 2006
Messages
1,224
Location
Fort Myers, Florida
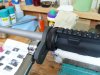
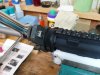
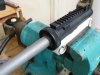
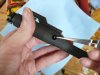
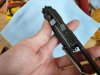
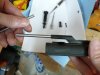
Figure I'd post this for anyone who likes to see a project from start to finish.
I hope to not have much lag between updates, though I'm still debating on what components for the lower and getting loot together.

I'll include pictures along the way, though I'll wait until the THR servers are all finished up. Here's a general outline for now.
Feel free to discuss, ask questions, throw tomatoes, etc. :D


Here's what I've got spec'd for the upper:

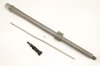
Barrel: Pac-Nor 16" medium contour, polygonal bore, 5.56 chamber, extended feed ramps.

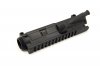
Receiver: CMT mil-spec with extended feed ramps.

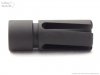
Muzzle device(s): Smith Enterprises G6-A2 Vortex.

Gas system: Mid-length, direct impengement, Vltor low-profile gas block.

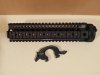
Handguard: LaRue 10".

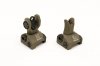
Iron sights: (BUIS) Troy battlesights.

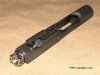
Bolt carrier group: LMT enhanced.

Charging handle: PRI M84 Gas Buster.


.
 
Here's the Noveske 16" barrel group including a MP tested bolt:
attachment.php


CMT flat-top upper receiver:
attachment.php


Smith Enterprises G6-A2 Vortex flash eliminator:
attachment.php


LaRue Tactical 10" handguard shown with Tactical Beverage Entry Tool:
attachment.php


Troy Industries (Noveske marked) Battle Sights:
attachment.php
 

Attachments

  • b161g556_1d.jpg
    b161g556_1d.jpg
    45.9 KB · Views: 901
  • urecs_1d.jpg
    urecs_1d.jpg
    46.9 KB · Views: 895
  • Smith Vortex g6a2.JPG
    Smith Vortex g6a2.JPG
    15.6 KB · Views: 875
  • L1020413-75.JPG
    L1020413-75.JPG
    59.3 KB · Views: 879
  • buisfrblk_2d by TROY ind.jpg
    buisfrblk_2d by TROY ind.jpg
    44.8 KB · Views: 872
Last edited:
Let me know how the polygonal rifled Noveske barrel shoots. I'm very interested. Usually I only see pistol barrels with the polygonal rifling.
 
The brown truck of happiness just showed up and brought me some tools, courtesy of Brownells:

attachment.php


On the left is the DPMS multi-tool.
At the top is a Starrett 565 pin punch set.

In the middle, left to right:
Sporting Conversions plastic pushtool (for take-down and pivot pins),
Sinclair cleaning link (keeps the upper in place for cleaning),
Brownells Colt 5.56/.223 field headspace gauge (for checking headspace after assembly),
Brownells 5.56 dummy rounds (for checking function after assembly),
Brownells Bolt Ejector tool (for ease of bolt assembly/disassembly).

At the bottom is the DPMS upper receiver block (for barrel installation and upper parts installation).
 

Attachments

  • tools1.JPG
    tools1.JPG
    113.2 KB · Views: 833
:p

Waiting on the real hardware to show up, so for now ..

S'more goodies to 'show off':
attachment.php

Top to bottom: Sinclair cleaning cradle, lug recess tool, rod guide and solvent port, action brush, carrier key brush, chamber brush, small rod stop and azoom snap caps.


I know the cleaning stuff is not exactly germane to upper building, but I believe it is important to clean all the components thoroughly before assembly and testing.
 

Attachments

  • L1020506-65.JPG
    L1020506-65.JPG
    103.8 KB · Views: 780
Goodies for the upper came in friday :)
Everything except for the LMT BCG :(

In order to install the Larue free-float handguard, the gas block that was pre-installed on the Noveske barrel needs to be removed to allow the handguard nut, barrel nut, PRI wrench, and spacer to get to the chamber end of the barrel.

attachment.php

Secured in the vise with rifle and pistol bench blocks and some Duck brand Easy Liner - for lining your silverware drawer. Happens to be good for opening stubborn jars too.


attachment.php

Drive out the pin.


attachment.php

Unscrew the locking screw.


attachment.php

A little bit of lube will help in reducing any scratching of the barrel while sliding off the gas block.


.
 

Attachments

  • L1020535-60.JPG
    L1020535-60.JPG
    68.8 KB · Views: 745
  • L1020537-60.JPG
    L1020537-60.JPG
    64 KB · Views: 739
  • L1020538-60.JPG
    L1020538-60.JPG
    63.4 KB · Views: 739
  • L1020539-60.JPG
    L1020539-60.JPG
    60.8 KB · Views: 732
Current thoughts regarding some of the stuff I got, that won't likely be used..


Takedown tool: I can push the both pins with my finger. Might be helpul for tight fitting receivers.

Bronze action and chamber brushes: Noveske only recommends a chamber mop and I hear tell that bronze against anodized aluminum may not be the best thing. For now, it's going to be cotton or wool mops for both. Time will tell.

Muzzle guide: Might be good in a pinch, but not really needed if already using a bore guide and cleaning from the chamber.


More to follow when the BCG comes home.


Good fun :D
 
Bronze action and chamber brushes: Noveske only recommends a chamber mop and I hear tell that bronze against anodized aluminum may not be the best thing. For now, it's going to be cotton or wool mops for both. Time will tell.

Technically nothing wrong with bronze in the chamber because the chamber is actually a steel insert that is pressed into the aluminum upper itself. Of course, depending on alloy, bronze can wear out an aluminum surface pretty quick so if you're careless, you can abrade off the anodizing from surrounding surfaces inside the upper.

I rarely need to scrub my AR chamber. Those star shaped felt chamber mops seem to be plenty good when you spin them around and use good solvent.
 
Aye, Cesiumsponge, I can see using the bronze chamber brush if it gets really filthy. I'll likely never use the bronze 'receiver' brush though.

Got the BCG in. It's not the enhanced, just the standard.. for anyone waiting on the enhanced BCGs, LMT is supposedly shipping them July 31.

Here's more build:

attachment.php

Shown in the order installed.
From left to right is the spacer, barrel nut, handguard nut, and keeper.


attachment.php

Apply some anti-sieze compound to the threads.


attachment.php

And suddenly it just disappears :eek: :D
Place the keeper against the upper receiver.


attachment.php

Slide the handguard nut so it rests on the barrel threads.


attachment.php

Hand tighten the barrel nut.
 

Attachments

  • L1020542-60-2.JPG
    L1020542-60-2.JPG
    62.6 KB · Views: 682
  • L1020563-60.JPG
    L1020563-60.JPG
    63.9 KB · Views: 677
  • L1020543-60.JPG
    L1020543-60.JPG
    49.7 KB · Views: 676
  • L1020544-60.JPG
    L1020544-60.JPG
    52.6 KB · Views: 679
  • L1020545-60.JPG
    L1020545-60.JPG
    64.7 KB · Views: 677
Last edited:
Set the spacer aside (fits into the Larue handguard, shown later),
and prepare to torque-set the barrel ...

attachment.php

Torque the barrel nut to 30 ft-lbs.


attachment.php

Loosen it up. Tighten and loosen two more times.
One more, this time to 35 ft-lbs.


attachment.php

Break out the "Eyeball Mark VII" and take a look ..
If your lucky, it will look to be aligned, if not, tighten until the nearest hole lines up, but don't loosen to get aligned, only tighten. If things just don't seem right, just start over .. loosen it up and tighten again to 35 ft-lbs.
I hear tell folks have gone up to 90 ft-lbs to get it aligned..

I wouldn't recommend going very high if using the plastic DPMS upper receiver block (claw) like I'm using, I probably ended up at around 50 ft-lbs and I could feel it start to bend. The clam-shell style block with insert would be best for high torque.


attachment.php

When it looks close, use a gas-tube or (brownells) gas-tube alignment gauge to check..
It looks straight.
But is it really?
Find out in the next episode .. :cool:


.
 

Attachments

  • L1020558-60.JPG
    L1020558-60.JPG
    60.9 KB · Views: 672
  • L1020559-60.JPG
    L1020559-60.JPG
    59.7 KB · Views: 667
  • L1020560-60.JPG
    L1020560-60.JPG
    58.6 KB · Views: 664
  • testalignment2-1-60.JPG
    testalignment2-1-60.JPG
    23.6 KB · Views: 664
Last edited:
Awesome post buddy!! My dept is sending me to Colt armorer's school for AR's later this month so I can't wait to get one done on my own!
 
Last edited:
Thanks, BsChoy! Awesome deal .. going to Colt, that'll be cool!

If your interested .. The books I read up for this build are:
"The AR-15 Complete Assembly Guide" by Walt Kuleck and Clint McKee - got this from brownells.

Also, Army/Air Force technical manual - got this from midway (Army TM 9-1005-319-23&P)
(Air Force TO 11 W3-5-5-42)

:) Have fun at Colt!


--------------------------------------------------------------------------


Build continued..

One way to test alignment is to place a straight piece of gas-tube or an alignment tool into the carrier key and then slide the carrier assembly into the receiver to see if it will pass through everything it needs to, without undue binding. For better feel, I wanted to remove the bolt from the carrier..

attachment.php

The firing pin retainer .. looks like a cotter pin, but it's straight .. no bent legs.


attachment.php

Slides right out.


attachment.php

Point the bolt to the sky and the firing pin drops out.


attachment.php

The cam pin in it's normal orientation.
(Warning- never fire without the cam pin in place! You will asplode!)


attachment.php

The cam pin rotated 90 degrees for removal.


.
 

Attachments

  • L1020564-60.JPG
    L1020564-60.JPG
    44.9 KB · Views: 658
  • L1020565-60.JPG
    L1020565-60.JPG
    45.5 KB · Views: 651
  • L1020566-60.JPG
    L1020566-60.JPG
    48.4 KB · Views: 645
  • L1020567-60.JPG
    L1020567-60.JPG
    42.3 KB · Views: 646
  • L1020568-60.JPG
    L1020568-60.JPG
    40.6 KB · Views: 647
Heh heh, I've done this with the exception of fitting the barrel.

Ladies and Gentlemen, THIS is why "building your own" is NOT cheaper than store bought! Loading your build with the EXACT top-shelf parts you choose will always cost more than what the big builders use :)
 
attachment.php

Pulls right out.
Note the hole in the cam pin .. this is for the firing pin.


attachment.php

Ready to pull out the bolt assembly.


attachment.php

Out it comes. Set the bolt assembly aside.


attachment.php

A few twists inside the carrier key with the brush.


attachment.php

Slide the brownells alignment tool in about 3/4" .. I tried both ends of both tools to find the best fit.


To be continued ..
 

Attachments

  • L1020569-60.JPG
    L1020569-60.JPG
    47 KB · Views: 635
  • L1020570-60.JPG
    L1020570-60.JPG
    45.2 KB · Views: 631
  • L1020571-60.JPG
    L1020571-60.JPG
    49.3 KB · Views: 636
  • L1020572-60.JPG
    L1020572-60.JPG
    29.6 KB · Views: 635
  • L1020575-60.JPG
    L1020575-60.JPG
    42.5 KB · Views: 634
Indeed, jason10mm .. not cheap 'tall.
Raman noodles anyone? :p

I'm glad to have done it (so far), what for the learning, nifty tools and all..

I just hope it shoots well ..
 
Status
Not open for further replies.
Back
Top