Brass crusher.

Status
Not open for further replies.

OrangeCat

Member
Joined
Mar 24, 2019
Messages
407
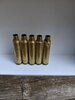
Tried seating bullets last night and this was the end result.

Obviously I set the die much lower than I thought. I tried setting it to where it touched the case mouth and then back up a quarter turn higher but everything I tried to fix it seemed to exacerbate the problem.

Any helpful tips anything I should be feeling for. Can I salvage anything from these or should I just kill the primers and chalk it up to learning experience.

The case furthest to the left looks okay and the one next to it is a little bit 'dimpled' just below the shoulder.

I'm using a Lee challenger breechlock and rcbs dies
 

Attachments

  • IMG_20190725_171435.jpg
    IMG_20190725_171435.jpg
    74.5 KB · Views: 159
Need to back your die off several turns if not more. Run your ram all the way up. Back off the seating stem then run the die down till you fell resistance, back off 1-2 turns if your not going to crimp. Lock the backing ring then proceed to set the seating stem.

Just deprime the primers and reuse them, go slowly and it want be a problem. Use a universal depriming die. Then use the primer fro non critical application, fouling. The only sure way to neutralize a primers is to fire it.

The first 2 may be salvageable the others may be a problem.
 
Back off way too much on your sizing, crimping (pistol brass), and seating dies starting out. Not enough is fixable. Too much isn't. It will be no different if you set up a different set of dies or a different press. When sizing the rifle brass make sure it will chamber after sizing.
 
How are you charging the powder? A powder-through charging die can be screwed in too far, and the powder measure will run out of travel before the brass is all the way in. This came up in another thread, at the exact time I needed it :(
 
You have 5 cases pictured. The two to the right I doubt will ever be fixed maybe the remainder can. Personally I would trash all five and chalk it up to the learning curve but your call on that note. You mention you are using RCBS dies so here is what the nice people at RCBS have to say and you will notice it parallels pretty much what has been suggested give or take a little.

1. Thread the seater die a few turns into the press. Put a case in the shell holder and lower the press handle, running the ram with the case to the top of the press stroke. Turn the die body down until it stops. The crimp shoulder in the die is now pressing against the top of the case mouth. Back the die out one turn, raising the crimp shoulder above the case mouth. Secure the die in position with the die lock ring.
2. Loosen the locknut, used to secure the seat plug, unscrew the bullet seater plug enough to keep the bullet from being seated too deeply.
3. With the handle in the up position, insert a properly primed and charged case into the shell holder.
4.Take a bullet and hold it over the case mouth with one hand while you lower the press handle with the other, easing the case and bullet up into the die. After raising the handle, note the seating depth of the loaded round. If the bullet needs to be seated deeper into the case, turn the seater plug down.
5. Run the loaded round back up into the die, raise the press handle and check the seating depth again. A few more adjustments may be needed for the proper bullet seating depth; then, you simply tighten the locknut to secure the bullet seater plug.

Now what we have here is an overview and like any overview things will need some final tweaking and even once tweaked practice will make better and better ammunition. When I began rolling my own ammunition there was no shortage of what I saw as sacrificial brass, part of the learning curve which fortunately is not that steep. Fully processed 223 Remington brass (5.56 NATO if you prefer) runs about $0.09 each in lots of 1,000 so tossing a few questionable pieces isn't that expensive. Just refine your setup with what people have shared with you and things will fall into place and go just fine.

Ron
 
How are you charging the powder? A powder-through charging die can be screwed in too far, and the powder measure will run out of travel before the brass is all the way in. This came up in another thread, at the exact time I needed it :(


A spoon, a scale, and a funnel.

The last two are Lee and the first is McDonald's (I think?)

I was using the directions that came with the press and it said 1/4 to 1/2 I didn't think of checking the die to see if there was any conflict there. The one on the right is as far as I can tell still good but the other four I don't think I want to mess with the second is a little 'dimpled' like I said you can't really see it but you can feel it. Like it was just starting to collapse, so I think I'll save number 1, Chuck the rest of them.

I haven't decided on whether or not I'm going to try and remove the primers and reuse them, or if I'm just going to find a way to set them off. (Put them in a length of black pipe and strike them with a nail?)
 
Trimming cases will minimize problems crimping. Backing the die off where the crimping takes place is standard practice. What can mess up your day is those cases that are not buckled as such-not scrunched. These cases have a ridge at the base of the shoulder that may be hard to see. The round may not chamber. Consider getting a powder measure and and a trickler. It will speed things up for you. Your dented case may be from too much lube on your case. Lube collecting in the die can make dents on and below the shoulder.
 
If you readjust your seating die like the above posters suggested your problem will go away. I have fixed cases like those by resizing them again. If its range brass I probably would just scrap them.

And don't fire those primers with a nail! I have removed lots of primers with a resizing die or universal depriming die with no problems. Just go slow and smooth. Safety glasses would be recommended.
 
A spoon, a scale, and a funnel.

The last two are Lee and the first is McDonald's (I think?)

I was using the directions that came with the press and it said 1/4 to 1/2 I didn't think of checking the die to see if there was any conflict there. The one on the right is as far as I can tell still good but the other four I don't think I want to mess with the second is a little 'dimpled' like I said you can't really see it but you can feel it. Like it was just starting to collapse, so I think I'll save number 1, Chuck the rest of them.

I haven't decided on whether or not I'm going to try and remove the primers and reuse them, or if I'm just going to find a way to set them off. (Put them in a length of black pipe and strike them with a nail?)
Do not strike the primer with a nail! If not chambered, the primer can fly out of the case. That seems pretty dangerous.
 
I'm thinking that primers can be killed by something like WD-40 from the inside. Maybe somebody here has done this thing. Might do well to Google killing primers. Making those primers go away with nails etc. will bring you a traumatic learning experience.
 
find a way to set them off
It seems simple enough, but, the primer will run up the nail (or punch), the flash will go around it, and you will lose a good-sized chunk of your finger. And that is all I am going to say about that... :oops:
 
I'm not describing it well but I'm meaning something like this but scaled to .223

https://www.thehighroad.org/index.php?threads/50-bmg-primer-popper-the-safe-way.852583/
Don't bother, no need. Just run the primed case through your sizing/decapping die. Don't slam it through, just slowly and you'll be fine (been reloading for over 35 years and have done this many times and reused most of the "pre seated" primers.). I know some reloading manuals say to not use this method, but mostly it's a CYA reason. "Killing" primers is often talked about but for me there has been no reason. Early on in my visiting reloading forums (2008) I read about killing primers and I experimented for myself. Nothing is quick, Very few methods are reliable, and some work over a period of time. Primers are not as delicate as some think...

I also say don't pop a primer with a nail! When in my early teens I did that. Primer cup traveled up the nail with enough force to split my fingernail. Pain hurts...
 
Ok I'll just decap the last four.

I played with the first. It Chambers sits in the magazine ejects when I throw the bolt. I don't see any defects and I'll put it in the calipers when I get home. But thus far I don't see a reason to not use it as is. I don't know how it managed to survive unmangled. Maybe it's tiny prayers reached the reloading gods.
 
In your shoes l would make up a few rounds without any bullet crimp at first. This will familiarize you with the seating process alone first. Once you get that ammo working then add the crimp step if you want. For consistent crimps you need to trim all the brass to the same length or some will still buckle the shoulders like shown in your first picture. Personally l do not crimp any rifle round as l get better accuracy without doing it. Note you always do have to crimp rifle ammo used in a tubular magazine feed to prevent bullet setback though.
When l started reloading l hade a relative show me how and l still made a number of mistakes. There is definately a learning curve to this hobby and you will get the hang of things soon. Heck l figured it out so anybody should be able to.;)The internet is a great help these days don'tcha think.
 
In your shoes l would make up a few rounds without any bullet crimp at first.

I actually don't really want any crimp with these .223 rounds I was aiming for just getting neck tension, but I won't be able to do anything till Monday so we'll try again. I'll pull some ugly cases out and try for some blanks and see if I can get a good setting.

The only other things I have are 6.5 x 55 and 30-06 I have plenty of 6.5 and don't really use the '06 so I don't know if they will be reloaded or even if they really need a crimp either
 
Reflecting a bit on this if you set the seater to a short brass and it was just starting to crimp you could have buckeled the shoulders of any longer brass when seating bullets. Also if seating flat based bullets they could have pushed the neck/shoulder down if the bullet caught on the case mouth. Running a deburr tool inside the mouth to chamfer the edge should allow the bullet easier entry and stop any scratching of the bullet surface.
 
Lee Challenger with rcbs dies. The length was from .148 to .151 I didn't measure to the shoulder so I don't know what the headspace is I've just been checking against the chamber of the rifle. I didn't trim them I was told for such a small lot I would probably be okay. I'm not sure which one was the smallest most were below .150.
I really wasn't trying to crimp them just trying to seat the bullet and had everything on the seating die too low.

I should have taken pictures before I pulled the bullets. But I didn't think of that.

This is 100% my error.
 
A few questions , how are you sizing your cases ? How much headspace and are you trimming ? Why are you crimping a 223 ?
Not crimping, just a faux pas when adjusting seating die (see post #19)...:p
 
We all have had to learn to do things correctly in the past to get where we are. Glad the OP got it sorted out safely. Heck after 30+ years reloading l still find a thing or two to learn on a weekly basis. The old story of "the more l learn, the more i realise l don't know yet. YMMV
 
Status
Not open for further replies.
Back
Top