Chrony DIY LED illuminator

Status
Not open for further replies.

rodregier

Member
Joined
Aug 5, 2007
Messages
1,828
Location
Halifax,NS Canada
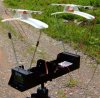
I'm thinking about a do-it-yourself LED illuminator for a Shooting Chrony F-1 to be used outdoors during heavy overcast or light precipitation.

The manufacturer sells the Chrony Led Lamp (CLL) option which they warn about not using during rain.

$87.95 plus battery module for $47.95

http://www.shootingchrony.com/products_newproducts.htm

http://www.shootingchrony.com/manual_ChronyLedLamp.htm


I think I could put something together for significantly less.

Proposed Bill of Materials:

$17 - 15cm Waterproof 12V LED illuminator strips (pair)

http://www.brightlightautoparts.com/BLTLRL02.html

$8 - Replacement 9" polydiffusors from Chrony (pair)

http://www.shootingchrony.com/products_replacement.htm

$26 - 12V 1.3AH rechargable gel cell battery

http://search.digikey.com/scripts/DkSearch/dksus.dll?Detail?name=P264-ND

$23 - 12V 300mA battery charger (offsite usage)

http://search.digikey.com/scripts/DkSearch/dksus.dll?Detail?name=271-2378-ND

$15 - power connectors, hookup wire, adhesive, etc. Use automotive 12V adapters as standard plug and socket connectors. 0.187 spade conn for battery.


$90 lot pricing, labour and shipping not included

n.b. $US currency pricing

Thoughts?
 
Power rethink:

8xAA holder, 8XAA NIMH batteries. Use existing charger. (Most folks probably already have a AA charger). 60mA draw for the lamps.

That would reduce power pack cost to (say) $20 with no separate charger cost. Would also make sourcing batteries and replacements cheaper. You could also use Alkalines which would reduce the capital cost.

That would reduce overall price to around $65.
 
Finally accumulated the components necessary to try out the concept. Then I had to wait for a suitable range day. It finally arrived.:D

My initial test worked fine. I was using a 110g .30 SP (carbine) projectile from a reduced .308 Win loading travelling at around 1950 ft/sec. It was chosen simply because it was the mildest loading I had for the firearm I took to the range for that trip - a Savage 110 in .308 Win (bolt gun).

When I get a chance I'll try a more extensive test with .22LR out of a pistol,
which will be a much tougher challenge for the illuminator/sensor combo.

See attachment for photo of assembled setup.

Bill of materials:


http://www.superbrightleds.com/cgi-bin/store/commerce.cgi?product=BARS


2 LB1-W12 LED bars $12.95 ea
(on special 21-Jun-2009, normally 15.95)

1 LB1-I18 interconnect $0.90

1 LB1-P36 power connect $0.99

1 RS 270-325 9V battery connector $1.99
(sold in pkg of 5)

1 RS 270-387 8xAA battery pack holder $1.99

8 AA batteries (I used NiMH rechargables)
Alkaline disposables should work fine too

2 DIY spacers

The LB1-W12 were each shortened to 9 led per segment (they just snap off). They will operate with 6-12V DC power, but are not rated for automotive 12V sources, which spike above 13V when not under load.

I used small diameter medication bottles cut to around 1" in length for the spacers. The spacing selected was to create enough distance so that there were no "hot-spots" visible thru the diffusor screen. I used clear packing tape to attach the LED bars to the spacers and the diffusors.

In my test, I draped a dark tarp over the whole assembly so that the primary sensor illumination was from the artificial light sources. This created a tunnel that I could shot thru.

The 2x9 LED bars cumulative draw is around 170mA, so 8 - 2500mAH AA batteries could probably run it for at least 48 hours without recharging. (Which is the expected battery life of a fresh 9v alkaline battery used in the Chrony).

In production this setup could be used outdoors or indoors without any sunlight to operate the Chrony sensors. If you were using it indoors, shielding the sensors from at least any fluorescent fixtures (which rapidly flash off and on) would avoid detection issues. Since no supplemental illumination is needed, simply shielding it for any other overhead light sources is probably the simplest approach. Draping a small dark tarp over the diffusors should do the trick. That would also protect it if you wanted to use it outdoors with precipitation falling from the sky.

I'm interested in constructive suggestions about a better spacer/attachment system. One of the challenges is that the LED bars need to be flat, while the diffusors supplied are curved.
 

Attachments

  • Chrony illuminator.JPG
    Chrony illuminator.JPG
    131 KB · Views: 90
Last edited:
If you have a right angle flash light and a piece of white poster board, here is how you can chronograph in the dark for free. It’s not high tech but it’s helped out a few times.
 

Attachments

  • chronylight.JPG
    chronylight.JPG
    23.9 KB · Views: 145
jmorris:

That is pretty slick. You'll need different materials for chrono in the rain, which was my primary goal. (Indoor or dark was secondary).
 
Yep, if you were in the rain you would have to stick everything in a trash bag.
 
Status
Not open for further replies.
Back
Top