
You are using an out of date browser. It may not display this or other websites correctly.
You should upgrade or use an alternative browser.
You should upgrade or use an alternative browser.
Cleaning a brand new uberti
- Thread starter tra27
- Start date
- Status
-
Not open for further replies.
Any idea what happened? I am farely sure that the us cleaner plus dish wash liquid stripped first layer off. Does it have some sort of coating on top the bluing or has the bluing several layers.
There are also parts of the parts that are left bare metal from the factory, ie part of the hand and loading lever hinge etc. Would it be a good idea to cold blue those parts to get protection from rusting or are those left bare for a reason?
There are also parts of the parts that are left bare metal from the factory, ie part of the hand and loading lever hinge etc. Would it be a good idea to cold blue those parts to get protection from rusting or are those left bare for a reason?
BCRider
Member
Well, bluing is actually a form of rust. It's "blue" and not red because iron and oxygen form a few different types of ferric oxide. The most common is the red stuff. But it's possible with heat and other influences to form one of the more complex ferric oxides and that one happens to be a dark black'ish blue color.
So you can't strip off a "layer". But if the US cleaner did attack and lift some of the blue layer then it could result in it looking a little less dark.
Or since you found that the color is still quite dark likely it simply cleaned it so well that the squeaky clean blue ferric oxide looked dull and silvery. Oiling the blued parts should restore the colour as long as you didn't actually remove any of the bluing.
As for the detergent you're using I would highly advise to avoid anything with a "fruit" connection to the ingredients just in case it's got some citric acid in the detergent.
For the same reason do not use any vinegar in the solution. the vinegar is acetic acid and it too does a nice job of removing blueing. Especially when used in a US cleaner.
The function of the bluing isn't to avoid rust. It can still allow moisture to the metal and regular red ferric oxide can occur. The function of the bluing is to act as a slightly pourous surface to aid in holding on to a thin layer of oil as an aid to fighting off rusting.
The internal parts will have oil on them. So there's really no need to oil the hand. (EDIT- oops. Meant to say "blue the hand" not " oil the hand") Same with the outside parts that are left unfinished. It's odd that some parts of your loading lever are not colour case hardened. Often the frame and loading lever parts are given a real or fake color case hardening finish. Are you sure yours is actually bare of any finish or is it just that it didn't get a lot of colour from the process?
Last edited:
Thanks for great answers!
You are right now when i think about it. When i used the us cleaner the loading lever had more like graphite color and it had black spots/areas, which i was then able to remove with scrubbing it with solvent and the us cleaner was dark brown in color. Once again when i re-oiled it it got blacker. So it as you said, must been a thick oil layer. Dont think they would use some sort of coating on it?
The hammer is clearly case colour hardened, but i dont think part of the hand, cylinder stop and loading lever hinge are. The reason why i believe so i because the "bare" parts rusted almost instantly after having contact with water. So seems that speed is of the essence when drying the parts. Sadly didnt take a picture of them.
Anyways now it's back together. Quite easy to disassemble and reassemble. Only one that took a moment to think about was the main spring installation.
BCRider
Member
Yes, you can't lollygag about after it comes out of the water. I like to rinse the parts well with hot water that is barely temperate enough to allow me to hold the parts in the stream. I rinse the parts long enough to warm up nicely then dry them with a towel right away and the warmth finishes the job not done by the towel and patching down the chambers and holes.
And it's better to oil too soon even if there may still be a bit of moisture than later after you're sure it's dry.
And it's better to oil too soon even if there may still be a bit of moisture than later after you're sure it's dry.
I was surprised how fast the parts catch rust. I rinsed them with hot water and placed them to the oven to dry on low temp. Also used the air circulating mode with door slightly open, but i didnt wipe them dry before that. So that has to be the mistake. Gladly its easy to wipe the rust off at that point.
It's like the bottom of the cast iron pot. If you leave it to soak in the sink, it rusts immediatly.
It's like the bottom of the cast iron pot. If you leave it to soak in the sink, it rusts immediatly.
BCRider
Member
Yeah, the time taken by the oven drying was more than enough to encourage the flash rust. The warmth also helps to cause this.
For black powder you want to be using Ballistol oil anyway. And the Ballistol works a lot liek WD-40 at displacing any residual water. So I'd skip the toaster oven next time and just rinse in the hot water, dry well with a towel and then using an old toothbrush (you DO keep all your old ones for gun cleaning, right?) with a little dribble of Ballistol on it oil up all the outside surfaces and run a lightly oiled patch into the chambers. Take special care to ensure the oiled patch lightly coats the end of the chamber. The oily toothbrush does a great job around the nipples.
For black powder you want to be using Ballistol oil anyway. And the Ballistol works a lot liek WD-40 at displacing any residual water. So I'd skip the toaster oven next time and just rinse in the hot water, dry well with a towel and then using an old toothbrush (you DO keep all your old ones for gun cleaning, right?) with a little dribble of Ballistol on it oil up all the outside surfaces and run a lightly oiled patch into the chambers. Take special care to ensure the oiled patch lightly coats the end of the chamber. The oily toothbrush does a great job around the nipples.
Well i finally got to shoot it and it was FUN! The cleaning came afterwars, i took about 40 shots and you could see it.
I removed cylinder and placed them on a plastic basin. Sprayed the parts with ballistol and left the gun soaked in it for a while. Then i poured hot water on the gun and the cylinders and through the barrel also. Scrubbed all the parts with a brush and ran some patches and cleaning wads through the barrel and cylinder holes. Wiped it as dry as i could, then used compressed air to get all the water off it and finally wiped it down with some ballistol.
Actually my question is that how pedantic I have to be with the cleaning to avoid rusting. Reason that im asking this that i ran like 10 or more patch through the barrel and i still got some brownish stains on it. I'm hoping and it actually looked a lot like when i cleaned the barrel of the factory oil, that it would be some leftovers of it. Do i need to use a toothpick to clean all the crevases around the nipples. This time i didnt take the nipples off.
Also one "problem" emerged after the cleaning, i loaded my spare cylinder using the loading stand and wasn't able to get it on the gun. I checked all the balls were below flush and loading lever and the cylinder rod wasn't blocking it. This morning i tryed it again with fresh eyes and was able to get it by using the hammer to get the hand off the way. Maybe its just a tight fit and needs some wear to smooth it out?
Crawdad1
Member
I just fill a bucket with hot water and soap disassemble the gun and put them in there and then start cleaning. Everyone has their own routine. Either work the hammer back or place it on half cock which drops the cylinder bolt stop out of the way. When new they're tight and will loosen up over time.
Well how the Remmy do at the range. Did you get a new one with the dovetailed front sight?
Well how the Remmy do at the range. Did you get a new one with the dovetailed front sight?
Crawdad1
Member
Here is my old one at 25 yards but with cowboy action ammo and conversion cylinder.

It's brand new, made in spring/summer 2015, but i dont think its a dovetailed front sight. Its a U - shape up side down.
It just occurder to me that it is or is it a three position hammer? First is half cock, second is "safety cock" and third is fully cocked?
Well it seemed quite accurate when the correct elevation adjusted poa was found.
It just occurder to me that it is or is it a three position hammer? First is half cock, second is "safety cock" and third is fully cocked?
Well it seemed quite accurate when the correct elevation adjusted poa was found.
BCRider
Member
I removed cylinder and placed them on a plastic basin. Sprayed the parts with ballistol and left the gun soaked in it for a while. Then i poured hot water on the gun and the cylinders and through the barrel also. Scrubbed all the parts with a brush and ran some patches and cleaning wads through the barrel and cylinder holes. Wiped it as dry as i could, then used compressed air to get all the water off it and finally wiped it down with some ballistol.
I don't bother with the first Ballistol spray down if I'm in cleaning mode. It's the water that cleans the fouling away and not the oil. And the water does a great job of this all by itself.
If you shop at the dollar store or Costco buy a bulk pack of cheap toothbrushes. They are superb for cleaning in around the nipples, cylinder stop bolt grooves, around the forcing cone and other places. I devote one to use as an oiling brush as well. It gets a drop or two of Ballistol and then it gets rubbed over these same hard to reach spots. It ensured that the deep dark corners get proper oiling.
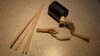
I've added a couple of pictures at the end with my "secret cleaning weapon" for cap&ball cleaning. The first bundle of pipe cleaners is used while under water to scrub out the chambers. Then I blow them out and use a second set but this time with a good size shotgun patch to dry then a couple of drops of Ballistol on the patch to LIGHTLY oil the chambers. One of the drops goes on the end of the patch so it hits the blind end and a drop or two along the side covers the rest.
I attribute this pipe cleaner trick to shortening my cleaning time for a "short clean" down to around 15 minutes from trigger lock off to trigger lock back on and ready for the cabinet (our laws up here for transport and storage). It's more like 20 if I'm putzing around and 30 if I'm having a brew and chatting with a buddy at the same time.
I had a lot of brown staining originally but it's gone away. I wonder if they blue the barrels and it's the ferric oxide of the bluing that is coming off as light brown stains? Or it may simply be that from first dunk to dry patching I have the barrel brushed, dried and oil patched all in around 2 to 3 minutes. This includes a fast blast of air through the reloading lever and some aerosol Ballistol to ensure it's all well oiled in there. The excess gets tooth brushed with the oiling brush around the rest of the frame and barrel exterior.
I've got a nylon bore brush dedicated to just doing my BP revolvers which speeds up the process vs having to find and screw it onto a cleaning rod. Instead it's just right there.
I've even thought about installing it onto a base which sits in the water bucket so I can just push the barrel onto the brush which is semi submerged so it cleans and flushes at the same time. If I do make up such a thing it'll include a plastic muzzle crown protector on a spring so it fits in and bushes the muzzle.
Hmmmm.... I like that! STAY TUNED! ! ! !
In the meantime enjoy the pipe cleaners. For .44 I use a half dozen or 7 depending on the brand and how bulky they are. And of course you want the ones with the stiff cleaning bristles.
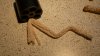
The first picture shows the "dry" bundle with a patch just barely inserted. The other dogleg bundle is my present "wet" cleaning tool. As the wires in the cleaners become more rusty and the bristles take on more of an orange colour from the rust I toss it and use the old "dry" bundle and make up a new "dry" bundle. The set on the left is the beginnings of a new bundle. The last inch is given a few twists of the bundle to lock the cleaners together. Then it's bent as shown in the second picture. I've left the fold over to get 12 to 14 cleaners at the end from doubling over more obvious. But needless to say you bend and pinch the bend until it fits neatly into the chamber. Don't bend it TOO tightly. Just enough to fit snugly into the chamber without the wire cores dragging. You want the end to be somewhat blunt so it cleans the end of the chamber. And a good way to do that is to leave a slight radius on the bend at the end.
The old "wet" bundle you see here has been used to clean my guns three or four times now. And there's another session or two in it. So it's not an expensive proposition.
The pipe cleaners are also super handy for cleaning out, drying and oiling the insides of the nipples and a few other spots for either the short or full cleaning sessions. At this point I don't know how I managed without them.
Attachments
Crawdad1
Member
Great write up BC on cleaning a revolver!!!! ")
And Tra27, Yes sir, your front sight is dovetailed and can be moved left or right.
And Tra27, Yes sir, your front sight is dovetailed and can be moved left or right.
Last edited:
Panzerschwein
member
Yeah get a pack of those pipe cleaners with the stiff red bristles in them. They are excellent for all type of gun cleaning, especially these older style single actions, and they are perfect for cab and ball revolvers to clean the nipples and whatnot.
BCRider
Member
Crawdad1
Member
It just occurder to me that it is or is it a three position hammer? First is half cock, second is "safety cock" and third is fully cocked?
Yep, first is half cock which lowers the bolt stop and the cylinder should turn freely clicking against the hand.
That's where I get my pipe cleaners at the tobacco store or even at a convenience store that had them.
BCRider
Member
In a pinch you can buy them from a local smoke shop. I get mine in bulk off Ebay or directly from some online seller.
Which reminds me, I'm done to around a couple a' hundred left now. Time to order up another big batch. The last order from about 6 or 7 years ago was for 1400 or something like that.
Mind you I found that when they are here I use them for my other hobbies as well. Even if pipe smoking were to be banned I would be amazed if pipe cleaners stopped being made. I'll bet that half or more of them are used for things other than pipe cleaning.
Great tip the ebay one. For some reason I didnt think of that.
I need to stop the water cleaning. I think my gun is rusting inside out and i've done only two water cleanings. I dont know what is the problem, but i have used hot water, wiped down right after cleaning and blowed it dry with compressed air (not the can one).
When ever i wipe it down it gives off some brownish stains on the paper. I dont know if its the stuff we have talked here earlier, but i got a bad feeling its rust. When i look at the gun with flashlight, i can see some shades of brown in the black finish.
I really have problems with rusting, I don't know why. I spend lot of time cleaning the gun but still there are spots that collect rust. Especially bottom of the cylinder holes (where you load powder etc.). I've given up water cleaning, because I'm afraid it just promotes rusting. Any ideas?
Also does BP corrode brass? My .45 jag is in pretty bad shape after this summer cleanings.
Also does BP corrode brass? My .45 jag is in pretty bad shape after this summer cleanings.
TRA27,
I go through a lot of Qtips. Also, I willspray down my guns with rubbing alcohol (I prefer 99% if I can find it, denatured may work as well) to quickly dry the wet gun. You can also use compressed or canned air to blow out the residual moisture at the bottom of the chambers.
I go through a lot of Qtips. Also, I willspray down my guns with rubbing alcohol (I prefer 99% if I can find it, denatured may work as well) to quickly dry the wet gun. You can also use compressed or canned air to blow out the residual moisture at the bottom of the chambers.
BCRider
Member
Any of the rust removers will also remove the bluing. So if you use anything of the sort use it VERY carefully.
It's hard to reach down in there. And really it affects nothing so long as you stop it with some oil.
WD-40 actually does a pretty good job of removing loose rust so I'd likely just flush and scrub with that to remove as much as you readily can without going all OCD on the job. Again the pipe cleaner clump brush would be my weapon of choice as the bristles on the ends will scrub away anything loosened by the WD-40. After that flush and oil with a black powder friendly lube such as Ballistol.
My current practice is to oil the chambers with a fairly wet oil patch on the pipe cleaner tool then leave it. Then I clean out the chambers with a dry patch the day of the shooting or the night before. This way I maintain a higher level of protection for the metal until the last possible moment
Crawdad1
Member
I need to stop the water cleaning. I think my gun is rusting inside out and i've done only two water cleanings. I dont know what is the problem, but i have used hot water, wiped down right after cleaning and blowed it dry with compressed air (not the can one).
There's something you're doing wrong. Either you're leaving the wet part out of the water for too long or you're not drying the part good enough. Some of these guys today put Ballistol into the water and use that to clean.
I don't, I just use HOT soapy water and (Dawn dishwashing liquid) and leave the part in the water even after cleaning, letting it soak. Then I take the part out dunk it in just hot water (no soap) then into a towel to wipe off, then I blast the part all over with WD40. These guys today have replaced WD40 with Ballistol which they say works better. I have no rust at all.
I've been shooting this Colt repro for a few years now at least twice a week, no rust.
- Status
-
Not open for further replies.
Similar threads
- Replies
- 3
- Views
- 675
- Replies
- 11
- Views
- 713
- Replies
- 20
- Views
- 1K