Colt Agent Refinish

Status
Not open for further replies.

wcwhitey

Member
Joined
Dec 30, 2006
Messages
2,814
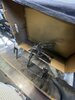
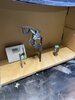
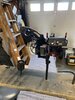
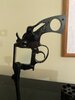
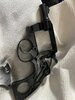
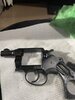
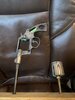
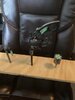
I asked this question on a technical basis in the Gun Smithing section but wanted to ask the revolver guys their opinion. This is my old 1958 Colt Agent. My father had given it a paint job some years ago and although looks okay in the pictures it needs a refinish. Long story short because of the old aluminum frame the refinish is limited to a spray on product. Understanding it will never be Colt Blue again I wanted to think outside the box. I am going for a Gray Parkerized look as in a WW2 Colt Commando. Second pic is off an actual Commando. 75F40617-C67C-48B6-9A31-D95D8668D32C.jpeg 98A19BDD-55DB-4912-BF9B-355324159AC3.jpeg Opinions?
 
Last edited:
Be careful about having someone Parkerize it. I had a gun parkerized by a highly recommended gunsmith and it came out a very light gray--not at all what I was looking for.

Another option might be Arizona Response Systems' parkerizing, or their Metacol III gray finish.
 
The Colt Agent has an aluminum frame and other parts.........It can't be parkerized.
The steel parts could be parked, but the aluminum parts have to be coated with a "paint type" finish.
Brownell's Aluma-Hyde will be a good coating. Possibly not as good as Cerakote or Gunkote, but good.
 
According to the Colt Firearms site,
a product called DecoBond is used
for a smokey grey finish on some
autos. Maybe Colt could help you
or point you in the right direction.

It's the same finish but in desert brown
Colt used for its Marine Corps
1911 run a few years ago.
 
Cerakote
Go on thir website they show all their colors
Have someone who specializes in applying cc
Cerakote
If your in illinois I can recomend someone
 
Cerakote
Go on thir website they show all their colors
Have someone who specializes in applying cc
Cerakote
If your in illinois I can recomend someone

Defeats the purpose, idea is to do it myself. Done quite a few guns, even did my own parkerizing at one point. Hard part for me is that the difficulty level of a revolver over a long gun or 1911 is much greater. It’s not a gold nugget. If I screw it up, I screw it up, it is a cosmetically challenged good shooter that locks up like a tank. Won’t be worse off after $20 and my labor. One can always spend money!
 
Last edited:
Work is underway. The first pics will give a good idea of how heavy the paint was and how it migrated to the action. Detailed stripped and cleaned with actetone. Surfaces striped with scotch brite and sanded with 600 grit wet/dry sand paper. Started masking and made the spraying jig to suspend all parts and have the ability to rotate. Will be degreasing on the jig and heat drying before spraying. Plan is to have parts good and warm as well as the spray while keeping the parts warm and flash drying between coats with the heat gun. After it’s finished it will sit next to a small electric heater overnight (about 100 degrees). Then allow to fully cure for the full 14 days. Slow and steady! Anyone see chinks in my plan?
 

Attachments

  • F567E1BC-6F85-45E2-8C6F-AB4B6F1C0326.jpeg
    F567E1BC-6F85-45E2-8C6F-AB4B6F1C0326.jpeg
    160.9 KB · Views: 34
  • DBA85FA8-5929-4DD4-8A66-CFBF9D5F4C84.jpeg
    DBA85FA8-5929-4DD4-8A66-CFBF9D5F4C84.jpeg
    138 KB · Views: 35
  • 6D73C73E-A673-47CA-8DF3-FBE6B7EEEA65.jpeg
    6D73C73E-A673-47CA-8DF3-FBE6B7EEEA65.jpeg
    110.6 KB · Views: 35
  • 3F36B2A9-BEC8-4133-A006-B15E160B6FF5.jpeg
    3F36B2A9-BEC8-4133-A006-B15E160B6FF5.jpeg
    95.1 KB · Views: 34
What are you using to spray it with? I had a home spray and bake Brownells gunmetal gray finish done on a rusty old Ruger Standard model .22. It looks 1000 times better than it did before, but the finish has chipped in several places so it’s not the most durable.

The parkerizing-colored look will make the old girl sparkle compared to the other finish. I can’t wait to see how it turns out :thumbup:.

Stay safe.

Brownells Aluma Hyde II, thanks
 
You guys talked me out of gray. Bird in the hand, Durablue. Let’s hope it adheres and cures well. So far it looks awesome, better than the pictures.
 

Attachments

  • B9784B8C-47D6-40D3-B976-05029FAD9EEE.jpeg
    B9784B8C-47D6-40D3-B976-05029FAD9EEE.jpeg
    88.2 KB · Views: 23
  • 93853E4D-9101-458B-B184-65424D2C4D11.jpeg
    93853E4D-9101-458B-B184-65424D2C4D11.jpeg
    110.1 KB · Views: 23
  • 58767B1E-1370-4BA5-9745-A67302F4EBC1.jpeg
    58767B1E-1370-4BA5-9745-A67302F4EBC1.jpeg
    124 KB · Views: 21
  • A89E1D71-AA26-4D12-92F4-EE7A8EC3ED7A.jpeg
    A89E1D71-AA26-4D12-92F4-EE7A8EC3ED7A.jpeg
    130 KB · Views: 22
  • 16E46662-8D6D-4F69-AADB-879C585195F0.jpeg
    16E46662-8D6D-4F69-AADB-879C585195F0.jpeg
    182.2 KB · Views: 21
Last edited:
This might be a better pic, the other one are not so good. Have to let it cure under heat for a few hours then move it too the house. Just cannot get pics to do it justice in my garage lighting. 071312FE-FEE5-4777-A04F-4DB8C8DDDFA3.jpeg
 
Last edited:
Heat cured and inside, two weeks total cure. 6D6A81C8-B834-442B-9F9A-5CC0FEEFAA27.jpeg
 

Attachments

  • E7799A12-B92E-4B60-ABEF-D60A11BED544.jpeg
    E7799A12-B92E-4B60-ABEF-D60A11BED544.jpeg
    58.6 KB · Views: 2
There will be some touch up after refitting. Going In the dehumidified safe for the long cure. Hard part about revolvers and paint on finishes is that they are thick and don’t like moving parts. Overall I think it looks pretty good, verry shiny and hard to get good pics.

4FEAC6B2-1321-4EA8-9B5A-86408D4B1D38.jpeg 9ED1C212-895D-482F-A0C7-D7ABDC38E4E5.jpeg
 
Last edited:
wcwhitey

Congrats on your DIY work!

Turned out really nice! Definitely made the right choice going with the Durablue in the Aluma Hyde II.
 
wcwhitey

Congrats on your DIY work!

Turned out really nice! Definitely made the right choice going with the Durablue in the Aluma Hyde II.

This stuff was made by Durakote it’s their Durablue line Blue/Black. I had a can and the cleaner already from a shotgun project last year. The Aluma Hyde II was lost in shipping by UPS. Figured a bird in the hand. Anyway, it’s not hard to do and I think it came out OK. It really has to set for a while before I can mess with it. Being thick as any spray on product is it’s gonna wear quickly on the moving parts like the crane and cyljnder notches. Blueing and anodizing would wear better. But all that said it’s a whole lot better than what it was. I like to carry it once in a while so this finish will be tested. Thanks for the compliment.
 
Status
Not open for further replies.
Back
Top