Electroplating Cases

Status
Not open for further replies.
p.s. annealing copper coated cases yields some pretty spectacular colouring. It can be manipulated as well by varied lengths of case tumbling. The longer you polish, the less colouring is left.
 
i especialy like the fourth of the left...
i now definitly gonna make me a batch of 50 , .357 magnum casings !:D
 
i would definitly try the solution as mentioned in "copperplating" , it works super
for your destined use , and within minutes instead of hours..

i don t put it on in layers , one coat .
the longer in the solution , the thicker the layer becomes , i by now had the previous . 303 casing tumbled around in a tumbler with walnut and a little car polish , the kind one would use for dull paintwork .
must say that the result is very good !

had i mentioned that i really like your idea ? :D
 
tried something completly different today...
a steel knob i took of my lathe .
i first got it somewhat polished on a electro powered polish cloth.
then i got it matted with some scotchbrite , cleaned it with some solvent and then in the tank with the solution.
when it got out i polished it again with the electro powered polisher.
here the results.... the first foto being the bare knob.
 

Attachments

  • 002.jpg
    002.jpg
    125 KB · Views: 18
  • 004.jpg
    004.jpg
    42.5 KB · Views: 18
  • 005.jpg
    005.jpg
    50.1 KB · Views: 17
  • 008.jpg
    008.jpg
    96.1 KB · Views: 24
the layer of copper is clearly though and thick enough to polish.

the one thing to overcome now is the sticking to the material , as i could scrape of some with a screwdriver , as you can see on the next foto...

one of these days im gonna get it right though...:D

oh , i scored a voltage supply for my experimends... its a hobby on its own i guess as its a phillips regulator with tubes ... from 1961 !
 

Attachments

  • 007.jpg
    007.jpg
    43.8 KB · Views: 16
  • 003.jpg
    003.jpg
    105.8 KB · Views: 15
Last edited:
oh , yet another thing , this time on topic.
i said earlyer i would also make me a batch of copperplated .357 brass.
i did and they came out very fine , actually to good.
i was at the gunrange today and i took the casings with me , there was someone who was much impressed by it.... long story short , i ended up giving the entire batch to him .... so i have to make somemore for the fotoos! :cool:
 
haha , its indeed a very old regulator..but i measured the current with a modern
digital fluke meter , and the regulator is still spot on !
how about that for "oldies but goodys " !

this is what i got from using 6 volt and 300 milliampere .
first a couple of lead 170 gr semiwadcutters of my own casting.
the left would be straight out of the mould.
the second from the solution.
the other three i polished with a benchgrinder with a polishing cloth.
[ i actualy don t know if its called this way though , but my language limits me ]

second foto you see a nickled case that i intentionly polished through , the second my copperplated one the same to get some idea of thickness.
the other casing you see is just a little polished.
 

Attachments

  • 005.jpg
    005.jpg
    48.6 KB · Views: 21
  • 002.jpg
    002.jpg
    49.3 KB · Views: 22
and now some results of my experiments , some completed cartridges
ready to go , and i must add , they are very , very smooth when you
go over them with you fingertips.
the layer seems to be alright , as i felt them going trough my sizer.
sizing didnt hurt the plating , so i guess hafting is okay. :D
 

Attachments

  • 010.jpg
    010.jpg
    58.6 KB · Views: 19
  • 008.jpg
    008.jpg
    35.6 KB · Views: 17
  • 011.jpg
    011.jpg
    42.7 KB · Views: 22
  • 007.jpg
    007.jpg
    45.2 KB · Views: 20
Wow! You have been busy. And with good results to boot. I have to say those long straight cases look like they belong in copper. The rimmed cartridges seem to have matching nostalgic feel. I wonder what a 45-70 would look like?
Btw, nice find on the power regulator. If you don't mind me asking, how did you come across a survivor like that?

p.s. I have now once fired my copper plated .270 win ammunition (20 rounds, 10 annealed). Case inspection showed no signs of abnormal stressing.
 
hi square pants
the regulator i found on a site like ebay or so , but then in holland.
it was kind of cheap , and in the neighbourhood so i picked it up.
theres some new info coming my way now , since i am in a plating companie
for my work now.
i was lended a sort of plating guide book , and tomorrow someone there would sit down for a minute to explain one or two things to me.
as it seems for now the regulator doesnt supply enough amps for me , but i am still figuring that out. the desired voltage seems to be around 6 volts dc though.

when i got more info how to perfect it , i will post it here so you can also benefit from that if you want to .

greetings from holland !
 
edwin41
I'm still following your progress and I must say you are rapidly aproaching perfect. Great photos keep them coming.
You now have me thinking about all the things I could plate. How do you think a carbon steel hunting knife blade would take the copper. If it would I'd love to try it for looks as well as rust prevention. A copper blade with a stag handle would be a thing of beauty.
T
 
Perfect. Any inside info is always appreciated. I have been using 6-12v and either 800ma or 2a. A little trick I have been playing with is plating a couple of "test" pieces for a few minutes before plating my actual piece. It seems to "wake up" the solution. Also, if you have access to a heating method, warm solution seems to allow a higher concentration of copper. Around 60-75 degrees c worked great for me.

As for carbon steel, it will plate. My best results are when I have polished the steel to a near mirror finish before plating. Oxidized steel that looks black won't plate. I agree, a "primitive" feel knife would look awesome in copper. Maybe even some hammer peening marks for authenticity? Only things to remember is, copper (even though it looks great) requires quite a bit more upkeep. Tarnishes on its own in less time and is softer(scratches easier). That said, a week of natural copper tarnish has a look all of its own.
 
great squarepants !
i see youve made great improvements so far .

nice to see in the background that you have the same reloading set up
from lyman as i do !

i also made a huge step now... read the following post !:D
 
big step forward !

hello
i think i also made big improvements now
i was lent a technical book about plating techniques , it full of things i dont really get , but also some great tips.

in the book are some steps for treatment before plating , for example casing brass , wich is called here messing in holland , not sure its the same with you.
first step would be degrease alkalisch , the second zwavelzuur dip and then rince of with water.
in free translation this would be something like this :
alkalisch degreasing , ive been told that vinager would do this.
to enhance this cleaning the vinegar should be heated to some 40 degrees
celcius , i dont know the fahrenheit equalvent , have to google it.
the secondstep is the dip , i think its good to do it with battery acid , wich is easely optaind at some hardwarestores.
batteryacid is essentially "zwavelzuur"with added water.
 
the third step is to rince off with water.
ive been told tap water is better suited than gedemineralised water.
then in the solution.
this solution is ideally when its of an "acid " type.
a good mix would be water with 275 gram per litre coppersulfate
60 gram per litre zwavelzuur.
as i mentioned before i use batteryacid as a source for this zwavelzuur,
as batteryacid is essentially zwavelzuur with water and easy optained by
hardware stores and automotive stores.
 
the bath for the plating can also be optimised.
a good improvement would be to have a square tank with on both ends a stick
or tube of copper standing straight up.
this would allow for a better spread of the copperparticles in the bath.
these two rods would be de positive side for the regulator.
another big improvement would be to have a plastic tube bended in a u shape
with both ends straight up and above the tank , one end closed.
in the tube you drill some holes , evenly spread over the lenght and about 1 millimetre in diametre.
now you can blow air through the open side with a aquarium pump or a compressor for instance , till you see some nice bubbling.
this would be an ideal bath movement.
the solution itself is best at a room temperature , no need for heating.
 
now its time for the powersource
there appears to be a thumb rule for the current , and this is 1 ampere
per square decimetre of material in the tank.
the voltage itself is not a big issue , somewhere between 1 and 15 volts
seems to be fine.
decimetre is a dutch measure , my language limits me sometimes , sorry for that.
maby some google and the american equalvent can be found?
so , its desired to pre calculate the surface of the material in the bath and set the ampere to the roughly right setting and re adjust as you go.

i for one have got the regulator sorted out now !
 
today i was for my work at a plating compagnie.
i thought to get some tips and hints there , wich i did by the way , but.....
we where talking about the powersource i recently bought.
it has a max output of 300 milliamperes wich is good for plating small things.
remember ... 1 amperes per square decimetre.
this guy said to me to leave my compagny car open for a while.....

an hour or so later i got curious , and this is what i found in my car :
 
hmmm the picture didn t get through.

its a friggin proffesionel plating powersource of high quality ! :what:
its an old thing and may not look to good , but when i lifted the top
i was very pleasantly suprised as its an all coppertype , and looks like new !
no fancy electronics but build to last and last.
check the ratings of this thing max 25 volts and a whopping 50 amperes !
 

Attachments

  • 003.jpg
    003.jpg
    108.8 KB · Views: 4
the best part of this regulator that when you turn the knob amperage
increases , but..... voltage adjusts automaticly !
this regulator adjusts itself to the surface in the tank .

now some results from my new toy....
i used the bath i made sometime ago and by now i know its not ideal.
the casing i plated is a .303 british , cause i plated one before.
the left case you see i plated using a penlight battery.
it was in the solution less than a minute , i rinsed it off at dryed it.
it came out kind of dull looking , i had it tumbled for some hours for this result.

the second case i plated today with the same setting as the left case ,
but now with the new regulator.
it was in the tank less than a minute.
you see it straight out of the tank... no polishing or anything afterward.

i looked at the scales of the regulator when i plated it.
it was some 1.1 volts and some 0.4 amperes.

i dont know if you can see it well on the foto , but the second case is real shiny and looks almost perfect to me !:D
 

Attachments

  • 001.jpg
    001.jpg
    49.3 KB · Views: 6
  • 002.jpg
    002.jpg
    83.8 KB · Views: 10
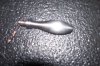
maby one or two tips more...
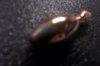
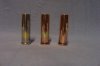
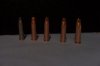
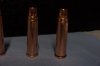
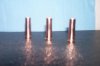
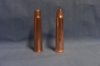
polish the casings prior to plating them... the smooth surface plates smooth !
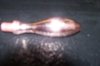
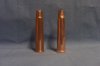
when they are plated with copper , stick then in some cow **** ...
yes ... i said cow **** .....
leave them there for some time and you will end up with a flamed look !
the ammonia in the cow droppings darken the copperlayer , and since the ammonia varys from place to place in the dropping you end up with flamed brass!

dont ask me where i got this tip....:D

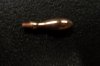
second , if you wish to plate steel , the pre treatmend would be a little different.
first step woul be to degrease it with the previously mentioned warm vinager bath ... after some fine sanding it ...
give it a dip in "zoutzuur" [zoutzuur is a dutch word ..google for american]
then rinse it off ..
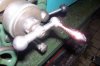
the trick here would be to get the steel object already connected to the
regulator before it goes in the solution !
if you dont , it will catch some "contact copper" from the solution .
cause steel in coppersulfate raises some current of its own...
the contact copper compromises the adhesie of the plating.
so yes t bran ... youre knife will plate just fine ! google tells me that zoutzuur is hydrochloric acid , use it in mixed version with water.
 
Last edited:
forgot a thing...
t bran , if you do plate youre knife i would defintly let it lay covered with cow dropping for a while ...
the result would be really stunning !
and in the case you don t like it , degrease the blade , add another layer of copper ....voila!
 
Status
Not open for further replies.
Back
Top