Help w/ my lee pro 1000

Status
Not open for further replies.

Keeperfaith

Member
Joined
Dec 30, 2010
Messages
235
Hello,

Im wondering if there is anyone in the San Antonio, Texas area that wouldnt mind helping me properly set up my lee pro 1000 progressive press.

I had time tonite to reload and I figured I'd only reload 100 rounds as a starter...

Well i have my press bolted down, i put everything together and the problems started after that:

1: i cannot properly seat a primer.... I experimented w/a used primer and it seated perfectly, then w/ a live primer it seats half way out...

2: the powder wont come out...I have it set up (properly from what I can see and read from instructions)...

so i said what the hell, ill just seat a bullet for a dummy round and see if its seats in the proper length...

3: the bullet seated almost all the way in the casing...

4: the silly case dropper tube thingy is sensitive, sometimes it works and somtimes it gets caught up and/or drops more than one case...(any advice for setting this thing up "right").

5: its cold in my garage (about 50 degrees), the powder Hodgon HP-38 seems to be sticking or clinging to plastic, is the temperature not ideal???

6: i have my Lymans 49th, thats the instructions I was using. I cant find my .45 acp Die Set instructions... Anyone w/ a copy that can email it to me or send a link so i can print up the instructions ([email protected]).

7: i also want to learn how to change out the shell plate for other calibers and I have various other questions that I can probably only ask in person cause I cant point to the object and say "how do i change out this thingy" or "do i need a different size thingy for .223?" on this forum.

THanks for the help and any help would be appreciated.

Steve
 
1: i cannot properly seat a primer.... I experimented w/a used primer and it seated perfectly, then w/ a live primer it seats half way out...

There's no reason a live primer shouldn't seat the same way as a used primer. Make sure you're pressing the handle all the way forward and that you're using pistol primers, not rifle primers. Large rifle primers are taller than the pistol version, so they won't seat all the way in 45 ACP cases.

2: the powder wont come out...I have it set up (properly from what I can see and read from instructions)...

Is the powder measurer raising up? If it's not, the flaring die needs to be screwed in more, if it is, make sure you've got the disk in correctly and the dispenser turned into the "ON" position.

3: the bullet seated almost all the way in the casing...

The screw on the top of the die sets the seating depth. Unscrew it.

4: the silly case dropper tube thingy is sensitive, sometimes it works and somtimes it gets caught up and/or drops more than one case...(any advice for setting this thing up "right").

The only time I've had an issue with the case feeder is when I didn't have the nuts on the mount tight. Use a wrench, not just finger tight.

5: its cold in my garage (about 50 degrees), the powder Hodgon HP-38 seems to be sticking or clinging to plastic, is the temperature not ideal???

I haven't had an issue in far colder weather than 50F, but I don't use HP-38. I've been told that wiping down the plastic with anti-static dryer sheets can help if you're having static cling issues.

7: i also want to learn how to change out the shell plate for other calibers

Raise the ram all the way up. Unscrew the bolt holding the carrier on the ram. Put a block of wood under the carrier and lower the ram. This should push the carrier off the ram. Remove the carrier from the press and remove the center post from the carrier. Unscrew the screw holding the round ejector to the carrier and remove the ejector (it's just a metal wire). Hold the shell plate in place with your hand, and turn the center post clockwise with an allen wrench. The shell plate should come loose.
 
http://www.thehighroad.org/showthread.php?t=635252

Some info and a few videos of the 1000 in action, might help.

I think you should watch the videos on the Lee website also, get the die instructions there. Not for nothing and no offense, but it sounds to me like you might be jumping into something you aren't quite up to, yet. Any progressive press can be tricky, and Lee progressives are known to be extra finicky, at times.
 
Thanks for the help and Yeah i was thinking the same thing, i may have bit off more than i can chew... Ill keep trying. The only thing going through my mind was "dammit i should have got the 25 dollar single stage press...".

keep em coming guys.

thanks
 
I've used HP-38 in colder weather with no issues. Try the dryer sheet. The casefeeder has to be adjusted to just the right height. You can also remove it and manually feed them. Primers need the weight of a full trough to feed properly. You can get instructions for anything from Lee's website.
 
Good posts/recommendations ... Keeperfaith, you are among friends. :D

Keeperfaith said:
thing going through my mind was "dammit i should have got the 25 dollar single stage press...
You can remove the center hex rod that actuates the auto-indexing of shell plate and turn the Pro 1000 into a single stage/turret press. After you adjust your dies on the turret, manually rotate the turret to use the other dies. ;)


If you are new to reloading, starting on a single stage press is highly recommended. I have helped set up new reloaders with Pro 1000 but now do so with a single stage press on the same bench as Pro 1000 will only do short rifle cases like .223/7.62x39. I have them go through the reloading basics on the single stage then transfer the reloading process on the Pro 1000 using progressive operation (performing multiple "progressive" reloading tasks with the same cycling of ram lever). If you like, you can do the same by switching to single stage mode to get yourself familiar with the reloading steps then using the Pro 1000 in progressive mode.

But it can be done. I would recommend you review all the Pro 1000 setup/operation/troubleshooting videos by Lee Precision first to familiarize yourself with the Pro 1000 then duplicate the steps on your Pro 1000 - http://www.youtube.com/user/LeePrecisionInc/search?query=Pro+1000 At the Lee Precision Pro 1000 link, start with the Pro 1000 Demo and like the video, I would leave the case feeder tubes off the press until you have the press operating properly (you can even take the case feeder off the slider and manually feed the case by hand).


For initial setup of Pro 1000, I use the following steps (I am working on a primer feed attachment post for the Pro 1000 support thread and may also do a step-by-step Pro 1000 initial setup/operation/trouble shooting thread as well. So, stay tuned if you can't find help sooner):

Note: This is a quick summary outline (will do detailed step-by-step with pictures in the new thread). Reference the Lee Precision videos for each step. (I am assuming you have the right shell plate already mounted on the shell plate carrier and have the right size primer feed attachment installed)

Step 1. Mount press (drill/cut a hole on the bench top so you can collect spent primers under the hole with a can/container - My solutions for primer collection (you can also stick a large tube through the bench top and fasten the tube under the primer drop hole on press base) - http://www.thehighroad.org/showthread.php?p=7561808#post7561808

Step 2. Clean and lube press (I use BreakFree CLP or any motor oil I have in the garage). I usually apply 2 drops of oil on my finger tip to lube the ram surface and 1 drop on all linkage/metal contact points. Cycle the ram lever several times and wipe off excess.

Step 3. Install shell plate carrier (be sure it is seated all the way down on top of the ram or you'll crack/break the base when you tighten the hex bolt). If you want to use the press in single stage mode, leave the center hex rod out. Make sure the pin on the primer feed attachment contacts the frame rod with notches so the notches will "shake" the tray to keep ramp/trough full of primers.

Step 4. Install dies on the turret (see videos). I adjust the bullet seating/taper crimp die a little different for more precise taper crimp/OAL, so I'll cover it on Step 9 below.

Step 5. Lube the center hex rod (if using press in auto-index mode) with 1 drop of oil on finger tip and apply on hex rod above and below the shell plate carrier. Cycle the ram lever. If the shell plate timing is not set to zero, adjust shell plate timing (see video). Cycle ram lever several times to lubricate the internal nylon indexing gear while rechecking the shell plate timing.

Step 6. Add primers to tray and insert into primer feed attachment. Tap tray to fill the feed attachment ramp/trough and cycle the ram lever, making sure the pin contacts the notches on the frame rod to "shake" the tray. If the pin is not in contact with the frame rod/notches, loosen the hex bolt on the shell plate carrier and rotate carrier on the ram until it does. Tighten hex bolt.

Step 7. Perform primer feed QC check. This is very important and should be performed before each reloading session to ensure "hassle/frustration free" reloading. While looking at the primer at the bottom of the attachment, manually actuate the case senor with your finger. The primer push rod should drop and the primer should slide down on top of the rod. If the primer hangs in the ramp/trough due to burrs/gouges on the surface, you can try to repair by burnishing with folded paper. Here's step-by-step instruction - http://www.thehighroad.org/showthread.php?p=7865801#post7865801

If repair/burnishing of the primer feed attachment does not allow the primer to slide down freely on top of the primer push rod when the case sensor is actuated, you need to replace the primer feed attachment or help slide the primer into station #2 with a bent paper clip or small precision screwdriver.

Step 8.
Once the primer feed attachment passes the QC check, continue with QC check of the rest of reloading steps by using a single spent case.

QC #1 - Shell plate time set to zero (checked)
QC #2 - Primers slide into station #2 when case sensor is actuated (checked)
QC #3 - Deprime/Resizing die in station #1 full-length sizes and pushes spent primer out
QC #4 - Primer seats properly when resized case arrives at station #2 (if primer flips and seats sideways, recheck your shell plate timing to zero)
QC #5 - Push ram halfway up to release shell plate lock and slide case out of station to verify powder charge weight (you did turn the hopper on?). Weigh powder charge and verify with load data. Even though powder charge weight is correct, I verify 3 powder charge drops to ensure powder charge weights are consistent and powder had a chance to settle in the hopper (Pro Auto Disk should drop charges with less than .1 gr variance for most small/flattened ball/flake powders like Bullseye/Titegroup/Green Dot/WST/W231/HP-38/WSF/Universal/AutoComp, etc). Note: Dump powder from case back in the hopper and fully cycle the ram lever to ensure proper Pro Auto Disk operation for each powder charge.
QC #6 - After dumping the powder charge into scale pan for QC #5, set a bullet on top of the flared case to check if you have enough flare (bullet bottom should set slightly inside the case neck and not tip over - you may need to use more flare for lead bullets). Do not over-flare, as it may reduce neck tension. Use minimum flare that will work.
QC #7 - Check OAL and taper crimp with a caliper. Using a resized/deprimed and flared case (no primer/powder), check the taper crimp/bullet seat depth (this can also be your dummy round to check for Max/Ideal OAL).

Step 9. Bullet seating and taper crimping in the same step:
Lee Precision video steps will give you "rough" taper crimp adjustment. I do the following for more precise taper crimp adjustment using a caliper:

- Unscrew the bullet seat/taper crimp die in station #3 (almost all the way out of the turret hole) and unscrew the bullet seat stem knob almost all the way out.
- Place a resized/flared case in station #3 (you'll need to raise the shell plate carrier halfway up to unlock)
- Set a bullet on the flared case neck and raise the ram all the way up.
- Screw/lower the die until it makes contact with the flared case neck
- While holding the die body, screw the bullet seating stem knob until it makes contact with the bullet.
- Lower the ram so the bullet is below the bottom of the die (be careful to not tip the bullet) and turn the die body 1/4 turn (of course, bullet seating stem knob will move with the die) and raise the ram to slightly seat/taper crimp the bullet/case.
- Using a caliper, note the OAL/taper crimp and incrementally decrease the OAL/taper crimp by rotating the die body/knob together 1/4 turn (90 degrees). Note, OAL may decrease faster than taper crimp.
- Once desired OAL is obtained, HOLD the bullet seating stem knob while you turn the die body to decrease the taper crimp. Once desired taper crimp is obtained, finger tighten the lock ring. Note: your OAL and taper crimp will increase when the shell plate is full of cases applying different amount of resistance, especially when you are sizing a case in station #1 and causing the shell plate to tilt (You'll need to do another QC check for OAL/taper crimp when you are in progressive mode with shell plate full and adjust as necessary). Tip: If you want less variations in OAL/taper crimp, use resized/primed cases and leave station #1 empty.

QC #8 - Inspect the bottom of case to ensure the primer is seated at least flush, preferably slightly below flush by .004". (I usually do this QC check in batches by loading finished rounds upside down on factory ammo tray or loading tray and running my finger tip over the bottom of the cases. Any high primer will be felt and reseated on the press or in a hand priming tool).
is left handed so it
Step 10. OK, NOW you are ready to start your reloading session. I normally do a once look-over to double check nothing looks out of place. Once the shell plate is full and the first round comes off station #3, I will repeat QC #7 by rechecking the OAL/taper crimp (usually there will a slight increase and I will make the necessary adjustment - I set these initial cases aside and reseat/taper crimp later).

QC #9 - I will occasionally randomly spot check each of the reloading steps.

Step 11. Resupply primers/powder as needed. If using case feeder, resupply cases. TIP: I prefer to set bullets with my left hand and it covers the top of case neck as the case arrives into station #3 and powder won't spill out from.


Changing shell plate:
Lee Precision video shows using a socket and wrench to remove the shellplate with the carrier on the press. When the shellplate carrier is out of the press, I use a two hand method.
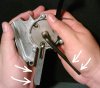
- Remove the hex rod
- Insert an Allen wrench or screwdriver in station #1 to hold the shell plate
- Insert the right sized Allen wrench in the center hole so the wrench sticks out as shown in the picture below
- With the carrier body braced on the left hand, give a firm push on the Allen wrench to loosen. NOTE: thread will loosen from the shellplate with a clockwise turn.

attachment.php


I hope this will get you going and keep us posted! :D
 

Attachments

  • Pro1K1.jpg
    Pro1K1.jpg
    42.7 KB · Views: 109
Last edited:
Make sure the leaver on the powder measure is returning all the way. There should be a little tention on the spring of the chain.
 
I wish I lived near you since you are having so many issues. Be sure to take your time and fix one issue at a time. If you have a hand primer, I recommend using it until your press is running like a fine tuned watch. I have a whole coffee can full of preprimed .45acp brass. Nothing worse than a small primer .45acp case to mess things up on a progressive press.

Work on getting the case feed right while depriming and sizing some cases. You need to only have the case feeder high enough to feed one case. I think the thickness of a dime is all the clearance needed between case and feeder.

Did your case come "setup" as .45acp? The fatter cases of .45acp require a bend it the "Z" shaped rod. I hand bent mine since it came as a 44 magnum press.

I don't remember having troubles with my powder through die. I just remember having to screw it in enough to raise the powder dispenser enough to fully activate the dispenser through it's full range of motion. Make sure the powder disk is in right. Check function without powder to see what is really happening. Maybe use some dry graphite in places of contact if you have it on hand. This will happen in time from the gun powder, but can't hurt.

On/off writing should be on the right side as you are facing it and in the on position after you have it filled with powder. Don't over tighten brass thumb screws.

I will stop here as BDS is the man when it comes to this press. My point is take it slow and methodical. :)
 
The only thing going through my mind was "dammit i should have got the 25 dollar single stage press...".

I bought a pro 1000 for $50 because the previous owner couldn't make it work as he had no instructions and was too frustrated to obtain them. I set it up properly and it worked like a charm...other than the fact it only had three stations and i desired more for my cast bullet loading. If you stick with it and get it set up properly it will definitely crank out the ammo.
 
Thanks again for the additional help. BDS ill have to take my time to read your posts. A lot of the terminology for the parts of the Lee are Green to me. I have to learn them and keep at it. Good news is I found my Lee 45 ACP die instructions.
And yes the press I bought from Midway was the Lee 45 ACP and the shell plate was already installed and the instructions said the DIES were factory set, SO I assumed I could just start loading. I did have the primer tray full (100 primers), the primers were feeding just not seating in correctly. After two new primers that did not seat all the way in, I tested it w/ a used primer. The primer seated perfectly, then no further success w/ new primers + the powder never dropped (im sure i have something set up wrong w/ the powder device). Then when I tried to seat a bullet for practice it seated way too far in...
See photos.

thanks again
Steve
 
45 ACP improperly loaded ammo

Heres the photos (I think).

Steve
 

Attachments

  • new iPhone photos 008.jpg
    new iPhone photos 008.jpg
    56.5 KB · Views: 25
OK and another question.

I observed a few shells of my 45 ACP have small primer holes...Whats the deal?

I thought 45 ACP was all large primer?

Is okay to then use small pistol primers in these shells or are they obsolete?

thanks

Steve
 
Keeperfaith, looks like I'll have to work on the new thread for Pro 1000 initial setup/operation/troubleshooting sooner than later. :D


Wow, definitely bullet seating/taper crimp die needs adjusting! :eek:

As to primer sticking out, I do this for press priming on Pro 1000. Once shellplate timing is set to zero (clicks into station at the bottom of the ram cycle), I initially apply light pressure on the ram lever to get the primer started in the primer pocket of the case. Once I "feel" that the primer is in the pocket, I apply full force to seat the primer (if I don't feel the primer seating initially into the pocket, I will apply light pressure on the lever and try a few times to seat - usually the primer will find the pocket and get seated). If you apply full force initially, you can jam a primer in the pocket as shown in your picture.

Also, I found Winchester primer cups to seat better in Pro 1000 than Wolf/Tula which is a bear to seat due to slightly larger cup. Especially in once-fired cases with tight primer pockets, I literally have to hold the frame with my left hand and give a "Arrrrghhhhh ... Oooommmph" push on the ram lever to seat them only flush. :cuss:

Having said that, many reloaders find larger diameter Wolf/Tula primers to be beneficial for cases with looser primer pockets (Every dark cloud has a silver lining. :D).

As to small primer pocket 45 cases, I usually separate them out when I sort spent cases. I have used small pistol primers with same powder charge and they have worked well - http://www.thehighroad.org/showthread.php?p=7840156#post7840156
 
Keeper,

What I found when I started w/ the Pro 1000 was a difficulty in understanding their instructions-really no internet in those days; I figured things out myself, reread the instructions then had the "oh, that's what they meant" kind of flash. Now that I have a lot of experience w/ it I just love it. One of the most important things is heeding Lee's warning, 'if something doesn't feel right, stop & figure it out' before proceeding. Do not force anything. There are a lot of things happening simultaneously. Go slow at first. Soon you will be cranking out the ammo like you never thought possible. Lots of good advice and helpful folks on this site.
 
During setup/learning of the press only run 1 case at a time. Make sure you don't get one die out of adjustment working on another. The dies don't adjust the same in the Pro1000 as they do in a SS.

I don't have the same problems with Tula primers seating as others do. They seat easy for me. CCI is what I have a bear of a time seating. I haven't ran into a crimped pocket in Winchester brass yet but make sure this isn't the problem. Also insure you have the right primer rod in there.
 
Status
Not open for further replies.
Back
Top