
You are using an out of date browser. It may not display this or other websites correctly.
You should upgrade or use an alternative browser.
You should upgrade or use an alternative browser.
How to take a picture of gold?
- Thread starter azyogi
- Start date
- Status
-
Not open for further replies.
Tomahawk674
Member
When you take pictures of reflective metals, what you are taking picures of is your surrounding.
Do it in a room that is well lit everywhere. Sunlight beats the crap out of any artificial light I have, so a sunny living room is best. Set your camera to no flash.
I am not photographer, but I think I have some nice pics. Try this and let me know how it works.
Do it in a room that is well lit everywhere. Sunlight beats the crap out of any artificial light I have, so a sunny living room is best. Set your camera to no flash.
I am not photographer, but I think I have some nice pics. Try this and let me know how it works.
arcticap
Member
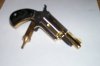
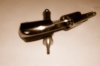
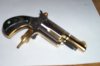
New to digital photos these shots do not do justice to this NAA Super C&B Gold Tone any ideas
1. When holding the camera ready to take the picture, only depress the shutter button 1/2 way for at least 1 or 2 seconds to give the focusing beam a chance to auto-focus the lens.
Then while continuing to depress the shutter button and holding the camera extra steady, gently snap the photo.
Many cameras have an indicator on the viewing screen that will let you know that the lens is in focus. Snapping the photo before the focusing beam can do its job can result in a picture that's blurry.
Blurring can also happen if the camera isn't held steady enough when snapping the photo.
2. Snapping photos at different angles and distances can help to reduce the amount of direct glare coming off of reflective surfaces.
Then a photo editing program can be used to crop, edited and resize them afterward.
After taking a fair number of pictures, choose to display the ones that have the best focus and the least amount of glare.
3. Sometimes taking pictures in a darker room can help to produce less glare too, and so can turning off the flash as indicated in the previous post above. Depending on the camera, the brightness may need to be corrected by editing them afterward.
4. Having a white background while the camera is on the auto setting can upset the white balance of the programing of some cameras.
Sometimes a darker background helps to produce a photo with the proper amount of white balance.
The white balance effects the color and the brightness of the photo that results, especially considering the flash. There's a way to adjust the camera's white balance by using a manual setting, but it's just much easier for most of us to use a dark background and the auto setting. Use any darker color that isn't too white or bright for a background.
5. Optical zoom is usually much clearer than digital zoom, so don't use digitial zoom indoors or for anything up close. Only use optical zoom.
Last edited:
Never try to do it with a cellphone. Otherwise, arcticap's given good advice. I'd add, use a tripod whenever possible, and be sure to let the camera get itself focused before you push the button. Don't force it to fire before it's ready, that's bit me more than once.
Wolfebyte
Member
when I was shooting jewelry for ebay, I took an opaque plastic juice jug (seems that the milk jug is too thick)
I cut the bottom off and placed it over the object and placed the lens inside the spout.
the plastic refracts the flash and prevents the glare from bouncing back into the lens.
you may need to place a small lamp at the 8 o'clock position to offset the flash bounce.
I cut the bottom off and placed it over the object and placed the lens inside the spout.
the plastic refracts the flash and prevents the glare from bouncing back into the lens.
you may need to place a small lamp at the 8 o'clock position to offset the flash bounce.
- Status
-
Not open for further replies.
Similar threads
- Replies
- 3
- Views
- 478
- Replies
- 1
- Views
- 377
- Replies
- 8
- Views
- 1K