It's your gun, and if you really want a snubby, go for it. First off, any gunsmith that would do something like this, you probably don't want them working on any of your guns. So do it yourself. First clamp the end of the barrel tightly in a vise. Don't worry about squashing the end of the barrel because you won't be using that part of it anyway. Next, make sure you have a new blade in your hacksaw, preferably as fine toothed as you can get, at least 24 teeth to the inch. Make a scribe mark in the top of the vented rib, allowing about 1/8 extra in barrel length for cleanup in case your sawing isn't perfectly square. Put a short length of cord through the trigger guard and around the vise so that the gun doesn't hit the floor when it comes loose. Now start cutting. This is good steel so you may want to squirt down your blade with WD40 while you cut so as not to overheat your teeth. Once the extra portion of the barrel is removed, you will need to square up the end of the new barrel. This can be done by slowly rotating the end of the barrel against the SIDE of the stone grinding wheel of a large bench grinder. Most people don't use the side of the wheel much, so it is probably still quite flat. Keep grinding until you get a nice square finish on the end of the barrel.
Next you will need to re-cut the crown. This operation is critical if you want to end up with a reasonably accurate gun. Go to the hardware store and pick out a tapered-cone grinding stone with a 1/4 inch shank that will fit in a hand held-drill motor. The actual angle of the stone isn't really important as long as the tip will fit inside the end of the barrel. Using a couple of shop rags to protect the finish on the gun, clamp it securely in the vise. Brace your arm and the drill motor against the edge of the workbench so the crown cutting stone doesn't wobble too much. And start grinding. How much is enough? Look around on the floor and find the end of the barrel that you cut off. Look at the tip of the barrel and use the old crown as a guide. But remember, the old one may be squashed a little bit from being clamped in the vise during the previous operation, so don't copy it exactly.
Now that the barrel shortening procedure is finished, you will need to mount a new front sight. The original sight and most aftermarket sights will require complicated machining operations to attach properly. But there is an easier and more practical way. Using a centerpunch, make a divot in the top of the vented rib about 1/2 inch in from the end of the barrel. Using the correct drill bit for a 10/32 tap, drill through the rib and into the top of the barrel. It's hard to tell how deep you are going with a hand drill, so the easiest way is to just drill all the way through the top of the barrel. Run the 10/32 tap into the hole and all the way through. Next take a brass 10/32 screw about 1/2 inch long, cut off the head and finish off the end nice and flat with a file. Clean everything up real good with Brakleen, especially the new threads and the brass screw. Dob a couple of drops of blue locktight on the new front sight and install it in the barrel. The heighth will be approximate, of course, and will need to be fine tuned at the gun range. WARNING: Make sure that after the initial installation and during subsequent adjustments, the new front sight does not extend into the barrel. When the adjustment is complete, take a hammer and a centerpunch and bung up the threads where the sight screws in at the top of the barrel. This will prevent it from working it's way into the barrel if it shoud come loose.
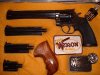
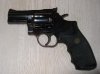
There you go, Colt Python snubnose. And you will have the pride of knowing that you did the work yourself. Enjoy.


")