
You are using an out of date browser. It may not display this or other websites correctly.
You should upgrade or use an alternative browser.
You should upgrade or use an alternative browser.
My first attempt at "gun photography"
- Thread starter Tarwater
- Start date
- Status
-
Not open for further replies.

SASS#23149
Member
turned out REALLY dark on my screen,fyi.
Smokey Joe
Member
- Joined
- Jan 2, 2003
- Messages
- 2,617
Well,proceed!
Tarwater--First attempts beget next attempts, and it is generally accepted that we learn more from our failures than from our successes. Let's see another one!
Tarwater--First attempts beget next attempts, and it is generally accepted that we learn more from our failures than from our successes. Let's see another one!
RNB65
Member
Do a search and you'll find several threads in the recent past on how to photograph guns. Forget about flash units. You need LOTS of light in order to get even lighting without harshness and shadows. A flash can't provide do that. Try taking your pics outside in natural sunlight or get a couple a couple of bright floor standing industrial lights at Home Depot.
Forget about flash units. You need LOTS of light in order to get even lighting without harshness and shadows. A flash can't provide do that. Try taking your pics outside in natural sunlight or get a couple a couple of bright floor standing industrial lights at Home Depot.
ditto.
post proccessing can only do so much......
Attachments
45R
Member
RNB65
Do a search and you'll find several threads in the recent past on how to photograph guns. Forget about flash units. You need LOTS of light in order to get even lighting without harshness and shadows. A flash can't provide do that. Try taking your pics outside in natural sunlight or get a couple a couple of bright floor standing industrial lights at Home Depot.
I respectfully disagree. This was done with a flash.


Keep trying and feel free to drop me a line if you need any help. My first gun pictures looked alot like that when I first started. It took me some time to learn how to "see the light"
Cheers!
45R
I too disagree about flash and the idea that one wants to get rid of harshness and shadows.
A no shadow picture would be featureless, flat and dull. It is shadow and highlights that provides depth to a pic.
This pic was done with a flash.

A no shadow picture would be featureless, flat and dull. It is shadow and highlights that provides depth to a pic.
This pic was done with a flash.
Gonefission
Member
I take no credit for this pic, but I though it could help some of you. The following was all done by Ezra Coli on the Gunsnet Forums. That guy has the absolute best gun porn I have seen.

Photo tips for you firearms
I like to see people’s firearms pics, and I like to take them. So I thought I’d put together a few tips to show what I do to get what I think are fairly decent photos. I don’t claim to be a professional photographer, but I have directed photo shoots a lot. So I find it to be fun to put together firearm photos that are a little more than just a “gun on the carpet”. While there is nothing wrong with snapshots made with guns against the wall or lying on the bed, I’d love to see if folks would try to put together some photos that are a bit more arranged.
Here’s what I do, this is only my method an someone with more patience or effort could probably do better.
Camera - I use both a 35mm manual SLR and a cheap digital. For posterity and for photos intended for some ultimate use that demands quality, I use the 35mm. You absolutely must use a manual camera, and be able to adjust the exposure. If you are unfamiliar with manual cameras, firearms photography would be a great subject to learn with. The digital camera is used so I can post stuff here on he forum faster. Sometimes, if the light is right, the digital pics are fine. All of you with GOOD digital cameras will probably just use them alone, but hopefully you will have one that allows you to control the exposure.
Exposure - Using a camera with a light meter, or if you are indeed a dinosaur like me, a hand held light meter, make sure you take a reading as close to the gun itself as possible, Through the camera and its built in light meter, take your reading very close to the gun, and set your camera to that f-stop or exposure (depending on the type of meter). If you meter the whole scene, your reading is the average of all the light reflected off the scene and will underexpose dark guns on light backgrounds or overexpose light guns on dark backgrounds.
Lighting - I use natural light. Its free and I don’t get to take my rifle into my wife’s photo studio anyway. The key to shooting outdoors is shoot in diffused light. You don’t want shadows. I find my driveway in the moring is shaded and gives nice pics. A clody or partly cloudy day is best, just shoot when the sun is behind a large cloud bank. I don’t even bother trying to shoot any other way. Flash gives off odd glares, sunlight makes the image too harsh, and I don’t have the time to mess with studio lighting even if my sweetie didn’t mind me messing up her studio. That’s it for lighting, just go outside.
Use a step ladder to shoot down on your subject. With some guns, you will need to do this just to get them all in the frame. I don’t bother trying to fill the frame with background, I crop them when I scan them.
Backgrounds - Use a simple background that is subdued in color like camoflage or a sold blanket. Wood is OK too if it makes sense to pose the rifl on wood. I like to use a few different camo nets in various patterns. Military uniforms make good backgrounds too when they are appropriate for the subject. These will usually not fill the whole frame, so a plain background will be necessary,
Props - This is where I like to make my photos shine. Set up a still life. Compose the scene with props that are related to the rifle. This is a perfect time to break out those ammo pouches, magazines, accessories, uniforms, etc. I also use flags when appropriate. Helmets and ammo boxes, bayonets and targets all make great props. Ammo, insignia, awards, schematics and ammo boxes are great too. Use your imagination.
Composition - Arrange your items in a semi-random manner, but arrange them with care. Symmetry in photos make for dead images, spread out your colors and don’t clutter it up too much. Too little in the phot is better than too much. Lay the rifle either perfectly horizontal or off at a skewed angle, both look good,
Final touches - Add a title to your pic using an image editor like Photoshop. I also like to include a flag of the nation inmy name graphic. Please, spinning, flaming 3D chrome typography is universally considered cheesy, so are embossing filters, three-d filters, etc. You might find it beneficial to add a light drop shadow behind the type to make it shand off from the background and to increase legibility. Keep it simple and go light on the shadow. White or black type is the best.
MachIVshooter
Member
I take no credit for this pic, but I though it could help some of you. The following was all done by Ezra Coli on the Gunsnet Forums. That guy has the absolute best gun porn I have seen.
Depends on what you're trying to accomplish with a given photo. If you want to show them off (gun porn), a nice background, angled layouts, accessories and creative lighting are good. However, when I snap my insurance photo's, I use a blank white background and position the gun very squarely in the photo, making sure that detail of the firearm itself is crystal-clear. I try to avoid shadows or glare for this purpose.
To flash or not to flash...
Not really, all you need is some tips and some practice.
A lot depends on what kind of camera/flash combination you are using, so the advice you are getting might be better if you posted those details.
If you get the camera too close to the object you are photographing and use a flash you tend to get a "hot-spot" in the middle of the picture with dark all around it. These are some general observations that might help.
1. Mount the camera on a tripod.
2. Go outside on a bright day and take your picture in a shadowed area, or better yet, one that is slightly overcast to avoid harsh shadows. Some shadow is good, but harsh/black shadow probably isn't.
3. Don't get too close to the subject, or it will come out fuzzy, and if you use a flash you'll get a hot-spot. Remember you can crop out extra background later.
4. Don't use a very light background on a dark gun (or the other way around) because this can fool the camera's light meter and cause the gun to come out looking like a silhouette.
You can get great pictures without needing any specialized equipment.
I'll try again when I get the chance. Man, this stuff is harder than I thought.
Not really, all you need is some tips and some practice.
A lot depends on what kind of camera/flash combination you are using, so the advice you are getting might be better if you posted those details.
If you get the camera too close to the object you are photographing and use a flash you tend to get a "hot-spot" in the middle of the picture with dark all around it. These are some general observations that might help.
1. Mount the camera on a tripod.
2. Go outside on a bright day and take your picture in a shadowed area, or better yet, one that is slightly overcast to avoid harsh shadows. Some shadow is good, but harsh/black shadow probably isn't.
3. Don't get too close to the subject, or it will come out fuzzy, and if you use a flash you'll get a hot-spot. Remember you can crop out extra background later.
4. Don't use a very light background on a dark gun (or the other way around) because this can fool the camera's light meter and cause the gun to come out looking like a silhouette.
You can get great pictures without needing any specialized equipment.
bumm
Member
One minor hint... If you want to get in close to a small pistol, or show a small detail, extension rings behind the lens of an SLR will let you get in closer.
This is a crudely lit, crudely scanned shot of an old Colt .25 that I shot to see if a new (used) camera body was working, but it gives some idea of what extension rings can do.
http://img.villagephotos.com/p/2005-7/1052094/95117822-picture.jpeg
Marty
This is a crudely lit, crudely scanned shot of an old Colt .25 that I shot to see if a new (used) camera body was working, but it gives some idea of what extension rings can do.
http://img.villagephotos.com/p/2005-7/1052094/95117822-picture.jpeg
Marty
Oleg Volk
Moderator Emeritus
My question is how to avoid dust, dirt and nicks from showing up in images. Thase are the bane of my still life work right now...
Gonefission
Member
My question is how to avoid dust, dirt and nicks from showing up in images. Thase are the bane of my still life work right now...
That's easy... Photoshop
First, take constructive criticism. Good photography, like good shooting, takes time, practice, and some study of fundamentals of technique, composition, and lighting. Photography has been a hobby of mine for years and there is always room to learn more and improve.
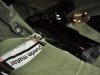
Your original photo, frankly, had some flaws. What was supposed to be the main subject of the photo, the gun, was completely overshadowed by that bright label, or whatever it was, in the foreground. The gun was lost in dark shadow and de-emphasized by being in the background.
Take time to find a location for you photo that gets some good, soft indirect lighting. The photo below was set up on a desk in a corner of the room that had windows on each side of the corner. The light was skylight, not direct sunlight. Good photos can be taken with flash, but hardly ever with direct flash from the camera itself. Pros bounce flash off of walls, screens, or special reflectors. Direct flash from the side, top, or back is sometimes added for defining edges and highlighting.
Arrange your objects to get a pleasing composition. Keep it simple, not too busy, but not bare either. View your composition through the viewfinder to get an idea of what the photo will actually look like.
The library or internet has tons of books for budding photographers. Take your time, learn some basics, and most of all, have fun!
K
Gentlemen,
Regarding flash. Good gun photos can be made with or without flash. However, for a beginner, using flash effectively can be difficult, especially if all he has is the typical on-camera flash on a point-and-shooter. I would urge looking for good existing light settings. It's much easier to visualize the lighting effects. An otherwise good composition can be ruined by bad flash.
K
Mumbles_45
Member
I like the strategically placed item(can't tell what it is exactly) in the foreground with the "puede matar" lable.
Cromlech
Member
w00t
No flash, just the little available sunlight in that room, on an old douvet.

No flash, just the little available sunlight in that room, on an old douvet.

bumm
Member
Nice gun and nice pic Cromlech!
I don't mean to range OT for this thread, but I was under the impression that centerfire pistols were pretty much banned in the UK... What do you have to do to have that?
Marty
I don't mean to range OT for this thread, but I was under the impression that centerfire pistols were pretty much banned in the UK... What do you have to do to have that?
Marty
Cromlech
Member
bumm said:I don't mean to range OT for this thread, but I was under the impression that centerfire pistols were pretty much banned in the UK... What do you have to do to have that?
Marty
It's dead.
 R.I.P
R.I.PFN Hi-Power b. 1976 d. 1992
I like the strategically placed item(can't tell what it is exactly) in the foreground with the "puede matar" lable.
It's a pack of cigarettes.
Bob R
Member
What I do with my point and shoot digital when it comes to flash is to tape a piece of 3x5 card over the flash at the bottom.
This diffuses the harsness of the flash and still allows some light to escape at the top for bounce off of the ceiling or wall.
I am sure you could experiment with different colors of paper, if you wanted. Kind of a cheap color filter.
This is what it gives me. Enough light for detail, but doesn't wash it out.

bob
This diffuses the harsness of the flash and still allows some light to escape at the top for bounce off of the ceiling or wall.
I am sure you could experiment with different colors of paper, if you wanted. Kind of a cheap color filter.
This is what it gives me. Enough light for detail, but doesn't wash it out.
bob
bumm
Member
Cromlech was saying
>It's dead. R.I.P
>FN Hi-Power b. 1976 d. 1992
You have my condolences. That is as infuriating as it is sickening.
Marty
>It's dead. R.I.P
>FN Hi-Power b. 1976 d. 1992
You have my condolences. That is as infuriating as it is sickening.
Marty
- Status
-
Not open for further replies.
Similar threads
- Replies
- 101
- Views
- 6K
- Locked
- Replies
- 0
- Views
- 296
- Replies
- 184
- Views
- 8K
- Replies
- 66
- Views
- 2K