Photographing loaded cartridges

Status
Not open for further replies.

Squeaky Wheel

Member
Joined
Oct 22, 2011
Messages
157
As a beginner reloader, I'm interested in learning how you guys take such good close-up pictures of loaded cartridges. This may be important for asking online questions about something odd that crops up.

What are the do's and don'ts of taking great close-up cartridge photos?

What type of cameras do you guys use? Can a smartphone work well, or does it require a 'real' camera?

Thanks in advance!
 
Personally I try to employ all of my photography skills. I set the camera on auto and press the shutter button and also pray a little. Fortunately with a camera brighter than I this generally yields good images. :)

Seriously, we have several very good photographer types here who can likely give much better advice than I can. However, here is a little of what I try to do. When photographing brass cases or loaded ammunition I generally polish the brass a little using a non-ammonia based brass polish. Also consider the background color(s) and texture, you want emphasis on the brass.Using a good camera with manual settings I try to use a short or narrow depth of field so my subject ammunition is well defined in focus with the foreground and background is out of focus or blurred. I try also to pay attention to my ambient lighting and the lighting color temperature to get a good white balance in my images. For close up images I like to use a good macro lens when needed and use a few different lenses as needed. For a basic point and shoot camera pay attention to the lighting and background. Positioning of the brass is important. Without getting crazy or pedantic the layout plays a big roll in the end images.

Smartphones can really vary tremendously as to the image quality, just a matter of how good the camera in the smartphone is, everything from how many mega-pixel to how well it affords flash as needed.

Again, we have some members who really do excellent not just ammunition but gun photography. This has come up in a few threads with incredible images posted. I just dabble in it. A good Photoshop software program helps also.

Just My Take
Ron
 
Personally I try to employ all of my photography skills. I set the camera on auto and press the shutter button and also pray a little. Fortunately with a camera brighter than I this generally yields good images. :)
Like I always say, "'A' stands for Awesome..."
 
Take your lens off the camera body, turn it around and tape it to the camera body, now you have a Macro lens with a small DoF.


Otherwise use Macro "mode" or Av mode set to a small f-stop.
 
Squeaky Wheel said:
What are the do's and don'ts of taking great close-up cartridge photos?

What type of cameras do you guys use? Can a smartphone work well, or does it require a 'real' camera?
I took photography in high school and did yearbook in college - still, I am just at hobby level in my picture taking skills.
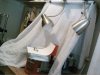
Here's my set up.

I do not have a fancy setup like a light box. I simply drape my reloading bench with an old towel with clips (BTW, that's my 2'x3' portable castered reloading bench inside the 5'x6' walk-in closet so often the single 13W CFL on the ceiling is enough lighting to take pictures). I keep brass in plastic Folgers coffee containers in a shelving unit next to the bench so I just grab one and set a dollar store cooking/baking pan on top of it. I set a couple of 8.5"x11" copy paper I use for targets on the pan rolled up against the Lee powder measure mounted to the bench to show continuous white background. I use two 13W CFL gooseneck clamp lights I use for the reloading bench flipped down for taking pictures and flipped up for reloading. (BTW, this picture was taken with a LG smartphone with a single 13W CFL mounted on the ceiling of the closet)

attachment.php


Here are my tips:

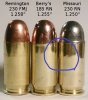
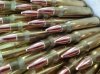
1. Having the right equipment really helps. Most of the pictures I post on THR is taken with LG android smartphone model LG-C800 (T-mobile myTouch phone) and Olympus SP-600UZ digital camera.

I have taken close-up pictures with several different smart phones and the quality of close-up pictures are not the same. The LG camera has zoom, brightness control and flash and I usually take the pictures with 25-35% zoom, brightness set to max and no flash to reduce reflection/glare (two CFL clamp lights provide more natural light color and reduce shadows). With the digital camera, I use the macro mode with the lens almost touching the object (like taking pictures of barrel chambers/rifling).

The LG smartphone is not active for cellphone use as I have other smartphones so I use it primarily as a bench camera. You probably could find used one on craigslist/classified for cheap.

2. Don't use flash or too bright of light as it creates glares. The two 13W CFL clamp lights have provided enough lighting for all the pictures I took for THR threads the past 3 years. On occasion, I have used small LED flashlights as supplement lighting but most of the times, the gooseneck clamp lights provided enough directional adjustment to reduce glare/reflection and shadowing.

3. Try tilting the camera with close lighting. You don't always have to take the picture at perpendicular angle. To show maximum detail, I will actually take off one of the clamp lights and place it right behind the smartphone so I have plenty of lighting without shadowing and zoom in 25-35% while holding the smartphone back a bit from the object. If I see glares or dark reflections on the cases, I will angle the smartphone slightly so I see bright brass cases. Personally, I think some shadowing makes the pictures appear more natural/real but will use a small LED flashlight if I want to eliminate all shadows.

4. If you can't hold the camera steady while it is focusing to take the picture, pictures will be blurry/out of focus/not sharp. Rest your body/elbows/hands on something steady (doorway, bench etc.) or use a tripod.

5. Don't laugh but although I have photo editing softwares, I prefer to use Microsoft Paint program to crop and insert texts/arrows (it's quick and easy for me). I open the pictures with the picture viewer and adjust the window size to get the right size of objects in the picture and press the "Print Screen" button (above the Home button) to copy and paste into the Paint program. After I crop/edit the pictures, I save it as JPEG compression to save space on server harddrives (I am currently using 41 MB for 635 picture attachments).
 

Attachments

  • photography.jpg
    photography.jpg
    35.1 KB · Views: 1,012
Last edited:
Like I always say, "'A' stands for Awesome..."
So the A setting stands for Awesome? That was great and I have to remember that. :)

Something I should have mentioned is when using flash I do use things to diffuse the light so it isn't harsh. Paper tissue sometimes fills the bill.

bds, that was a great post and the setup really shows what a little imagination can do. Really, really nice. I have been meaning to put together something similar. With retirement on the horizon that will make a real good project. Thanks for the motivation and ideas.

Ron
 
Cartridges are bright (or should be), so I often have trouble with glare. I get better results with indirect flourescent lighting and no flash.
 
Sometimes glare/reflections cause optical distortion. Here's an example of picture I took on a rush that shows this affect.

attachment.php


When a concern for bulging of cases came up in another thread, I took this dark/shadowy picture to prove the cases are not bulged - it was just glare/reflection (Berry's reload in the center between two factory rounds).

attachment.php


attachment.php
 

Attachments

  • MBC230.jpg
    MBC230.jpg
    39 KB · Views: 851
Last edited:
Nice stuff there bds.

We know how Remington has been big on using bees in naming some of their ammunition. Names like Hornet, and Yellow Jacket come to mind. Years ago they did a really cool and interesting picture and used it on the Yellow Jacket .22 ammunition boxes. They went out and caught some yellow jackets. They were placed in a jar and in a refrigerator. When the bees get cold they get sluggish and somewhat dormant. Several cartridges were painted with a clear sugar water solution around the bullet.

The bees were removed from refrigeration in a warm area where the cartridges were. Using tweezers the bees were placed beside the cartridges. As they warmed up and slowly became active they began to climb the cartridges attracted by the sugar water smell. A series of photographs were shot making for some really cool images. Really slick how it was done and the bees cooperating. The bees were actually released and the claim was no bees were harmed in making the images. That had to be early 60s and I have never forgotten those pictures.

This summer I want to try a few things like this once I am retired. I will finally have the time to experiment a little with the cameras I have. Maybe even learn something along the way. :)

Ron
 
One thing I have discovered in the last year, is that the iPad2 takes pretty good photos close up. Do not use any zoom. See attached.
 

Attachments

  • image.jpg
    image.jpg
    123.5 KB · Views: 173
If I want to take a GOOD photo of a couple rounds then I break out my Canon DSLR, EF-S 60mm macro lens, and a TRIPOD.

The most important item is the tripod. :) This allows a long exposure at high f-stop for maximum DOF.

Sometimes I resort to a wider angle lens if the macro lens won't work. Like for this photo:

IMG_5844.jpg
 
Lots of good tips. I've found that lighting is very important and selecting the proper while balance for the lighting you have goes a long way to get good looking pictures.

Defuse lighting reduces shadows.

Remember that for most pictures you want to post on the net you don't want a large file or high resolution picture. VGA 640x380 is usually quite adequate to illustrate your point. If you want a real close up you can use the higher resolution of your camera to take the picture and crop the subject to make an "enlarged" picture for the net at lower resolution.

Example, the picture below was taken at 7 meg and the subject area was cropped to show a close up of a primer.

Primer.jpg
 
For extreme close up shots, try LED flashlights as your lighting source at various angles.

When I tried to capture the details of primer cups/anvils, the usual 13W CFL clamp lights did not bring out enough of the details. I have 80/120 lumen and 100/250 lumen LED flashlights and toilet paper tissue over 80/120 lumen flashlight at different angles/distance worked to capture these shots - http://www.thehighroad.org/showthread.php?p=7794378#post7794378

This shot was fairly straight forward. The LED flashlight was held overhead while I took the picture.
attachment.php


Notice the difference between overhead vs angled lighting? The bottom picture of anvils show greater detail with angled lighting.
attachment.php


With this shot, I wanted to highlight different anvil tips and shapes. I angled the LED flashlight and this was the best of like 10 different light angles.
attachment.php
 
I am lazy, so I usually just use my Droid Bionic phone to take photos. My camera is rated at 8MP and I recently figured out that I can set the focus point to where I want it on the subject. I should work on some close-ups with my DSLR.

Here is one from the shooting range on Saturday, taken with my phone. It does pretty good for a built in camera that is always with me.

photobucket-67859-1360572530429.gif

ee8e5a4a-263a-4133-86bc-d3e36c5d72db.gif
 
Last edited:
I know a professional that uses her Android for the most of here work.

I have two cheapy phones that I use. One takes nice pictures the other is good enough to get your point across.

Funny thing is the one with the worst camera & cheaper display shows the best images.
 
this was the best of like 10 different light angles.
Yep, good lighting, multiple pics, from multiple angles. "Pic" the best one.

I use a lens held up to my little Sony camera to simulate a macro lens for closeups. It does OK. Lighting is probably the most important.
 
Status
Not open for further replies.
Back
Top