Video Powder Check...No Adjustment Necessary

Status
Not open for further replies.

GW Staar

Member
Joined
Feb 26, 2009
Messages
3,709
Powder Check/Lockout Dies rob your press of a station. No longer necessary! Finally there exists small enough, inexpensive enough video cameras and monitors to replace a powder check station. Especially nice for Pro 2000 owners who have a harder time peeking into cases, being that the stations between powder drop and bullet seating are in the back.

pRS1-16172670t98.jpg
51340p0rfNL._SY100_.jpg 41WRO5zq8zL._SY100_.jpg

IMG_1620.gif

Went to the local Radio Shack and bought their $30 LED strip coil that's cuttable into many 3-Led 12volt pieces. (Don't look at them directly or you will damage your eyes.) Then I glued a single 3-LED piece inside my Pro 2000 casting with dbl-sided foam tape. Bright is good! I still have nearly 3' of strip left for where ever else my dim eyes need them.....Hmmm under the shelf over the bench.....or maybe under my railing at my front entry steps. One 2" section lights the whole thing (seven risers)! This product requires a 12 volt transformer. COOL product!!! (covered with a clear plastic weather proof sleeve)

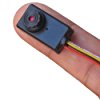
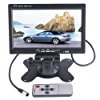
The inexpensive Miniature movie camera (5volt, $56 and comes with a transformer) and the 7"diag. video monitor (12 volt, $34 need a 12v transformer) I got at Amazon. I shared one 12v transformer I had in the parts box for both the monitor and the LED lights. I mounted the monitor, vertically in the included case, screwed temporarily to a one inch wood dowel.....I have a 12" long 1X1 steel sq. tube ready to paint for a permanent mount.

OK, here's the video, but keep in mind that it's a video of a video (quality suffers): I placed a variety of cases for the demo: First a blinged .357, then the hardest one, a dirty dark .223 case (can't but barely see the bottom in the vid of the vid, but in real life video I can....but still a little bling would help), then a blinged .308, dirty 45ACP, a really dirty .40 S&W, then the bright .357mag again. Obviously bling makes a difference. The end of the video may be a mess, but I de-tripoded my camera so I could show you the little camera tucked & epoxied to the press casting top inside. The picture quality is darker and grainy in this video of a video...real life video is excellent! I'm very pleased! Click on the picture to see the video:

th_MVI_1619.gif "] th_MVI_1619.gif [/URL]
 
Last edited:
I have all the stuff to do the same thing. Just haven't had the time to hook it all up yet. I plan on mounting the camera on the end of an inspection mirror that has a flexible shaft----
http://www.harborfreight.com/2-inch-mirror-with-flexible-shaft-97217.html

That way I can move it from side to side depending on the position of the powder drop. Right now the powder drop is in station 3, but I do intend to move it to station 2 for several calibers as I get things set up a little differently.

Currently waiting for RCBS to ship me the lower parts for the powder die. Also waiting for the RCBS 9mm powder thru expansion die to come back in stock.
 
Gosh, and to think that I just look into the case after the powder drops using my Dillon. How primitive! (I do have a bright light shining on my work area.)
 
Great! Then you aren't so primitive. At least you're not lighting a match.:)
 
Oops....fixing the prices...thanks. When my ram is all the way up the camera was just a tad too deep and prevented full stroke by about a 1/32". So I unscrewed the camera case and used a little heat shrink tube to cover the circuit board and glued it in without. Clearance was fine after.

Edster, I looked at that one.....but it was too big for what I wanted. You can point yours at an angle outside the ram and see fine in short pistol cases, but .308 and .223 was also a goal of mine and angle & clearance was the problem. Yup small monitor is cheaper still. You'll have to post a video when you get done.
 
Last edited:
That's his Forster trimmer. It's way cool as well. He had a video of it in action.
 
Edster, I looked at that one.....but it was too big for what I wanted. You can point yours at an angle outside the ram and see fine in short pistol cases, but .308 and .223 was also a goal of mine and angle & clearance was the problem. Yup small monitor is cheaper still. You'll have to post a video when you get done.

I understand your reason for mounting directly above. Still working thru all my plans while waiting for parts to arrive. Just sent another email to RCBS asking when it was going to ship. They told me by the end of the week two weeks ago. I ordered this stuff a month ago now.

My main reason for the flexible arm is some calibers I will use the powder thru expander and powder drop in station 2, and the rest will be the traditional set up with expander and powder drop separate. So in case 1 I need to have the camera over station 3, and in case 2 it will be over station 4. But who knows by the time all the parts arrive I might be on revision number 7 or 8 of the whole plan.

I do see your point. The clearance is so small between the shellplate and the casting that my vision of sliding it in a track was dashed. The bright spot on the shellplate in the video is between 3 & 4.....so if I were to move my bullet feeder to #3, I'd be seeing the bullets not the powder level. Hmmmm I may have to add another camera.....one for rifle and one for pistol, and install a switch between. I suppose another one time expense of $60 isn't terrible...amortized over a year.:rolleyes:

Worth it? Well yeah! One of the problems when you get my age. is keeping proper focus on all the important steps at once. It was too easy to miss seeing a powder cop....the Lockout die (for sale now) was good only for pistol, and I ain't drilling a hole in the press casting to insert a Dillon squawk box. (that thing is $80 or so.) Can't miss that big screen!:) All my projects are for one purpose......extending the hobby as long as I can before I have to hang it up with Alzheimers or something, and make it as fast and comfortable as possible. Another case of that below.

Rule3: Click the picture below for my video of my trusty, 44 year-old, now arthritic-friendly Forster. :) (trims, chamfers, deburrs in one push of the button switch) Note....the mirror next to the press you see in the video was what I used before the video camera came along...the LED's replaced the big black lamp in my face as well.

th_ForsterImproved.gif "] th_ForsterImproved.gif [/URL]
 
Last edited:
The light one........but I am screwing around with it in the video.......I was trying to peer into that damned black dirty hole in the .223, annoyed because in the video of the video you can't see the bottom........in real life you can! Shoulda used a tumbled case. Also all the wobbling is due to all those cases sitting on a big #3 shell plate for .45/.308.....not exactly a reloading scene.

A real picky observer will also notice the die plate is for .40 S&W. A real mix and match! I just stuck in the first one I came to to fill the hole and test clearances. You all know my videos are always rough.....I don't take the time to do productions.:eek:
 
R3,
You might not get all that stuff if you get an RCBS press, but you'll certainly be eligible for it. :D

GWS,
You the man! I'm thinking a good spot for the monitor might be on a portable stand (or permanent attachment) directly behind the bullet tray. (I do actually use that tray to hold bullets.) Reach for a bullet and check the monitor at the same time. You see any downside?
 
So if I decide on the RCBS press I get all this cool stuff too???:D:D

Of course......you didn't KNOW that?:evil:

Be glad to coach you as needed. None of my stuff is hard to make....well except the APS primer counter.....had to out source for the circuit board.:rolleyes:

I'm thinking a good spot for the monitor might be on a portable stand (or permanent attachment) directly behind the bullet tray. (I do actually use that tray to hold bullets.) Reach for a bullet and check the monitor at the same time. You see any downside?

No, I don't see any down side. My wood dowel mount is a temp until I paint my 1x1 steel tube......guess you could weld a plate to the bottom and make it portable. I'm just going to glue in a wood block inside the bottom and lag it to the table from underneath. Mines a little high on the dowel....the permanent mount will be a little shorter.
 
Looking from the eyes of an outsider I can see that they think we need some therapy :scrutiny:, yet looking through the eyes of a man I see this is our therapy. :D
 
BTW I thought about using a little air cylinder in place of my press Lever and rigging up a foot pedal to cycle it. ( no Pun) Any suggestions other than a blast shield, a sprinkler system and some good insurance? (Pun)
 
Looking from the eyes of an outsider I can see that they think we need some therapy :scrutiny:, yet looking through the eyes of a man I see this is our therapy. :D

Wow, I didn't know.....I thought I was the only one. I do all this to stay out of the funny farm.......bars......brothels......CIA recruitment offices....you know. (and my wife is happy that I stay out of her hair):)

One person has asked me if I had any pictures or video of the build process.

Really this is so simple that I didn't think much in the way of a tutorial was necessary. If you order the parts you will see what I mean.

The only "extra" thing I had to do was unscrew the two tiny phillips-head screws in the camera case, remove the single tiny circuit board (with lens mounted on it) and covered it with shrink tube for protection. Why? Because mounted with the case around it there was not enough clearance between the shell plate and the press casting to raise the ram all the way. Least not inside where the best view can be had.

Once removed and covered I just used 5 minute epoxy and cemented it to the spot I chose, between station 3 & 4.......people might experiment between 2 & 3. I used plastic tack to place it temporarily for "hot" tests of what the monitor displayed. Once I had the spot picked out, I used the raised ram with a little square of cardboard to hold the glued camera in place for the 5 minute set time.

The leads from the camera (2) just plug in to the supplied transformer lead, and the lead to the monitor. NO conversions.....they plug right in.

As for mounting the Monitor......again two wires: one plugs in to the camera as noted above....the other is literally "leads" to be soldered to a 12 volt DC transformer you will have to purchase or rob from your electronics surplus box. I used some small garage door opener wire and soldered one end to the 2" LED piece, to the copper spots provided, and the other end to the same 12v transformer used with the monitor at the monitor/transformer connection. That connection amounts to sliding a 3/4" piece of shrink tubing onto the positive transformer lead, then twisting the three positive leads together, soldering, folding it inline and sliding the shrink tube over the joint. Light a match and shrink the tubing around the joint. Repeat for the negative leads. BTW the LED strip pieces are marked + and - so you can't screw that up. (YES, polarity is important)

For those not schooled in DC elect wiring, RED is positive on the leads from the monitor. Looking at the black dbl wire lead from most small transformers, (do cut the end connector off first) then determine which is positive. It will be the wire with a white stripe or repeated white marking or perhaps just a rib texture. (The door wire I used is white with one side having a black marking on the wire.....the one with the marking is positive.)

Use a small plug strip with a switch, plug in the transformers and turn it on. That's it. Wire routing? I haven't finished that yet. Zip ties and/or coiled ribbon tubing may get used. Each will have a different need with that.

If anyone needs more pictures......maybe tell what area is needed and I will add them. I wasn't sure there would be any interest in more details.
 
Status
Not open for further replies.
Back
Top