
You are using an out of date browser. It may not display this or other websites correctly.
You should upgrade or use an alternative browser.
You should upgrade or use an alternative browser.
What clever little things have you "invented or discovered" that you can share?
- Thread starter James THR
- Start date
sugarmaker
Member
Dillon 600 2000 rounds per hour
Take a 2 liter soda bottle and cut it at a 45 degree angle beginning about 1 inche into the body of the bottle. Drill a hole in the bench the size of the bottle mouth (tight fit) at a 45 degree angle about 6 inches past the end of the 600 . Stick the mouth of the soda bottle in the hole. Place akro bin, 5 gallon bucket, etc. beneath the bench (I happened to have a shelf there so the shells only fall 8 inches or so).
Load a shell onto the spindle with left hand, work the handle with the right while picking up another shell with the left. Flick the lever back sharply with the left index finger and the shell will fly off the spindle directly into the bottle, then drop into the bin. Place the new shell onto the spindle and repeat.
I too tried to order the climax rings from the local fastenal. The response was that they were trying to wipe out their own internal stock of the rings, so that is why they were so cheap. They are still available from Climax, through Fastenal, but at the original +/-$8.00/each price. No dice. I did some digging, and found this:
http://www.drillspot.com/products/9..._istc-087-14_1-piece_threaded_clamping_collar
Jackpot! I have not ordered any yet, but I should be soon. I think I will get a few reloaders that are interested to go in on it to make the shipping worth it.
One thing I noticed is the 1-5/8 outside diameter of the collar. It might be too tight for some progressive. I am pretty positive that they would not fit in all 5 stations of my LNL AP. If I only using stations 1 and 4 with a 2 die set, it should work. I am sure there would be no fitment issues with a single stage.
sniper1259
Member
- Joined
- Sep 4, 2009
- Messages
- 38
to bds and all, just a quick note about die lock rings
just about any large fastener company on the net has "thin style 7/8-14 lock nuts" they are hex nuts about .200 to 1/4 inch thick and really thin from the flats to the threads
and they go for about 20 to 40 cents apeice. (on my Dillon 550b i dont need but one per die or 4/head because the tool heads are removable)
but for the rock chucker and others that have to chance the dies out to chance cals, use two per dielocked against each other, if you cant find them at a nut and bolt store then try Dillon, they dont just sell to Dillon press owners! they work great for me and a 10 inch cresent wrench works great tightening them up. no allen wrench and these DONT "just get loose some times....(mysteriously...)" !")
just about any large fastener company on the net has "thin style 7/8-14 lock nuts" they are hex nuts about .200 to 1/4 inch thick and really thin from the flats to the threads
and they go for about 20 to 40 cents apeice. (on my Dillon 550b i dont need but one per die or 4/head because the tool heads are removable)
but for the rock chucker and others that have to chance the dies out to chance cals, use two per dielocked against each other, if you cant find them at a nut and bolt store then try Dillon, they dont just sell to Dillon press owners! they work great for me and a 10 inch cresent wrench works great tightening them up. no allen wrench and these DONT "just get loose some times....(mysteriously...)" !
Last edited:
whtsmoke
Member
Take 45 acp brass and lube it good, take a steel resizing die and force the 45 brass into it using a vise, knock it out and you have some nice littl cases to use in your 44, found this years ago in a reloadeing book. i used them in my little charter arms bulldog when they first came out.
MarshallDodge
Member
I assume that you are using a 44 sizing die?whtsmoke said:Take 45 acp brass and lube it good, take a steel resizing die and force the 45 brass into it using a vise, knock it out and you have some nice littl cases to use in your 44, found this years ago in a reloadeing book. i used them in my little charter arms bulldog when they first came out.
gamestalker
member
Seating without belling the mouth
When I started reloading 30 some years ago, I would seat my bullets without belling the mouths. I discovered early on that as long as I was careful about alligning the bullet, it would seat perfectly fine and with less working of the brass without belling. This is really effective on auto loading cartridges, especially 9mm, which had a reputation of set back issues many years ago.
When I started reloading 30 some years ago, I would seat my bullets without belling the mouths. I discovered early on that as long as I was careful about alligning the bullet, it would seat perfectly fine and with less working of the brass without belling. This is really effective on auto loading cartridges, especially 9mm, which had a reputation of set back issues many years ago.
nojoke
Member
Photo essay of installing a dillon powder check into a lock n load
I'll reply back if the thing ever breaks.
I opened it up to 7/16"
Started at 1/4" and used a piece of wood as my drill guide.
Used a drill press into the wood to assure the guide was true vertical.
Then clamped the guide onto the press.
Worked very well.
Light hand on the drill since the aluminum is quite easy to drill through.
I've included a couple of measurement pictures for anyone wondering.
Last edited:
whtsmoke
Member
MarshallDodge yes you use a 44 special steel die, sorry i didnt make that clear. i always just loaded them with light loads, they were a hassle to make but were fun to use at the time when special brass was a little costly.
neck brush holder from spent brass
Made a neck brush holder for my bench with a deprimed 30-06 shell. Drilled out the primer hole then tapped it to hold a cleaning brush. My bench is made out of 2 by 4 so I drilled a hole in the bench beside my press and glued it in place. You can screw in whatever size brush you are loading for. When you are sizing and depriming brass just give the neck a few passes over the brush before putting it in the press.
Made a neck brush holder for my bench with a deprimed 30-06 shell. Drilled out the primer hole then tapped it to hold a cleaning brush. My bench is made out of 2 by 4 so I drilled a hole in the bench beside my press and glued it in place. You can screw in whatever size brush you are loading for. When you are sizing and depriming brass just give the neck a few passes over the brush before putting it in the press.
Innovative
Member
Here's an easy project that works real well ....
The RCBS Case Master is a great tool for the money. However, spend a few bucks in your local hardware store, and you can improve one quite a bit. This simple upgrade removes the rickety, spongy play from the adjustable V-blocks. Now you can get much more consistent readings.

These are the required parts . . . .

Visit my website, and you'll see over 130 pages with articles that show Handloading Tech Tips and "easy projects" like this one.
.
The RCBS Case Master is a great tool for the money. However, spend a few bucks in your local hardware store, and you can improve one quite a bit. This simple upgrade removes the rickety, spongy play from the adjustable V-blocks. Now you can get much more consistent readings.
These are the required parts . . . .
Visit my website, and you'll see over 130 pages with articles that show Handloading Tech Tips and "easy projects" like this one.
.
j2crows
Member
RCBS hand held primer modification
So many times I wish I had something that would set my primer depth at the seating I wanted. So...I drilled a hole in the handle of my RCBS hand held priming tool. Then I threaded the hole. Threaded in a 7/8" long bolt through the front of the handle and a square nut (that's all I had) on the backside that fit the bolt. I had to grind the square nut so the it wouldn't hang up on the backside. Sacrificed some real old cases, a new case and a 4 times shot case. Backed off the nut and backed out the bolt. From here it was simple trial and error adjusting the bolt in/out until I found the sweet spot for the primer seating depth I wanted. Tightened everything up and, "bingo" it worked!! I then proceeded to prime 50 cases as fast as safley possibe and each one was right on!!. Don't know how long the adjustment will last but it's very easy to readjust.
So many times I wish I had something that would set my primer depth at the seating I wanted. So...I drilled a hole in the handle of my RCBS hand held priming tool. Then I threaded the hole. Threaded in a 7/8" long bolt through the front of the handle and a square nut (that's all I had) on the backside that fit the bolt. I had to grind the square nut so the it wouldn't hang up on the backside. Sacrificed some real old cases, a new case and a 4 times shot case. Backed off the nut and backed out the bolt. From here it was simple trial and error adjusting the bolt in/out until I found the sweet spot for the primer seating depth I wanted. Tightened everything up and, "bingo" it worked!! I then proceeded to prime 50 cases as fast as safley possibe and each one was right on!!. Don't know how long the adjustment will last but it's very easy to readjust.
Attachments


Elkins45
Member
Have not read the whole thread, so forgive me if this has been covered before.
I installed the Lee Bench Plate system so I could keep my bench less cluttered by swapping out presses, powder measures, etc. as needed. Because of the way they are shaped, if you run a press long enough without retightening the screws you will end up with it in your lap. Usually that's my reminder that I should have tightened the screws a few rounds before
To stop this I stacked all my mounting plates together and drilled through a hole that wasn't covered by any of my presses. I then installed the plate in the clamps and drilled through the metal and all the way through my bench top. Now after I install and tighten the clamps I just jam the screwdriver down through the hole in the plate into the bench. This lets the screwdriver act as a stop pin and prevents it from falling off the bench.
gathert
Member
Good idea. I just grab two big C clamps and put one on each side of the inch thick board my press is mounted on that has my press and powder measure mounted to it. Easy way to move the whole setup and nothing on the bench to get in the way when the press is not there.
16in50calNavalRifle
Member
- Joined
- Mar 7, 2009
- Messages
- 355
Elkins and gathert, unless mine is different, the Lee Bench Plate system actually has a hole pre-drilled in the wood pieces and the mounting plate and the presses just for the purpose of a "safety" - something like a screw or a screwdriver that goes through the press/tool, wood piece, and bench and keeps the press from slipping off.
Anyway, it's good to know I'm not doing anything wrong, because your presses get loose too.
Elkins you mentioned the "way it is shaped" - meaning the whole bench plate set-up with the wood mounting pieces. Just occurred to me - what if the trapezoid (yes, I remember that one thing from geometry) had the top or small end pointing out, towards the edge of the bench, instead of inward? The press loosens up because of the motion/force of resizing and belling the case mouth.
If we mounted a press the other way - top of press towards the long side of the wood piece - and of course reversed the bench plate so that its long side was on the inside, away from the edge of the bench, wouldn't it pretty much put a stop to the problem we're talking about?
Lee is kind enough to supply 3/4 wood pieces - but they're pre-drilled, so we'd have to drill new holes to mount the press to them. And then of course another set of holes to mount the bench plate in the reverse direction. I don't really want to perforate my nice butcher block bench surface that much - wish I knew about the loosening issue before I mounted this to begin with.
Is there any other idea you guys have about ending this issue - the bench plate system is a great idea, seems kind of stupid to be always checking if the press is secure (as I do).
Steel Talon
Member
Don't waste money on cleaning patches, go to Goodwill and buy a few 100% cotton white t-shirts and cut them up.
Or go to a fabric store and buy a yard of cotton flannel for $4.00 to cut your patches from. Let me tell you a yard will last you a very long time...
AndreaCarrara
Member
Lee hand press, ram.
Good Day everybody.
Since I deprime in front of TV, I got annoyed emptying the ram after 45 spent primers...so I drilled the ram for an additional inch.
Now I can deprime more than 50 cases without stopping halfway. I used a column drill with a 8mm drill bit to dig in.
Cheers.
Good Day everybody.
Since I deprime in front of TV, I got annoyed emptying the ram after 45 spent primers...so I drilled the ram for an additional inch.
Now I can deprime more than 50 cases without stopping halfway. I used a column drill with a 8mm drill bit to dig in.
Cheers.
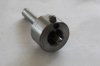
Neck turning tool
Enjoyed quite a few hours browsing this thread, thanks all.
Thought I would share this little tool. It is used in a lathe and I can hold the case with my fingers. I will use one of the Lee case holders as used in their hand held case trimmers and use it in a tailstock chuck.
The case is a close fit on the mandrel and needs to be well lubricated. Spin the lot slowly you don't wan't to heat things up. I haven't perfected it's use yet. It is set up to use after sizing.
Enjoyed quite a few hours browsing this thread, thanks all.Thought I would share this little tool. It is used in a lathe and I can hold the case with my fingers. I will use one of the Lee case holders as used in their hand held case trimmers and use it in a tailstock chuck.
The case is a close fit on the mandrel and needs to be well lubricated. Spin the lot slowly you don't wan't to heat things up. I haven't perfected it's use yet. It is set up to use after sizing.
Attachments
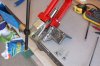
Press mounting
This maybe a bit elaborate for what it does but it does allow me to use the bench for other things without having holes in the top. I suppose about the best about this is knowing that it will work if you wanted to do the same thing.
This maybe a bit elaborate for what it does but it does allow me to use the bench for other things without having holes in the top. I suppose about the best about this is knowing that it will work if you wanted to do the same thing.
Attachments
Vette
Member
Be careful if you order the climax lock rings. they are a well made product and well worth the money but be sure to pay attenyion to the outside dia. I bought 10 of them and my dies are to close together to use them except on one turret press. This has nothing to due with the product and is intirerly my fault for not measuring first
quartermaster
Member
If you are having problems with your hammer type bullet puller with the rubber band binder which holds the collets together, throw it away and replace it with a shellholder. I fits nicely.
I can't take credit for this idea as I read it in a magazine, but it does work and is a lot less agravating than trying to get that rubber band back on.
I can't take credit for this idea as I read it in a magazine, but it does work and is a lot less agravating than trying to get that rubber band back on.
Similar threads
- Replies
- 47
- Views
- 3K
- Replies
- 0
- Views
- 76K
- Replies
- 1
- Views
- 253
- Replies
- 60
- Views
- 3K
- Replies
- 16
- Views
- 8K