
PhillySoldier
Member
- Joined
- Sep 11, 2017
- Messages
- 150
Getting ready to start a project finishing off my garage and building a new reloading bench. Currently I have 3 different reloading stations and bench's - 1 station in the basement and 2 stations in the garage that hopefully all will be consolidated to the new bench
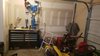
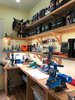
I have sort of a cubby spot in the garage 10' 6" x 4' that will be the new bench. Right now I have a toolbox bench w 650 in that area (pic attached). I wanna start by adding some additional electrical sockets to that area as well and finishing plastering and painting the garage. The 2nd pic is sort of what I aiming for except I want to do a full wall of cabinets for the base and only 2 rows for shelves. The counter top will run the full length and be 30" deep
And tips, suggestions etc are all welcome. If interested I'll post progress updates. No clue what im doing w the electrical or spackling so this autta be interesting


") Same top construction, laminate, wood edging, but the frame is full steel. Once leveled up with the leveling feet I added later, and screwed to the wall, it doesnt move either. Too bad my current living situation doesnt allow for it.
Same top construction, laminate, wood edging, but the frame is full steel. Once leveled up with the leveling feet I added later, and screwed to the wall, it doesnt move either. Too bad my current living situation doesnt allow for it. 


