
I heard about this but never tried it, or have seen it done. Has anyone ever gotten a fixed front sight revolver that turned out to shoot way low, only to file off too much and have it end up shooting a bit too high? I’ve heard of building it back up with job weld or Epoxy putty; then shaping it off the remaining sight and getting it back to stock. One can then SLOWLY swipe a shave or two with a fine fileat a time while testing in between until accurate. Anybody tried or seen this done? Problems with, or tips/tricks to it? Thanks
You are using an out of date browser. It may not display this or other websites correctly.
You should upgrade or use an alternative browser.
You should upgrade or use an alternative browser.
Building up front fixed sight with Epoxy or steel putty?
- Thread starter becket
- Start date
- Status
-
Not open for further replies.
I don't recall using JB Weld for a sight, but I've used it for other things. It is strong, it files, shapes and sands nicely. Once shaped, it can be colored black with a permanent marker like a Sharpie.
I don't know that there's any real magic to it. You'll want something to keep it roughly in place and in generally the right shape while it's curing. Something like some soft, slick plastic--or maybe aluminum foil. You'll need to do something to the sight to make the new addition adhere. JB Weld is not really an adhesive so much as it is a structural material that hardens. So the sight will need to have some sort of notches or grooves that will give the JB Weld something to hold to after it hardens.
It's not going to be as sturdy as the original steel sight, but it will probably hold up pretty well. I guess if it all goes really wrong, you can get someone to silver-solder a new sight on the gun. Or maybe cut off the old sight, put a dovetail in the barrel (assuming enough barrel material to work with) and then put a dovetailed front sight on .
edwardware
Member
- Joined
- Feb 23, 2010
- Messages
- 4,426
JB is very soft, for the smallest wear part on a steel revolver. I own S&Ws old and experienced enough that holster wear has slightly rounded the carbon steel front sight.Problems with, or tips/tricks to it?
The correct solution would be a new sight and hard solder. Sculpting in JB would work if you get the bond really clean, and your willing to re-make it every few times you make contact with it.
I'd try the JB Weld. I love the stuff. I really don't understand how it works because once it cures it is very hard and might even be called brittle, but I've used it to turn a notched AR15 hammer into a rounded one on a dedicated .22 build and after 5000 rounds, the JB Weld is still there and shows no signs of wear after all of those cycles of the bolt cocking the hammer with the JB Weld being the point where the bolt meets the hammer.
What I do is make sure that you read the package to make sure that you are getting the latest and highest strength formula. I think the best stuff is at 5000psi or something like that. Don't get the JB Kwik. Get the stuff that you are supposed to let set overnight. Before you start working on it, heat your oven up to about 175*. Once you have it molded to the front sight, by whatever means you will use, stick it in the oven for about 20 minutes. The heat will accelerate the curing process. It'll be done just that quick.
I don't think you need to go through any extreme measures to prep the surface either. Just degrease it and scuff it with sandpaper. Shoot, when I mix JB Weld, I do it on a paper plate with a waxish coating on it. I stick the plate in the oven with the part I'm working on so that I can check that to see if it's done baking. The JB Weld actually sticks to the wax coating.
Other than JB Weld, I did see welding rods online that allow you to weld with a propane torch. The rods have something like a 900* melting point. Heat up what you want to weld with the torch and touch the rod to it. I didn't look into it any further, it just reminded me that I need to buy a welder. It's probably just some form of silver solder.
I have a shooter (another m64 Smith’) that I bought cheap and then found out why, ‘back when’.
I eventually will have it cut to 3” (just like that size barrel in a carry gun) and a dovetail put in. There’s s gunsmith about an hour away that can do it; but I’d like to try the front sight fix as a basic test piece first. Better that revolver so my inevitable mistakes or technique shortcomings will be exposed on a gun it won’t really matter on. I’ll let you know
and try to get a tip or two to help anyone else
trying it.
had some extra glass from a bedding job:

the super Blackhawk was shooting too high with the 300 grain bullets @ 1400 fps so I did a little experiment with the acraglass and a file.
I would not do this with my model 29, but I can always send the ruger out and get a pinned front sight if I decide to "fix" the situation.
luck,
murf
the super Blackhawk was shooting too high with the 300 grain bullets @ 1400 fps so I did a little experiment with the acraglass and a file.
I would not do this with my model 29, but I can always send the ruger out and get a pinned front sight if I decide to "fix" the situation.
luck,
murf
Never tried it with epoxy or JB weld. I pinned and soft soldered a piece of brass rod on the top of my sight. You can use square rod and file it to the shape and height or use round rod. I used a round rod and a "ghost sight" rear sight. The soft soldering temps did not hurt the finish on the rest of the sight and the barrel. I was careful. You can do some calculations to get the correct height if you know where the gun shoots now.
Or, and this is my recommendation if you shoot the gun a lot, you can just mount a red dot sight and forget the front sight.
Or, and this is my recommendation if you shoot the gun a lot, you can just mount a red dot sight and forget the front sight.
Good tips! Think since it is an inexpensive gun I just want to shoot a bit before the front sight and that part of barrel is remixed, I’ll thy the rod first. Once filed to accuracy I can take the calipers and measure the height from barrel; then I can have a correct height for the epoxy deal When I do get it cut down and dovetailed, I planned on putting an Xpress big dot on. It’s to be built for lose up 10yds or less and practice at longer ranges will show me where to hold. I guess for the rear, the gunsmith can just cut what’s needed across the channel and. I want the front sight to be prominent due to aging eyes, hence the big dot. But doo those sights have any elevation adjustment in the back? Guess I should go look, duh.
Vern Humphrey
Member
Or you might attach a sliver of steel to the top of the front sight with JB Weld or epoxy. Let it set, then paint it flat black.
Or you might attach a sliver of steel to the top of the front sight with JB Weld or epoxy. Let it set, then paint it flat black.
This sounds like a better idea. JB Weld works really well as a glue.
1. Get some super-thin SuperGlue
2. Lay a thin bead along the top of the sight (just "wet" the top surface)
3. Pick up a "pinch" of baking soda and using thumb/forefinger "spinkle a fine dust of that baking soda on the (wet) superglue. It will instantly harden rock solid.
4. Sandpaper flat surface.
5. Repeat 2-3 as required to build up the sight as req'd
`Can do this at the range and (just as instantly) find/tailor the right sight height.
GooseGestapo
Member
- Joined
- Jan 6, 2003
- Messages
- 6,157
I’ve used banding strips (used for banding steel tubing for shipment) cut to desired shape cemented with JB Weld to raise front sight. Also .12” aluminum plate cut and filed to shape. But deemed straight epoxy to be too soft.
Also used JB Weld to cement heli-coil threads into aluminum or magnesium aircraft engines and components. Once used to repair the engine block on a Ford 3000 diesel tractor that cracked. Probably from freezing. Used the putty, created a thread, worked it into the crack after cleaning with acetone. 15yrs later, it’s still holding !!!
I suggest mixing in some metal shavings to give it some rigidity.
All excellent ideas! Shavings for strength, a baking soda buildup, welds etc; lots of unique ways this has been tackled in the past. As an aside tip: Another use for the baking soda comes from my tile days. You need some mud to set fast, add a handful of baking soda to a bucketful of the tile cement. Mixer-drill it in, WORK FAST and you have set tiles in an hour. Good for setting a section of cuts, or last tiles heading out a door. Good in small batches for home fixes and replacing cracked tiles on a much smaller mix scale
Driftwood Johnson
Member
Howdy
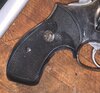
This is the front sight on one of my Colts. Before I bought it somebody had stripped all the finish off in an attempt to make it look old. Perhaps at the same time the front sight was repaired. I have always assumed it was repaired with solder. As can be seen, the repair was undercut slightly to make it a little bit more secure. The trick would be using a solder which melts at a low enough temperature so as not to disturb the hard solder that holds the sight to the barrel. This Colt is one of my main match revolvers in CAS and has gotten drawn and holstered a lot over the last 15 years or so, so the repair is quite secure.

This is the front sight on one of my Colts. Before I bought it somebody had stripped all the finish off in an attempt to make it look old. Perhaps at the same time the front sight was repaired. I have always assumed it was repaired with solder. As can be seen, the repair was undercut slightly to make it a little bit more secure. The trick would be using a solder which melts at a low enough temperature so as not to disturb the hard solder that holds the sight to the barrel. This Colt is one of my main match revolvers in CAS and has gotten drawn and holstered a lot over the last 15 years or so, so the repair is quite secure.
Nice! I’m trying Underwater Weld, a waterproof epoxy. I am waiting on the rough shape to dry overnight, then I’ll shape it enough to start testing height before finishing and paint. Afa above, I’m contemplating trying to solder and glue a 1/4, penny on and shaping till correct before polishing the copper outer bit. This first test is mainly to get correct height from barrel to hit center at
5 & 10 yards. I’ll go thinner at top to sight well in gutter rear sight. This first test will also measure strength and shape holding ability with several cylinders of standard,
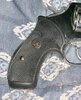
then +P fmj ammo. If it holds, I’ll cut 75% off; then router out a trough and epoxy in a 1/4” polished penny in roughly the shape in post above. Once dry I’ll retest. If all’s well I will make it all look at least decen. So should I paint the base black, or silver? Also about done with.squarebutt to round butt conversion; you can see where I need to finish with the fine file to even up the rear of butt. Grips are compact Pachmyers. Nice wood will follow the polish job and hammer bob to come soon.
5 & 10 yards. I’ll go thinner at top to sight well in gutter rear sight. This first test will also measure strength and shape holding ability with several cylinders of standard,
then +P fmj ammo. If it holds, I’ll cut 75% off; then router out a trough and epoxy in a 1/4” polished penny in roughly the shape in post above. Once dry I’ll retest. If all’s well I will make it all look at least decen. So should I paint the base black, or silver? Also about done with.squarebutt to round butt conversion; you can see where I need to finish with the fine file to even up the rear of butt. Grips are compact Pachmyers. Nice wood will follow the polish job and hammer bob to come soon.
Last edited:
Vern Humphrey
Member
I like black. Black sights do well in almost all conditions. If you need low light performance, you can paint it with typewriter correction fluid.Nice! I’m trying Underwater Weld, a waterproof epoxy. I am waiting on the rough shape to dry overnight, then I’ll shape it enough to start testing height before finishing and paint. Afa above, I’m contemplating trying to solder and glue a 1/4, penny on and shaping till correct before polishing the copper outer bit. This first test is mainly to get correct height from barrel to hit center at
5 & 10 yards. I’ll go thinner at top to sight well in gutter rear sight. This first test will also measure strength and shape holding ability with several cylinders of standard,
then +P fmj ammo. If it holds, I’ll cut 75% off; then router out a trough and epoxy in a 1/4” polished penny in roughly the shape in post above. Once dry I’ll retest. If all’s well I will make it all look at least decen. So should I paint the base black, or silver?

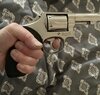
Round butt almost ready to polish. Out after final evening up of backstraps and shortening strain screw a tad more:
Attachments
Vern Humphrey
Member
I never thought of building up a front sight with parmesan cheese!View attachment 921590 View attachment 921591 Pics below in roughed in shape:
")
That one finally gave in, but I may have found the laughable replacement. I started over after cleaning the original shaved sight top well and
was wondering what to try next. I ended up snipping a tiny cutting off the end of medium diameter bright green weed eater plastic line! Some superglue under and in the curved gaps at the bottom, a bit of light sanding cleanup ;
And viola! A poor man’s fiber optic. Darned if it hadn’t held tight through all use and a range table kerpkunk as well. Looking down the barrel it looks nice and bright green, shoots dead on now. Go figure.
GeoDudeFlorida
Member
- Joined
- Dec 1, 2020
- Messages
- 11,229
My wife makes stained glass art. I borrowed her soldering gun and flux to silver solder over and fill for a picatinny rail mount over the hole left behind on a 1917 Remington rifle where some bubba had cut off the rear sight. It was a lot of work but the silver solder is hard, melts at a low enough temperature not to cook off the hardness of steel, and it takes to bluing. I’m not sure if it’s a good solution for your project but the silver solder used for stained glass work is easy to find and relatively cheap.
Do you know exactly what kind of solder it was?
The solder typically used for stained glass work is very soft and is a tin or tin/lead alloy with a melting point below 500F.
Silver solder is much harder and has a melting point between 1200F and 1700F. A torch is required to melt it.
The solder typically used for stained glass work is very soft and is a tin or tin/lead alloy with a melting point below 500F.
Silver solder is much harder and has a melting point between 1200F and 1700F. A torch is required to melt it.
- Status
-
Not open for further replies.
Similar threads
- Replies
- 18
- Views
- 5K