Well this project has been an ongoing educational project since April of this year when I decided to strip the bluing off a Cabela's Confederate Navy. Although these particular guns aren't too well thought of by many, they happen to be great starter guns and this particular one is my favorite shooter. At this point in time it's got north of 1,000 rounds through it at least. The standard load is 16gr 3f and other than the recoil ring has a pretty distinctive imprint from the back of the cylinder, she's still about good as new.

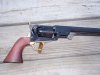
Original finish with no modifications.
===============================
Although there are some imperfections I don't think that I'd want it perfect. Given how much this gun gets shot it will undoubtedly pick up it's fair share of handling marks over the next few years.

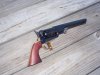
Barrel markings removed, polished and two applications of Birchwood Casey Plum Brown
========================================================
For any of you who are thinking about doing this I think the biggest advice that I can give is, "Take it SLOW". Make sure that BEFORE you apply the browning solution all metal parts are polished EXACTLY how you want them to be. Once it's browned any areas that aren't polished will show up like a flashing blue and red light in your rearview mirror. Luckily I didn't rush the polishing on this one or it could have looked a lot different. The other thing that you want to be ready for is what your parts are going to look like after applying the browning solution, they ain't gonna be purdy believe me. My first thought was "Crap, how am I going to fix this mess?"
All parts to be browned were heated in the oven for at least 45 minutes at 350 degrees. I opted against a torch on the advice of 45-70 Ranger, the oven will provide much more even heat and you don't have to worry about getting carried away and over-heating any particular area.
Mykeal warned me against using round balls to seal the chambers and bore but his warning came a little too late, I'd already started the process. But...I used a brass hammer to seat those balls into the places I didn't want the solution to go and it worked, but if you're gonna do it this way make sure you get them seated right at their equator or just a little past. I had one fall out on the cylinder but it was after the first application and I did not do the face of the cylinder a second time so I got away with it. If I were to do it again I'd use wooden plugs.
Conclusion...
Would I do this again? Probably, removing the barrel markings wasn't real labor intensive and the soft metal is pretty forgiving. Have read numerous times on this forum about making sure your polishing is right before you blue/brown anything saved me from myself on that part. If I was to do it again it probably would/will be on my 2nd Model Dragoon one of these days.
Original finish with no modifications.
===============================
Although there are some imperfections I don't think that I'd want it perfect. Given how much this gun gets shot it will undoubtedly pick up it's fair share of handling marks over the next few years.
Barrel markings removed, polished and two applications of Birchwood Casey Plum Brown
========================================================
For any of you who are thinking about doing this I think the biggest advice that I can give is, "Take it SLOW". Make sure that BEFORE you apply the browning solution all metal parts are polished EXACTLY how you want them to be. Once it's browned any areas that aren't polished will show up like a flashing blue and red light in your rearview mirror. Luckily I didn't rush the polishing on this one or it could have looked a lot different. The other thing that you want to be ready for is what your parts are going to look like after applying the browning solution, they ain't gonna be purdy believe me. My first thought was "Crap, how am I going to fix this mess?"
All parts to be browned were heated in the oven for at least 45 minutes at 350 degrees. I opted against a torch on the advice of 45-70 Ranger, the oven will provide much more even heat and you don't have to worry about getting carried away and over-heating any particular area.
Mykeal warned me against using round balls to seal the chambers and bore but his warning came a little too late, I'd already started the process. But...I used a brass hammer to seat those balls into the places I didn't want the solution to go and it worked, but if you're gonna do it this way make sure you get them seated right at their equator or just a little past. I had one fall out on the cylinder but it was after the first application and I did not do the face of the cylinder a second time so I got away with it. If I were to do it again I'd use wooden plugs.
Conclusion...
Would I do this again? Probably, removing the barrel markings wasn't real labor intensive and the soft metal is pretty forgiving. Have read numerous times on this forum about making sure your polishing is right before you blue/brown anything saved me from myself on that part. If I was to do it again it probably would/will be on my 2nd Model Dragoon one of these days.
")