Anyone have the scoop on Daisy's 1884 BB gun?

Status
Not open for further replies.

rick-o-shay

Member
Joined
Oct 28, 2017
Messages
52
I talked to my buddy today, he mailed the bb gun, supposed to get here fri., but it's not a Red Rider. He told me it has a hammer- look it up and it's a 1884. So even with the broken cocking lever it's probably a decent price.
They're going for more on fleabay, one private auction house has 5 bids and it's up to $500.
One fellow says his is so accurate he's shooting flys off the wall at 10 feet.
Friday seems months away.
 
  • Like
Reactions: 444
Are you talking about the Daisy Spitting Image guns?

They made two,,,
A Winchester Rifle and a Colt SAA Revolver.

Unfortunately I don't have any pictures of mine,,,
Here's some generic web images.

7365909_3CK02HZND.jpg
179-web.jpg


Back in the early 60's they were the guns to have,,,
The revolver is a very low power BB gun,,,
The rifle shot about like a Red Ryder.

I own a pair of each just for the fun of them,,,
For backyard plinking at beer cans,,,
They're hard to beat.

I do believe they are now discontinued from Daisy.

Aarond

.
 
The 1894 is a cool gun but not the easiest to work on.

FWIW, there is also a Daisy 'Model 94', some have a non functional hammer on the stock. The Model 94 came after the Red Ryder Carbine No. 111 Model 40 and was the last "Red Ryder" (they stopped using the Red Ryder name after about 1958 and were called Carbine instead) until 1972, when the Model 1938 Red Ryder came out.
 
It came a day early- thats a first in post office history!!
It is the 1894, some good and some bad, it's well used. The cocking mechanism doesn't catch, I'll bet when it quit he threw it across the yard and broke the lever.
The hammer works as a two stage safety sort of, and it works.
I ordered a used lever off flea-bay and a repair manual. Daisy is getting back to me with a parts list I hope.
The NRA mentions them on a Daisy history write up.
IMG_1249.jpg IMG_1250.jpg IMG_1251.jpg IMG_1252.jpg to be continued.....
 
It looks pretty good in the photos, and all there. There are a couple versions of the 1894, but hopefully some of the following info will apply to yours:
Good luck, I'll be watching this one!
 
Some good some bad, got the new lever in, no BBs out yet. It had a catastrophic failure of the lever the hammer hits on, then I'd say the kid smashed the gun down and broke the lever, sort of like when I used to break golf clubs. But I can tell it's got some power just by cocking it. I'd say on par with my modded RR.
I want to thank KR in Ohio for the manual, he even sent three targets along with. It's much easier to read than the down loaded copy I found. Also Denis in WI who sent the new/used lever off fleabay, it was in good shape and works well. As a bonus it's the new style where the two halves are welded on the short arm thingy?
When I called one fellow about a parts list he said they don't use one. The parts are hard to match up and hard to work on, I should send it in for repair. It is a bit fiddly, but went step by step with the manual and took pics. There is a couple vids on the tube also.
All I started out to do was replace the lever, but when opened up it needed cleaning. I didn't take the power plant out though.
I read about the fellow who designed this riffle, I am impressed how well every thing fits together, it is a true copy. Even the plastic wood grain stock and forearm look good. Although my stock has a slight leftward warp, the plastic is very sturdy, unlike todays cheap junk.
I'm leaving it cocked over night, to see if the seal might reform and push a little air out the barrel. If not tomorrow I'll get some of that transmission stop leak and give it a bath, for a temporary fix. That stuff is supposed to make seals swell up. The barrel was dirty but not rusty so I think the air chamber will be OK, hope the air tube isn't split.
Thanks Cobalt for the links
This thing is no rapid fire blazing saddles gun, when you cock it forward you have to put the safety on to return the lever, then cock the hammer again to shoot.
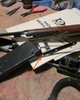
When I opened it up I could see there was a problem with a bent arm- top arrow in pic. IMG_1271.jpg IMG_1290.jpg IMG_1298.JPG
to be continued.....
 
got a little further, not good though. The plunger assy is junk. The air tube has damage on both ends. I can't figure how the front could end up like this, except some nimrod took a screw driver and hammer to it. And the back of the feed assy has been gouged up with some thing.
Got some parts coming.
cobalt did a lot of spring checking, I didn't find anything like this spring, does anyone know if it's stock? .07" dia X 6 3/4 free length .70" OD 25 coils. IMG_6364.jpg IMG_6369.jpg IMG_6376.jpg IMG_6371.jpg
 
Wow, not much spring rate to that one! The closest I see is from a Model 499B:
0.077” wire OD x 0.69” spring OD x 32-33 coils x 7” free length.
(Your spring is ~ 5.5 Lbs/in versus ~ 6.9 Lbs/in for the 499B spring.)


If you go w/this spring, I wouldn't cut it down any. I'd install it w/the small amount of "extra" preload the length gives, that along with the slightly larger wire OD should give a modest boost in MV.
 
Last edited:
Wow, not much spring rate to that one!
0.077” wire OD x 0.69” spring OD x 32-33 coils x 7” free length.
(Your spring is ~ 5.5 Lbs/in versus ~ 6.9 Lbs/in for the 499B spring.)

Sorry where does 499 come in? Are you saying it's the weakest of all???

If you go w/this spring, I wouldn't cut it down any. I'd install it w/the small amount of "extra" preload the length gives, that along with the slightly larger wire OD should give a modest boost in MV.

HAHA Merry Christmas to all- cobalt I figured every one would be bunkered down for santa.
I had a hunch to check this thread after I got back from the mail box.( my computer is not message freindly). I got a new plunger assembly in just now.
And a thanx to JG who answered the same question,in a email. I figured it'd be next year before any thing happened. I don't know what you came up with cobalt, I was told "thats about right, should be 7" long" on the spring question.
The cocking force is about par with the modded (5/8" spacer) Red Rider & stock model 25.
However the cocking mechanisms are so different that may not say much.
I'm not doing a test-n-tune here, it's the only one I have, the air tube is skinny, I'm going to drill it out, and not preload the spring. What ever it comes out - is alright. There are plenty of guys who've got these in multiple, they can test-n-tune. I lived a long time with one rat gun, until it was a hobby.
I predict it'll be par with the other two at least. This spring may be 1/4 inch short but feels about the same, on this lever.
 
As far as weak to strong, the 499B is at the bottom, the Sheridan Cowboy at the top. But there's more to it than just spring rate, as you eluded to. The 1894 uses a smaller diameter compression chamber and who knows what the piston stroke is- so the spring rate is only part of this equation. Not preloading the spring is probably a good idea- no reason to overstress it for a few more fps.

FWIW, my notes have some results another fellow got from drilling a 1894 air tube:
"Drilling the 1894 air tube (to 3/32") gave me about 27 more fps."
ETA- His stock air tube was a tight 5/64”. A 1/64" increase doesn't sound like much but it's about a 30% increase in area.
 
Last edited:
Couple new developments- no BBs yet. Not only is the 1894 compression chamber tapered, but they used "cobalts" modification in the beginning. The " plunger case"
is a half inch shorter than my Chinese RR. Don't know about the early RR.
And it's built heavy. I drilled the air tube to an 1/8 inch, but with the 1/2 inch preload, I'm going to to build a compressor tool. No way to get that stake seated w/o it. I'd test it stock but it is fiddly to break down and rebuild. Plus I want to shoot!
Merry Christmas to all. We got snow for Christmas in the pacific northwest. IMG_6404.jpg
 
Couple new developments- no BBs yet. Not only is the 1894 compression chamber tapered, but they used "cobalts" modification in the beginning. The " plunger case" is a half inch shorter than my Chinese RR. Don't know about the early RR.
And it's built heavy. I drilled the air tube to an 1/8 inch, but with the 1/2 inch preload, I'm going to to build a compressor tool. No way to get that stake seated w/o it. I'd test it stock but it is fiddly to break down and rebuild. Plus I want to shoot!
Merry Christmas to all. We got snow for Christmas in the pacific northwest.View attachment 772450
When you say "they used "cobalts" modification in the beginning", I'm guessing that mean the spring comes preloaded from the factory?

I did not know the 1894 compression chamber was shorter than a RR. Interested to see the results of your mods! More I see, more I think I 'need' one of these...
 
Last edited:
ROLFL--we got ammo down range. HAHA
It does work, but needs some help. The first pic is a black diamond BB stuck in my hall way target from about 10 ft.
The other is a half hour outside, sitting, and testing power. I hoped it would loosen up and gain some power, I think the opposite happened, even my old eyes could pick up the flight of the BBs.
IMG_6429.jpg IMG_6437.jpg
 
So there are some problems, I did drill the air tube, but the first seals I received, were ground down RR seals. They are in the gun. I also received a set that looked like stock RR seals. Didn't try them, the spring unit and stake were already installed, so I couldn't check the fit. Who ever had the gun apart last managed to put a slight crease in the midpoint of the chamber. I'm sure that must effect the seal as it travels past. I did stick some bits of feather along the seam behind the chamber, didn't see any air movement when fired. You can see a 2 1/2 inch weld which makes the compression chamber.
I would think for these seals to seal properly they'd need a flexible lip to expand and contract as the air cylinder tapers. Although the old one didn't seem to have one.
The feed follower mechanism on this gun is wore out. Spring is weak and the metal grabs. Leading to dry fires. This gun cocks both ways, found out what happens. When the lever cocks forward it doesn't load a BB. The action of pulling back moves the air tube back enough to allow the spring feeder to push a BB into the chamber. If I hold my thumb on the feed follower it will load a round. Also when the magazine is full, (feeder spring compressed) when 1/2 way through the second motion you can see the follower slip down a notch as it feeds . So that follower is an indication of many rounds are left before recharge.
weld.jpg follower.jpg
 
Yes cobalt you need one, just be careful what you pay for it. I'm underwater on this one.
Yes the preload is a 1/2 inch shorter plunger case, and on top of that another 1/2 inch preload to get the stake in, with a compressor.
Anyone interested in how things work, this is a great piece of engineering. There is an article some where about the guy who designed it, wish Daisy would bring it back new w/o the fake hammer.
Fascinating as a hit-n-miss engine.
The hammer weighs 1 3/4 oz, don't think anything inside the chinese RR weighs half that. That coupled with the stiff hammer spring makes for a lot of energy to set off the main spring. I can see why the first version of the secondary lever got so bent up.
To operate it I found after a shot, cock the hammer like a single action pistol, then cock the lever. The hammer has two positions, half cock and the lever will return to stock, and full cock and the same. But the hammer has to be out of the way for it to be able to return the lever. And if your at full cock, you can hold the hammer and return the gun to safe.
I like to have a heart attack, this was the third time I put this back together, almost done and I see in my can of screws a pin, I left out. No clue where it went. Finally figured out it was the stock spring holder for the old air tube.
I'm done with it for now, I may follow up later. The feed mechanism needs work on this one.
This is fairly involved, I recommend the manual as a must. As is a spring compressor, you can't fit a thin screw driver between the plunger and the body. Which I have the dimensions for some where.
1984 hammer.jpg
what is that?.jpg
 
Well, regardless of the somewhat slow MV you seem to be getting, props for taking on the task- and succeeding. If not for lacking the correct plunger head, I believe the gun would be shooting better than ever, that is if the chamber crease isn't killing the compression. Either way, good job and thanks for documenting it all here- I'm betting it'll be a help to anyone looking for info on the 1894.

And yes- that's a honkin' big-A hammer!!

A hit-n-miss engine? Dam, last one I saw in the wild was installed permanently in an old Disston sugar mill that was alongside a canal in my FL hometown. The engine was too massive to haul out after the mill quit working so it became part of the ruins. I heard a while back that there were some people looking into opening a museum there but no idea what came of it- if anything.
 
Last edited:
Every night I turn off my computer, every morning I get a new ip address, so I don't get notifications from some forums.
I did this thread because there isn't much info one these BB guns. One video I found was a study in "don't do this".
I left one string hanging, the spring compressor, since no notifications, I can't answer questions unless I log on to this thread.
Think of a U with a handle off the bottom. The legs are 1/8 inch thick by 2/1/2 inches long-- 2 inch long won't work- don't ask. The distance between the legs has to clear .56 inches. So a 1/2 in rod won't work.Unless you can weld some spacers. Part of the pic is looking at the end of the receiver with the plunger case and spring installed. It's dam cold in the garage right now, so I cut a slot in a piece of 1/2 thin wall conduit. Had to bend ears on the legs to hold the spring because the thin wall allowed it to slip between the spring and the receiver group.
To do it again I'd weld 1/8 welding rods to a piece of square or flat bar-worked down to .57".
Hit-n-miss engines? The late 80's ran into a gold surveyor on holiday. He'd been up in the Nevada mountains surveying old gold mines. Said there are plenty of old hit-n-miss engines up there at the abandon mines- to heavy to bring back down. Built one from a set of plans- not too successful -ran about 5 minutes. Hope to convert a Wisconsin engine to one this summer.
Hope this thread helps some one in the future.
IMG_6445.jpg
 
A scan of the repair manual for the Daisy 1894 along with a blueprint for the spring compressor tool can be seen HERE.

Here's some additional info on the spring compressor tool:

JG Airguns sells a factory tool, cost is $50.00. Expensive, but some folks won't have the option of making a tool.

I made a spring compressor from a piece of scrap wood and two lengths of steel rod. It is shown below.

Specs:

The wood is 1-1/2" x 5/8" x 10" long. I smoothed the end and edges for ease of handling.

The rods are 5/32" diameter (1/8” would work fine, too.), having >/= 6-1/2" exposed length.

The rods are inserted into drilled holes that are ~1" deep and JB Weld holds them in place.

DAISY_SPRING_COMPRESOR.jpg


This is one made from a cheap spark plug socket:


DAISY_SPRING_COMPRESSOR_SPARKPLUG_WRENCH.jpg


Below are spring compressors of a different type- they compress the plunger spring. This was made from inexpensive hardware that many folks will already have:

PLUNGER_SPRING_COMPRESSOR2.jpg


An innovative plunger tube assembly compressor:

PLUNGER_SPRING_COMPRESSOR-B1.jpg


The following passage was written for the Red Ryder type plunger assembly. I don't know if the exact same washer size will work in the 1894, but the concept might work:

To make compressing the plunger spring easier when it’s time to reinstall the plunger assembly, I use a 13/16" OD washer with an ID large enough to fit easily over the plunger tube to give the tool something more than just the end of the spring to purchase on. The washer goes on the tube first followed by the spring then the wiper and piston. If you don't have any such washers on hand, I found some that were a perfect fit while rummaging through the hardware drawers at my local Ace hardware. IIRC they were in the bushing area. Cost was like a nickel each.

DAISY_104_W-COWBOY_SPRING_INSTALLED-A_w-text.jpg
 
LOL this ol’ girl’s got her claws in me and won’t let go. It’s so bad I named her “Ophelia" this morning.
While watching hockey last night, I came up with a plan to relieve some of-if not all the crease in the compression chamber. Woke up twice thinking about her last night. I’m a guy who thinks of guns as a tool, like a drill press, made to poke holes in stuff, the army taught me that, although they were a little more adamant about my weapon. I found an M-60 will keep my attention.
Didn’t see any use in going any farther and have the crease in the compression chamber be the culprit.
I looked at the factory seal that came and it does have a bit of a flair compared to the first one, which I suspect was ground down from a late model.
The used one has maybe 150 rounds and left cocked over night when I wasn’t using it. The OD is .079 and the factory one .081. with a more flexible skirt.
To see if it does any good, I braved the rain storm, brought out the stuff and got a base line. 142.4 FPS for an average. Had trouble picking up the rounds on the crony, but I could see every flight. Some real nice cure balls.
I also put a couple BBs in the barrel and blew them out, it’s tight enough to make' em sting my palm, so I won’t worry about a new barrel.
The factory air tube has a seam so I’ll use the modified one I’ve got.
Tomorrow out to the shop.
Cobalt
5/32 rods are very tight in the model 1894, in fact the spring stayed compressed until I pulled them out.
And kudos for your wooden handled compressor-works great and quick-n-dirty. Stock on left
stock on left.jpg
 
1-2-18
Hopefully this will be a how it’s done not an example of don’t do this.
My idea is to drive a tapered plug across the damage and pop it out.
First I tried to raise the low spot with heat, didn’t work, but I needed to temper the metal to relieve any stress.
I was surprised how resilient that paint is, don’t know what they used back in the 70’s but it with stands a lot of heat. Of course damaged paint is not “collectable”.
I put a cylinder scope down to see if I could get before and after pictures. Win or lose I’ll post them.
 
Spent most of the day, but got the crease out. After a few attempts I had to reduce the diameter of the plug, but it drove home good. It might be the case I stretched the compression chamber a bit, but the seal should follow it OK-I THINK?
It's been a week or so I've been thinking about this, worried the plug would fold over the crease. And another old BB gun goes to parts sale.
What I thought was a scratch in the paint on the left hand receiver cover, opened up to be a crack. There is a lot of torque cocking and firing this BB gun. I've got replacement parts coming.
No reassembly tonight , I'm celebrating the fact I didn't trash this tin toy, so tomorrow will be a non working/recovery day.
 
Ophelia's a shooter!
Didn't crony it yet, feels about like a Chinese RR. The compression tube repair and the proper seal made a huge diff. The BB feed is a bit baulky, got new coming for it.
Not much good with open sights, this one rattles around. I might scope it, might try a lazier sight.It's a keeper and it's been fun. Next time the chrony's out I'll see what it does and post.
They say this is Daisy's hardest hitting, not sure about that. The first cock moves the spring guide 1 3/4 inches and the second pulled the air tube back about 1/2 inch or so.
Tried to show the workings of loading and firing, it is a blast to shoot.
 
One last note, fixed the spring BB loader with a spacer to increase spring rate. There are new springs available.
I bought a used left hand receiver cover, it wasn't direct fit and a darker color, so order new old stock, which matched color. They both must be newer models, were sturdier built. Minor mods easy enough with a Dremel and now the gun doesn't twist when it's cocked.
 

Attachments

  • IMG_6512.jpg
    IMG_6512.jpg
    121.8 KB · Views: 17
  • IMG_6513.jpg
    IMG_6513.jpg
    78 KB · Views: 16
  • IMG_6514.jpg
    IMG_6514.jpg
    64.3 KB · Views: 16
Status
Not open for further replies.
Back
Top