Big Holster Tips?

Status
Not open for further replies.
Happy with my lining, though I could have used MUCH thinner leather.

The decorative strap will tighten up the belt loop to the holster.

Rough slicking the edges, lots of finishing to do.
 

Attachments

  • DSC02205.jpg
    DSC02205.jpg
    67.9 KB · Views: 15
  • DSC02206.jpg
    DSC02206.jpg
    126 KB · Views: 14
Have you tried piloting the needle holes with a small drill? I mark my stitches with a toothed wheel, then drill out each tooth mark so the needle is a tight but not impossible fit in the hole.
 
I was thinking of using a drill by the time I got 1/2 way done.

I have used a lacing chisel on thinner projects and didn't like how much material is cut.
 
Hey Doc, I make holes in leather with a tool that I got with an Exacto set. I chucked it in my drill press so I can use the leverage from the press to put in my holes and make it easier to sew. I also use thinner leather, like 3-4 and 5-6, and glue them flesh side to flesh side. When you are done you have good leather inside and out. I,ll take photos if you want to see what I do. Any questions, feel free to ask. Joe
 
I don't like the idea of drilling holes because it removes material. When the holes are punched with a diamond awl, you're not removing any material and the holes will close up around the stitching, making it look much, much cleaner.

IMG_1792b.jpg
 
Seems I am using the wrong kind of awl for poking my holes, and not lubing it with beeswax.

No WONDER my hands hurt.
 
I don't like the idea of drilling holes because it removes material. When the holes are punched with a diamond awl, you're not removing any material and the holes will close up around the stitching, making it look much, much cleaner.
Well, yes and no. Removing material does no harm -- if you use a groover for stitching, you also remove material, but no one says you shouldn't do it.

Conversely, a diamond awl leaves cuts, which under stress can enlarge.
 
Removing material means the holes never close up. People do it because it's quicker and easier, not because it's better.

The diamond awl used in combination with a stitching groover makes the stitch look much cleaner AND protects the threads.


...which under stress can enlarge.
Not if it's properly saddle-stitched.
 
Seems I am using the wrong kind of awl for poking my holes, and not lubing it with beeswax.
What size is your blade? I can tell you from experience, it's a lot more work until you get the right size awl blade. I went through two or three before I found what works. Stitching should be easy until you get to the backstitch.
 
I am confident in my stitching. My burnishing is ok.

Do you all typically stamp and wet form before you assemble?

I've read several different notions.

I had to give up on the snakeskin inset.. my skill just isn't up to it with the tools I have on hand. I tried several times to get a nice oval or egg shape, and was just boogering it up. I am going to hand stamp/texture the strap tomorrow before dying and securing it.
 

Attachments

  • DSC02207.jpg
    DSC02207.jpg
    62.6 KB · Views: 12
  • DSC02208.jpg
    DSC02208.jpg
    77.3 KB · Views: 13
  • DSC02210.jpg
    DSC02210.jpg
    57.9 KB · Views: 11
  • DSC02209.jpg
    DSC02209.jpg
    78.9 KB · Views: 10
Last edited:
Oh the awl I have been using is a scratch awl not a diamond.. to it has a taper that gets larger if you push it too far. I was really having to hammer it to get through FOUR layers of leather at the seam. I switched to a stitching awl with a chisel point for doing the holes in my strap, it worked great!

It's a learning experience, and I am having fun in spite of my cramping hands and back.
 
A good, sharp diamond awl makes all the difference in the world. Keep it sharp and it will glide through the leather.

Sometimes my fingers get sore from stitching but the only cramping I get is when I'm doing a lot of stamping.


Do you all typically stamp and wet form before you assemble?
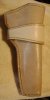
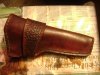
Here's the order in which I build a holster. Obviously, there's more than one way to skin a cat and some folks do it differently.

1. Create the pattern. I either draw up a pattern from scratch, or create it from another. Either way, I draw it up on manila folders by laying the gun lengthways along the fold, sights down. I carefully roll it over to one side and do a tracing. When I cut out the pattern, I fold it first and cut the bottom and both mainseam edges at the same time.

2. I lay out the pattern onto the leather and cut a slightly oversized piece from the hide. Reason being, even with a large cutting board (24x36), it's easier to cut out the pattern from a smaller piece.

3. Trace the pattern and cut it out. I use a red ink pen for this because if ink gets anywhere on the finished piece, it will be covered up by the color. I do my pattern cutting with a trim knife, utilizing a rotary cutter for any straight edges.

4. Bevel the edges that need beveling. I do not bevel the edges where the mainseam will be glued and sewn together. I prefer a bissonnette style edger.

5. Case the leather, wetting it on both sides and letting it dry for a few minutes, until the surface starts to dry. Our tap water has a high chlorine content so I use bottled water.

6. Cut all my stitching grooves, both sides. I cut my grooves approximately 3/16" from the edges. This will result in the stitch line being about 1/8" from the finished edge.

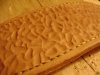
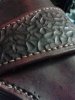
7. I proceed with any line work and stamping. I frame out my border stamping with the stitch groover. Depending on the pattern and level of embellishment, I may cut several grooves on the holster. Using a freehand groover with stainless ruler as a straight edge for the inside border along the fold.

8. Add the maker's mark, stamp the make, model and year.

9. Mark the main seam with the overstitch wheel.

10. Cut my grooves and punch all the holes for the belt loop. Including the holes where it is stitched to the pouch.

11. Cut stitching grooves on the inside of the pouch where the belt loop will be sewn on. Some of this can be done with a straight edge but most is free-handed. This protects the threads from abrasion during holstering.

12. If it is to have a retention strap, I cut the hole in the belt loop with a bag punch and stitch it into place at this time.

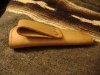
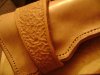
13. Most my holsters have at least a partial welt. At this time I cut it out and glue it in place onto the front side.

14. Punch holes for mainseam on the front side only, including welt.

15. After the glue dries I dye and completely finish the inside. I put one coat of dye on the outside so that it colors evenly under and around the belt loop. I also slick the appropriate edges at this time.

16. Stitch the belt loop into place.

17. Glue the mainseam being extremely careful not to get glue where it doesn't belong.

18. Punch holes for the mainseam from the front side to the back. Being careful to align the backside holes with the stitching groove. This is where a good sharp awl really pays for itself. Sharp = slow and careful penetration.

19. Stitch the mainseam. I back stitch both ends three or four stitches, starting at the throat and ending at the toe. Cutting the thread off on the back side only.

20. I use a bench sander to sand my mainseam edges smooth and even. Which also removes any glue that ran out.

21. Bevel the edges of the mainseam one last time.

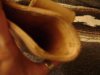
22. Apply dye until desired color is achieved. Usually one or two more coats. When the holster is good and wet the last time, I wet form it with the firearm (or dummy) it was fitted for in a 1gal ziplock bag. Allowing it to dry overnight.

23. Apply one or two coats of extra virgin olive oil, allowing it to completely soak in.

24. Apply gun tragacanth. Slick the edges again, paying particular attention to getting the mainseam as close to perfect as possible. I do not use edge paint. As the gum trag is drying but still slightly damp, I start buffing with a denim remnant. Leather will polish to a nice luster when it's slightly damp. I may also do this while it's wet forming.

25. I use either Bag Cote or Tandy's Professional finish and buff a final time.

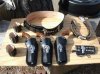
26. I take pics and ship it to whatever lucky SOB ordered it. :p
 
Done for tonight. 'Fakeskin' made with a pear stamp.

That light brown in 2 coats plus a rubbed in EVOO gives it a deep red-brown tone.

Overall I am pretty pleased.
 

Attachments

  • DSC02211.jpg
    DSC02211.jpg
    86.6 KB · Views: 9
  • DSC02212.jpg
    DSC02212.jpg
    80.1 KB · Views: 9
  • DSC02213.jpg
    DSC02213.jpg
    130.8 KB · Views: 16
  • 10603551_10152404271653235_4425967023160309368_n.jpg
    10603551_10152404271653235_4425967023160309368_n.jpg
    36.9 KB · Views: 15
The owner loved it, his father in law might be wanting one just like it. ;)

He did mention he forgot what a beast it was to carry, but her really liked how it rode.
 
Glad to hear it. Always good to make the customer happy. I'm going to a gun show for the weekend, and I have a customer who is a Paladin nut. I'll post photos later. Joe
 
Status
Not open for further replies.
Back
Top