This thread will be dedicated to the modifications required to turn this:
27" Long / 17" LOP / 7 pounds unloaded

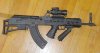
Into this
29" long / 18" LOP / 8.6 Pounds Unloaded

PLEASE, do not discuss the function or quality of the bull pup kit/parts. That has been discussed in length in multiple threads about these rifles. I would like to keep this thread focused on the just the modifications I made to the factory gun.
If you would like to be added to an email group send and email to [email protected]
Please put "Bull Pup" in the subject line and the following info in the body:
This build thread is base on using a factory built Bull Pup AK-47. There is a KVAR kit available in limited supplies but I already have an turn key Bull Pup that I purchased from J&G for $400.
Obliviously there are a few parts that you must have to build this rifle but some are interchangeable, such as the Flash Suppressor, Vertical Grip, etc.
For the purposes of this build thread I will speak about specific parts, this is not an endorsement for that part, it is just what I used.
Here are some of the parts that I will use:
QUAD RAIL ASSEMBLY
VERTICAL GRIP ASSEMBLY
MUZZLE ASSEMBLY
BUTT STOCK EXTENSION
ADDITIONAL ITEMS YOU WILL NEED
Various Button Head Allen Bolts
Back Up Front Sight
Scope
Although I have no intention of offering a "KIT" I can help you acquire the items marked with an asterisk and I would be willing to do some of the modifications to the quad rails.
This build thread will be slow paced, but very through. Please feel free to discuss the current or posted steps but refrain from discussing the future steps as it will just bog down the discussion.
______________________________________________________________________________________________
MODIFICATION OF THE FRONT END
There are several things I don’t like about the front end of the factory rifle. The extended front sight block sits way too high and I had concerns that it would catch on stuff and be easy to knock out of alignment. I decided to remove it and go with a rail mounted optic and back up sights. The Slant Cut Compensator doesn’t do much for a semi-auto which is why I replace it with a $10 Bird Cage Flash Hider.
To facilitate these changes I performed the following work:
REMOVAL OF THE FRONT SIGHT BLOCK EXTENSION
You should be able to remove the Front Sight Block Extension at this time. I installed the original Front Sight Post into the original Front Sight Block so it would not get lost.
REMOVAL OF THE FRONT SIGHT BLOCK
This is an image of my $30 arbor press. These are not that expensive and have many uses in a shop.

Now that the Front Sight Block is removed you will have 2 grooves on the top of the barrel that can be expensive to repair so I just cover them up with an inexpensive barrel shroud.

I use a 4" length of 1/2" galvanized electrical conduit which is available at most hardware stores.
Before I install the shroud I do a couple things to prep the rifle for future work:
I remove the Bayonet Lug with a band saw and grinder since I have no intention of ever installing a Bayonet. This step is not required.
I remove the Sling Loop that is part of the Front Hand Guard Retainer with a Dremel and a cut off wheel. This is required to fit the Quad Rail to the rifle. I think you could modify the rail to fit around the Sling Loop but I intend to use a rail mounted Sling Swivel.
Once that is done I paint the bare area of the barrel with Rustoleum High Temp Flat Black Paint. I heat the metal with a heat gun and apply the paint. I also bead blast and pre-paint the barrel shroud.
Once it is cool I slide the shroud onto the barrel and use the Bird Cage Flash Hider to secure it in place. It fits tightly so it should be pretty much centered once you install the Compensator.

Not only does the shroud hide the grooves but it also give the front end a thicker Bull Barrel appearance.
______________________________________________________________________________________________
MODIFICATION OF THE BUTT STOCK
The factory rifle has a 17" length of pull which sounds long but for this type of weapon it's not a problem. However, I didn't like the rectangular unfinished look that it had and I was pretty sure it would not be comfortable to shoot.
I used a Tapco T-6 butt stock to create a wood template. I used the wood template to mark a 1/4" sheet of T-3 aluminum. I cut out the rough shape with a band saw and finished it on a belt sander. Then I bead blasted and pre-painted it.
I use 8 fender washers and 2 self tapping screws to attach it to the original butt stock. The fender washers create a gap that gives you some place to tuck the edges of the Tapco Butt Stock Pad into.
The butt stock extension adds 1" to the length of pull but it still doesn't feel wrong.


______________________________________________________________________________________________
27" Long / 17" LOP / 7 pounds unloaded
Into this
29" long / 18" LOP / 8.6 Pounds Unloaded
PLEASE, do not discuss the function or quality of the bull pup kit/parts. That has been discussed in length in multiple threads about these rifles. I would like to keep this thread focused on the just the modifications I made to the factory gun.
If you would like to be added to an email group send and email to [email protected]
Please put "Bull Pup" in the subject line and the following info in the body:
- Forum you are contacting me from
- Forum ID
- Full Name
- Telephone Number
This build thread is base on using a factory built Bull Pup AK-47. There is a KVAR kit available in limited supplies but I already have an turn key Bull Pup that I purchased from J&G for $400.
Obliviously there are a few parts that you must have to build this rifle but some are interchangeable, such as the Flash Suppressor, Vertical Grip, etc.
For the purposes of this build thread I will speak about specific parts, this is not an endorsement for that part, it is just what I used.
Here are some of the parts that I will use:
QUAD RAIL ASSEMBLY
- UTG Saiga 12 Quad Rail ($90) *
- UTG Saiga 7.62 Quad Rail ($70) *
VERTICAL GRIP ASSEMBLY
- 13 Slot 1" Riser ($15)*
- Tapco Stubby Vertical Grip ($18)
MUZZLE ASSEMBLY
- AR 15 Birdcage Flash Suppressor for AK-47s ($10)
- 6" length of 1/2" Electrical Conduit *
BUTT STOCK EXTENSION
- 1/4" x 3" x 6" Aluminum Plate
- 1" Fender Washers
- Tapco Butt Stock Pad ($10)
ADDITIONAL ITEMS YOU WILL NEED
Various Button Head Allen Bolts
Back Up Front Sight
Scope
Although I have no intention of offering a "KIT" I can help you acquire the items marked with an asterisk and I would be willing to do some of the modifications to the quad rails.
This build thread will be slow paced, but very through. Please feel free to discuss the current or posted steps but refrain from discussing the future steps as it will just bog down the discussion.
______________________________________________________________________________________________
MODIFICATION OF THE FRONT END
There are several things I don’t like about the front end of the factory rifle. The extended front sight block sits way too high and I had concerns that it would catch on stuff and be easy to knock out of alignment. I decided to remove it and go with a rail mounted optic and back up sights. The Slant Cut Compensator doesn’t do much for a semi-auto which is why I replace it with a $10 Bird Cage Flash Hider.
To facilitate these changes I performed the following work:
REMOVAL OF THE FRONT SIGHT BLOCK EXTENSION
- Remove the Slant Cut Compensator by depressing the retention pin and turning it to the right until it is off the barrel.
- Use a 7/64 Allen wrench to remove the Forward Hand Guard.
- Remove the Front Sight Post from the Front Sight Block Extension.
- Remove the small set screw from the front of the Front Sight Block Extension. I didn’t have an Allen wrench that was small enough, so I just used a #0 Phillips screwdriver.
- Use a 1/4" Allen wrench to remove the Front Sight Block Extension Bolt.
You should be able to remove the Front Sight Block Extension at this time. I installed the original Front Sight Post into the original Front Sight Block so it would not get lost.
REMOVAL OF THE FRONT SIGHT BLOCK
- Use a 3/32" pin punch to remove both of the Front Sight Block Retention Pins.
- Use and Arbor Press to press the Front Sight Block off of the Barrel.
- Reinstall the Retention Pins to prevent the lose of the pins and the muzzle device retention pin parts.
This is an image of my $30 arbor press. These are not that expensive and have many uses in a shop.
Now that the Front Sight Block is removed you will have 2 grooves on the top of the barrel that can be expensive to repair so I just cover them up with an inexpensive barrel shroud.
I use a 4" length of 1/2" galvanized electrical conduit which is available at most hardware stores.
Before I install the shroud I do a couple things to prep the rifle for future work:
I remove the Bayonet Lug with a band saw and grinder since I have no intention of ever installing a Bayonet. This step is not required.
I remove the Sling Loop that is part of the Front Hand Guard Retainer with a Dremel and a cut off wheel. This is required to fit the Quad Rail to the rifle. I think you could modify the rail to fit around the Sling Loop but I intend to use a rail mounted Sling Swivel.
Once that is done I paint the bare area of the barrel with Rustoleum High Temp Flat Black Paint. I heat the metal with a heat gun and apply the paint. I also bead blast and pre-paint the barrel shroud.
Once it is cool I slide the shroud onto the barrel and use the Bird Cage Flash Hider to secure it in place. It fits tightly so it should be pretty much centered once you install the Compensator.
Not only does the shroud hide the grooves but it also give the front end a thicker Bull Barrel appearance.
______________________________________________________________________________________________
MODIFICATION OF THE BUTT STOCK
The factory rifle has a 17" length of pull which sounds long but for this type of weapon it's not a problem. However, I didn't like the rectangular unfinished look that it had and I was pretty sure it would not be comfortable to shoot.
I used a Tapco T-6 butt stock to create a wood template. I used the wood template to mark a 1/4" sheet of T-3 aluminum. I cut out the rough shape with a band saw and finished it on a belt sander. Then I bead blasted and pre-painted it.
I use 8 fender washers and 2 self tapping screws to attach it to the original butt stock. The fender washers create a gap that gives you some place to tuck the edges of the Tapco Butt Stock Pad into.
The butt stock extension adds 1" to the length of pull but it still doesn't feel wrong.
______________________________________________________________________________________________
Last edited:

")