
Thanks all for the heads up and helping me past the great age of fuse to that of caps! So I got this great brass hammer and nipple but it's flat and the cannons not. I fear that the brass will break if I ... well that's as far as I got. Everything I think of I foresee breaking the brass. Ideas please.
You are using an out of date browser. It may not display this or other websites correctly.
You should upgrade or use an alternative browser.
You should upgrade or use an alternative browser.
How do you bend brass?
- Thread starter CANNONMAN
- Start date
- Status
-
Not open for further replies.
WestKentucky
Member
Use heat and a ball peen hammer would be my guess. Brass is pretty soft so you can probably do more than you think. I have no real experience though so wait for a better response.
Steel Horse Rider
Member
As was stated, Heat and Beat! You need an anvil with a curved heel or perhaps the back of a jaw on a bench vise would work in a pinch. You will need a broad heat source, a good pair of insulated gloves, tongs or pliers to hold the piece to be bent, and then the patience to work the piece slowly test fitting it to the cannon barrel or to a template that has been fitted to the barrel in the proper place. Real old time blacksmithing......
Just a question, could you not run the piece longitudinally?
Just a question, could you not run the piece longitudinally?
rcmodel
Member in memoriam
Heat works on brass bar stock. Sometimes.
But sometimes it does't too.
But your thingy is cast brass.
So not so sure you can bend it without breaking, heat or not.
You could try annealing it first by heating it dull red and quenching it in water.
Or you could mill a chunk of brass bar stock that fits the barrel to make a flat base for it.
That would be your best bet I think.
rc
desidog
Member
- Joined
- Nov 21, 2008
- Messages
- 2,595
How thick is that base? I'd say your only options are to grind / file the bottom concave, or just bolt it on as is and have a bit of a side-gap, and get some brass wedges and shim the side gaps... or mill a flat onto the cannon barrel.
Either way, i'd also be concerned with weakening the barrel when you drill and tap the two mounting screw holes in it.
Either way, i'd also be concerned with weakening the barrel when you drill and tap the two mounting screw holes in it.
Schwing
Member
Any cast material will not bend without breaking. I would mill out a separate piece as RC suggested. Even annealing it will do little to prevent it from breaking.
rcmodel
Member in memoriam
It also appears if you mount it lengthwise with the barrel, there may be enough material on the bottom to fit it to the barrel.
Not sure it is supposed to go on sideways like you show in the picture.
Like this.

rc
Not sure it is supposed to go on sideways like you show in the picture.
Like this.
rc
Last edited:
Ephraim Kibbey
Member
I agree with RCMODEL. I think inline is the way to go.
Maybe file a slight flat on top of the barrel.
If you want the lanyard to work from a side stance, use an eyebolt in one of the attachment holes and run the lanyard through it to redirect the pull.
Maybe file a slight flat on top of the barrel.
If you want the lanyard to work from a side stance, use an eyebolt in one of the attachment holes and run the lanyard through it to redirect the pull.
I'd you guys to see ofitg's mount. I think it's the same. As for where to mount this, I don't want to be in the rear and wish to not pull against the design. I agree about cast metal breaking regardless yet I do not care to shim. There is not enough to grind to fit though there is plenty of cannon to pierce for mounting. Last I don't want to call Dixie because stubbornly, I believe you guys will sort this out for me.
whughett
Member
With all the miracle epoxies, metal and non metal, available perhaps a custom mount could be molded. The piece seems to have an excess of length and could be shortened somewhat. How much recoil would that be subjected to.
BCRider
Member
It's a casting so with some heat to anneal it you might be able to bend it. But even annealed it may still break since it IS a cast piece. But USUALLY if you anneal it the brittle structure of the metal as a result of the casting process SHOULD go away. But this is a definite maybe sort of thing. More importantly since you only have one Murphy's Law says it WILL break even with careful annealing. If you had two or three on hand then the first one would soften up and bend sweetly as sugar pie. But since you only have one........
So... .why not make your own from scratch? That way you can cut and shape the metal so that it is purposely designed to mount circumferentially on the barrel and be pulled from the side. If you can turn out and bore a barrel and attach the trunnion stubs correctly you easily have the skill and knowledge to make your own side pull hammer.
Alternately if you really must use the one shown then mount it longitudinally as rc' shows and put a fairlead just behind so the cord can turn to the side without any undue angling of the pulling action. But the purpose designed and made option would look a lot nicer.
A side question if I may? What provides the striking speed to the hammer? I don't see a sear, latch or even any signs of a spring to drive the hammer. Does it simply rely on the snappy pull on the cord?
BCRider
Member
Just a point. I'd anneal it THEN work it cold. It'll work harden fast though. So get it half way shaped and re-anneal before finishing.
From what I know brass isn't like steel. You don't want to try forming it while hot. It's much too soft and can simply come apart like bending raw cookie dough when that hot. Having seen this with brazing rods when I mess up I know it would be a risky thing.
Also the correct temperature for such hot forming isn't a dull red. It'll be something lower than that to form it without the risk of totally deforming it. By the time it's glowing at all it's going to be very close to simply melting.
Dear BCRider, I wish my luck was as fond as Murphy dwells out! I used to think chance favored the prepared mind. Now I just hope there's a chance of not getting up to pee more than 3-4 times a night. ofitg did this. I mean he bend his lock. It was a bit back a while and I don't know if his was cast by the pic. I like it as it seems to favor the stance I want while shoot'n this thing. You are correct that the pride of pull equates the force of the hammer. I wanted a spring loaded mouse trap kind-of-a-thing. I see safety and hazard in both. Ideas?
Steel Horse Rider
Member
According to my 5 minutes of internet research there are a wide range of brass alloys. Alpha brass alloys can be worked cold, Beta alloys should be worked hot, there was no details given as to determination of the type. The melting point of brass is just over 1400 degrees so as long as the color remains below a dull red it should not melt. I think I would spend a little more time researching the original methods for firing cap fired cannons and seek to duplicate their techniques. I would think that it would not be that hard to make a spring loaded bar that could be held back by a U shaped sliding piece where the second leg of the U would serve as a block to the bar striking the cap unless the U shaped piece was manually retracted, similar to the way a cross bolt safety works on a Marlin lever gun.
rcmodel
Member in memoriam
Trust me, it's cast brass.It was a bit back a while and I don't know if his was cast by the pic.
Another option if you want to mount it sideways is to bend a steel strap to fit the barrel.
Then trim the lock base down to just the hammer pivot part and low temp silver solder it to the steel strap.
Then drill and tap the steel strap for the nipple.
rc
Curator
Member
RCmodel has shown you how it is supposed to be mounted: Lengthwise. No amount of bending will adapt this to mount side-ways. I have mounted several of these, and you may need to shorten it to make it fit your barrel. The "hammer" is designed to fall forward as the lanyard is pulled from the rear.
BCRider
Member
If the power and speed of the hammer blow comes from the pull itself then I'd seriously want to make a coil spring powered hammer with a pull pin as a release or use a sear. I just KNOW that if the cannon were anything under at least 50 lbs that when I pulled smartly to power up the hammer that I'd yank the cannon right around and put a hole through one of the cars in the parking lot behind the firing line.
But setting up something with a spring and a pull pin to act as the trigger means a new design. The good news is that for a side pull the hammer itself would be in line with the barrel. But it means that this one is no good and you're back to making something up from scratch.
But setting up something with a spring and a pull pin to act as the trigger means a new design. The good news is that for a side pull the hammer itself would be in line with the barrel. But it means that this one is no good and you're back to making something up from scratch.
ofitg
Member
- Joined
- May 17, 2010
- Messages
- 445
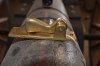
CANNONMAN asked me to post this photo -

This is a Dixie Gun Works lock I mounted on a barrel in the 1970s..... I don't remember all the details on how it was done (the 70s are kinda "fuzzy" in my memory), but if I were going to do it today, I would heat the brass with a propane torch and hammer it around a curved surface.
Is it safe to assume that these locks are still made with the same type of brass they used 40 years ago?
I don't know why the hammer should or needs to fall forward. I don't have room to mount it this way without adding stuff. Stuff I think takes away from the "look" of the cannon. Straps, shims, glue, etc. Well, I'd rather just use a fuse. I see that ofitg managed this some 40 years ago. I believe what one man can do, so can another. I called Dixy and shared all of your ideas. Guess what? They agreed with the popular idea of heat and cool. Annealing. Neat word. Not to the point of using oil, which kinda surprised me. Interesting idea to reset the hardness. Not sure why this is a good idea. More please. Plan on the great operation this weekend. Pics and details coming your way.
doubleh
Member
Brass is "hot short". If you try to bend it hot it's going to break. Anneal it and it will bend some but work hardens quickly. Bend a little and re-anneal. Brass anneals under 800 degrees. Let it cool slowly or quench it. The results are the same.
BCRider
Member
.....They agreed with the popular idea of heat and cool. Annealing. Neat word. Not to the point of using oil, which kinda surprised me.
The changes that occur in higher carbon content steels when you heat it past a specific critical temperature then let it cool slowly or quench it to cool it rapidly is not shared by most other metals or even mild steel alloys. Which is why Dixy and us folks here are saying it doesn't matter if you cool it fast or slow and why it doesn't matter if you use water or oil. Other than oil leaves the part messy which you'd want to clean up before forming the part.
The primary hardening mode in most brass alloys is through work hardening. This is so prevalent that in many cases to "harden" a part one method is to lightly hammer it repeatedly just hard enough that it leaves light surface marks but doesn't deform the part otherwise. But go a little too far and the part can work harden so much that it shatters. It's a fine line. Been there, done it and had to make a new part.
Ideally you would anneal the saddle and strap and form it with pressure rather than hammering. And I'd suggest forming the curve in three steps with annealing at each third of the total bend just to be sure it doesn't harden during the bend and snap on you. You want to form it between blocks of hardwood in a vise instead of hammering because each hammer blow hardens the metal more than an equivalent pressure bend in the vise. And you'll need more than three blows to cover this much bend.
Alternately if you could set up some forming blocks in a jig that would allow for ONE blow then a good heavy hammer or light sledge and one good sharp over the shoulder swing would form it in one go. Time plays a part in the forming process.
An example is motorcycle control levers. Cheap forged aluminium that bend like over cooked pasta into the oddest shapes during a crash. If you try to bend them back they'll snap like cheap wine glass stems. But anneal the bent area and you can form the levers back again to some extent. Re-anneal them and you can finish the job. I won't trust brake levers to this fix but I've done more than one clutch lever and had no issues with them for many years of use after the repair.
- Status
-
Not open for further replies.
Similar threads
- Replies
- 42
- Views
- 2K