How many layers of plywood for my new bench?

How many layers of 3/4 plywood for my bench top?

  • 2 = 1.5" of plywood, it's plenty

    Votes: 76 68.5%
  • 3 would be better

    Votes: 17 15.3%
  • 4 will be super strong

    Votes: 5 4.5%
  • Other

    Votes: 13 11.7%

  • Total voters
    111
  • Poll closed .
Status
Not open for further replies.
Mine is 4x4s (2x4s would work but you'd need twice as many) squeezed together with threaded rods and a single layer of 3/4" marine plywood on top. Its also bolted to the joists in the wall. Very solid.
 
My last benchtop I built was built on a layer of 2x's under 3/4" plywood and a sheet of "tile board" on top which gave a smooth and very easy to clean work space. The presses mounted to rails so they could be removed / changed giving me more work space.
 
I have built thick reloading benches and thin reloading benches.

There are other considerations; bench weight, bench shape, press to be used, and what the press is expected to do.

Remember statics in college?
http://en.wikipedia.org/wiki/Statics

My father, the gun designer, talked that way. He would have said there is a moment arm the press knob couples to the bench.

I am still back in grade school, thinking and talking in terms of leverage.

My old cursed rockchucker puts such a force on the bench that it has to be mounted at the end of a free mounted bench to keep the legs of the bench from lifting.

The co-ax press puts very little on the bench in terms of constraints.

I found that I am better off mounting the bench to the wall if the rockchucker is trying to tip it over.
 

Attachments

  • 7 in thick reloading bench 11-19-2011.jpg
    7 in thick reloading bench 11-19-2011.jpg
    93.9 KB · Views: 43
Well, the top is screwed on. Some of the glue smeared when I put the benchtop on, but hopefully enough is still there. Plus a whole lotta screws!

I put some Elmer's stainable wood filler putty in the countersunk holes, but I think I need to hit it again. Will the putty sand flat? I tried to fill the holes neatly, but then when I used the putty knife to level it, some small amounts fell out. If I oversmear a bit will I be able to sand flat later?

attachment.php


attachment.php
 
Yes, I usually over fill and sand with an orbital after 6 hours or so. If some falls out it was a bit too dry. add some more fresh and sand.
 
Dunked in the blue kool-aid

Should I stain it a second time, or do you think it will be blue enough? It is a bit blotchy, but I used the prestain conditioner. Oh well. I have great respect for people who can get the stain super even, but then again it is just 2x4 and plywood sheeting.

I was thinking about arranging the space so it won't be as crowded as my other bench. I was thinking to divide the bench in half, and then center each press in the middle. I was also thinking to put one Rock Dock on the bench, that way the 1050 can stay permanently installed, but maybe I might get another Hornady LNL AP for smaller batches and leave it all set up, skip the casefeeder. I also need to find room on the bench for the nice Dillon scale, as well as a Giraud trimmer. I might also move my Dillon super swager over from the other bench.

So should I start finishing or stain again? The can has plenty left in it. And am I better off with a polyurethane wiping varnish, or an acrylic based like the Formby's Tung Oil (it isn't) wiping varnish?

attachment.php
 

Attachments

  • IMG_1330.jpg
    IMG_1330.jpg
    151 KB · Views: 143
Like I told you, blue stain and for that matter any water-based stain is beyond my experience. Sorry, but you're still on your own.

Only you can say whether more is better.....try a place where it don't show and see. An option also is to brush on the stain and not wiping it off. That would color the areas that didn't take stain......you can also tint the clear finish.

As for the finish, if you're going to have a top that resists dirt and grime you are going to need more than a wiping finish. Several coats of Urethane may work best. I went beyond stain and varnish on mine and glued on a Formica top.

If you decide you aren't getting what you want with the blue stain, you can always stain over it with a brown or paint it.
 
> If I had room, I would go to Harbor Junk (freight) and get their table, I have seen it and it is heavy and will do the job.
> http://www.harborfreight.com/garage-...ood-69054.html

That's funny, I have one of these, part for me and partially for the kids. I c-clamped my press to it temporarily while I looked at building a wall mount, and then of course used it a bit. It was surprisingly stable! (Press is mounted on a strong arm mount, c-clamping to table was easy). I'll add some mounting holes to the table so I can use here when needed.

... got the table recently one of their 40% off coupons which made it nicer!
 
Buy some fl;at sawn 2x lumber.

Rip it into 1.5 in wide strips.

Turn each strip 90 degrees to make it lt now 'quarter sawn.'

Sandwich between twp layers (one on each side) of 3/8 inch underlayment (B-C type grade or better).

A layer of tempered Masonite on each side will further extend the life.
 
Problem!

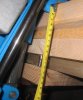
I messed up drilling the holes, and two were not in the right spot. I put a drill bit through the press and tapped on it to mark the spot, but somehow the right two holes aren't correct. I was able to drill from below and get another hole working, but the last hole is no good. I broke a drill bit off and had to pound it out. The expression, "when you realize you're in a hole, stop digging!" comes to mind.

So, in the clearer light of morning, what are my options? One thought I had was to move the press 3" to the left, use the two working holes, and just carefully redrill another two holes, and then use some wood putty to fill in the other two disasters. I figure I can just sand and stain those little holes, and then just throw another layer of finish over it so it won't look so bad.

I also saw on a woodworking site about cutting a plug, and using that to fill in a gap. So if I used a plug cutting bit I could make a plug out of plywood and it would look "nicer" but that would be lots more work.

Or, any suggestions on how I could just make that last crappy hole useable? I tried drilling it wider with larger drill bits, but I didn't have any other size 6" long bits. I also think that once I drilled the channel from below off center, that any attempt to drill again in the same area is making the bit slide off center. I don't have a drill press, but I have an attachment for a hand drill which allows you to set the angle and it rests against the surface so you can drill reasonably perpendicular holes (hey, the first two were good).

Would it make sense to fill the last hole up with wood putty as best I can, let it dry, and just try to redrill that one hole? Is there any other compound which I could inject into that messed up hole to let it harden and dry, so I can give it another try? The other three holes are good, and I like the location where it is, so in theory this would be best.

Thank you for all help and suggestions. I will try adding a picture or two as well later.
 
If you can open up the botched hole a little bit so that it will allow the bolt to pass through, just use "fender" washers (above and below the wood, if needed).

You really don't want to count on whatever you might use to fill the hole to resist any pressure. There certainly are very strong ways of repairing such things, but they're more bother and aren't necessary for what you're trying to do.
 
Tried that, but it wasn't going well. I did a bit more searching online on "fix misdrilled hole in wood" and got some ideas. I will try the dowel method I was just looking up. I figure if I get a nice 1/2" drill bit and some dowel that will plug up the whole mistake, and then I can redrill a nice 1/4" hole again through the repair area.

I feel really dumb making the mistake, but I sure did learn a whole lot from it (no pun intended). Here's hoping the repair goes well.
 
White or yellow wood glue and a wood dowel from home depot will fix it. Just slather glue on both surfaces to give the best coverage and slidability before it sets and drive it in. Let it dry then re-drill.

If your hole doesn't fit dowel sizes (even wallered out perhaps) just drill to the next larger sized dowel and proceed as above.

Measure twice drill once.......or even measure 4 times drill once!:D

If you'll put your press in place and using a china marker, mark inside the slots or holes while the press is sitting there you may have better luck.

:)rolleyes:well....that was a waste of time....while I typed away you posted that you already came up with that.)
 
Last edited:
I keep preses mounted on lengths of 2x lumber and use F-clamps to old them on the bench top.

Even 2x will flex under the clamps with my old 4x4 press.

I inlaid steel angle over the width of each board at each end to stiffen the wood.

No more flex, and the steel spreads the clamp pressure out and prevents crushing the wood fiber.
 
When you go to redrill the plugged hole, use a forstner bit, if you have one. Or make a small pilot hole. The dowel might want to push your hole off center.
 
made my bench out of particle board with 6 coats of varnish for a smooth surface. Nailed or screw a 2x4 ledger board on the wall at the desired height and used 2 three and a half inch door hinges to fasten the top to the 2x4. This way it will drop down when not in use which saves space. I cut 2-- 2x2 legs with a 1/2 inch dowel sticking out of the top to pin it to the top. I drilled a 1/2 in. hole to accept the dowel pin in each corner. plenty strong! When I want to use it I just lift it up slip the legs under it and pin them in. Done
 
The dowels went in no problem. I squeezed them in my pliers to create some grooves for the glue, and tapped them home. I bought the forstner bits, so hopefully it will be no problem to redo the holes in the right place.

Different question, about the grade of fasteners. I have the universal mounting kit, but obviously the bolts don't reach. I purchased some standard grade 1/4-20 6" bolts. Would it make any difference to order some Grade 5 or Grade 8 bolts instead? And somewhere I read that if you use Grade 8 you need to match the washers and nuts also in Grade 8.

Any advice on the types of nuts/washers and if this would be useful?
 
:) For what you're doing the standard fasteners will be JUST fine.

Grade 5 and Grade 8 (and all the other designations) are for the sorts of pressures and tensions you generally need power equipment (motors, hydraulics, etc.) to break.

You're just pulling on a press arm with your hands. The basic Grade 2 stuff will work perfectly.
 
When we finished the house, carports and shop I had a nice pile of scrapwood and a few unused pieces of lumber. About 2 hours of labor and a couple of beer I had a reloading bench tied into one of the shop walls Plywood on top is half inch but supported by many crossmembers. Been there for 26 years. Wall cabinets were made from empty wood ammo cases. It is not a showpiece, just functional.
 
I built a bench very similar to GW Staar's drawings out of 2x6 pine I was given. I've got several presses on it. Rock solid. I put in a plywood shelf and backer. It's almost 6' long. Weights a couple hundred pounds empty. Probably over 1000 with all the equipment and junk on it.
 
When I started reloading I had no space to set-up. I did have a really old end table made in the days when "real" wood was used in furniture. I bolted a 1/4" boiler plate on it and mounted my press ( a Dillon 550 ) to the plate. I made many thousands of rounds from that unusual set up.

At another residence I made a table from 4X4 legs, brackets for decks, plywood stiffeners, a solid wood door and the old boilerplate. Still waiting for the girls to dance on it. They never show.....
 
Status
Not open for further replies.
Back
Top