I thought AR-15s were supposed to be EASY (learn from my stupidity)

Status
Not open for further replies.
Pro tip: I stick down some black electrical tape while tapping in the bolt release roll pin to avoid scratching the lower. Lets face it, that ones kinda hard to get to. I use a small brass hammer and steel drift.
 
I assembled the barrel nut with a 18" pair of channel lock pliers. It's not rocket science, but I have worked on cars since I was 18, so 80 pounds of torque is something I got to hand tighten on every lug nut of every wheel I ever mounted away from a shop with air tools.
:scrutiny:

That is the mechanical lock on the nut - tube vs tooth. Not torque or thread locker or whatever.
:uhoh:
 
I've been following your saga of the Scottish AR and I've been curious about your trouble with the barrel nut. Your iconified responses to the 2 quotes are... well... ambiguous.

I recall that you used a torque wrench to tighten to 30 ft lbs, but I didn't see what value you had reached when you quit after breaking some teeth off - 80? 80+?

In reference to the last quote/icon pair - it seems to imply you used thread locker? And if so, does that mean you didn't use any lube on the barrel nut threads?
 
I'm an equipment maintenance man by trade so I have some tools and I know my lefty loosey from my righty tighty.

That said, about November 2012 I bought a new Colt 6920 for $1100ish and called it good.
 
I've been following your saga of the Scottish AR and I've been curious about your trouble with the barrel nut. Your iconified responses to the 2 quotes are... well... ambiguous.

I recall that you used a torque wrench to tighten to 30 ft lbs, but I didn't see what value you had reached when you quit after breaking some teeth off - 80? 80+?
IIRC the first teeth sheared at about 60 ft/lbs, at which point the point of the tooth was directly in the way of the gas tube hole. So after that I didn't bother with the torque wrench, because it was plain that the only option was to move that tooth out of the way. It got to the point where I was afraid I was going to break something else before I could get it lined up. It was like the worst case scenario.

In reference to the last quote/icon pair - it seems to imply you used thread locker? And if so, does that mean you didn't use any lube on the barrel nut threads?
I used thread locker on the extension/slip fit into the upper, as recommended by several sources to fill in the "slop" of the barrel to receiver fit. I used anti-seize lube on the threads.

The :uhoh: icon was in reference to the erroneous statement that the torque doesn't matter, and that the gas tube is relied upon to provide a mechanical lock for the barrel nut. As stated in above posts, the gas tube is meant to "float" or rattle and not bear against the sides of the barrel nut teeth. Which means that yes, a proper amount of torque nut IS what secures the barrel nut.

The question about Tirod's calibrated elbow concerned his apparent statement that 80 ft/lbs is the standard for assembly of the barrel nut. As you know, that's way more than the minimum required.

At least that's my understanding after reading the assembly manual.

But as is apparent from this thread... I'm not an expert.:eek:
 
People, dont be dismayed, just do your research first. I built my first one during the crisis, not expensive and it runs like a top. The first lowers I saw were polymer, but I was steered away. Then one day I saw a Seekins lower and bought it. Bought the M-4 stock off of amazon, a Spikes tactical upper from a local gun store. Barrel from Sportsmans guide, gunshop gave me a M-4 double heat shield hand guard. Aim surplus bolt carrier group. Gas tube and other bits here and there. I spent just under 700 or so and it worked perfectly.

I had never built one before, this was the first (but not the last) one. Between advice from here, my local gunshop and various online videos from Brownells, CMMG and You-tube, it was very straight forward. Learned a ton and I can completely strip it when necessary and aquired tools necessary to do so.

Russellc
 
From what I've seen lately, you can't put together a quality upper for what PSA sells them for or a cheap one for that matter.
 
If you get all of your parts in place you can assemble one in an hour to an hour an a half.

If you try to piece meal it you will nearly always invite problems unless you have really thought out all of the parts in advance and built the rifle "on paper" so that you know everything you are going to acquire will work.

But since you can't shoot a partially built rifle, why not just take your time, get all of your parts in place then when you are ready, build it?

It is always surprising to realize how much you get into a complete rifle. Fifty here, a hundred there, next thing you know you have a $1000 rifle.

They are fun to assemble but it is such a short effort to actually assemble one that its like waiting at a restaurant for two hours for a meal that you wolf in 15 minutes. So in the case of an AR all of the fun has to come from the slow motion gathering of the parts.
 
Is that a dissipator or full rifle length? Either way I like it.
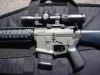
Dissipators are full length rifle handguards/sight radius with a shorter 16" barrel. The originals had rifle-length gas tubes which caused some problems. Mine has a lo-profile midlength gas system under the handguards. Most "mock dissipators" today use midlength gas for reliability.
 
You know what makes building uppers easy? Free-float tubes/rails.

I prefer them over basic delta rings and A2 sight posts. Super easy to assemble with just a torque wrench. If you don't have the wrench, you can even tighten it by hand if you are strong enough as long as you at tighten it well. Freefloating also gives you a more rigid handguard; I hate the small movement of handguards but that is a personal preference. There is nothing wrong with the standard delta ring/A2 post and is actually considered very rigid. Its the 2-pc handguard that bothers me.

Here are 2 of my recent builds both free floated. Adds a bit of accuracy as well (although I'm no marksman).

40A04120-8D21-4497-B635-6A33974C0F0A.jpg

10.5" Pistol w/ Carbine gas, and 16" Midlength SOCOM Carbine.
 
Here's my 2 cents. :D Of course I started with Noveske upper and lowers and quality barrels and parts. Went together like a Swiss watch. :neener:
 

Attachments

  • IMG_6289.jpg
    IMG_6289.jpg
    199 KB · Views: 17
  • IMG_6358.jpg
    IMG_6358.jpg
    139.1 KB · Views: 19
Who makes that one? How does it lock onto the barrel nut?
The handguard is a PRI Delta carbon fiber handguard. It uses a proprietary barrel nut which is threaded to accept the nut on the handguard. It wasn't cheap, but I really like it
 
I too built at the height of the panic, I figured if the govt. wanted to prohibit me from having an AR, I HAD to get one. After scrounging the parts, and getting an armourer's wrench and a mag well support. The lower took 1 hour to assemble, the upper (no forward assist, dust cover) the same. My carbine has 1500 rounds thru her, not a hiccup. It was really fun, and I know the rifle inside and out, if any part needs replacing I can do it.
 
I'm not suggesting that 80 foot pounds is a goal. Not at all. The TM isn't clear, but the point is that you aren't supposed to exceed it. My additional caveat is that attached to the barrel nut wrench, it's not a direct numerical reading, as the leverage of the wrench added to the torque wrench means it cannot be the actual number. It's just an indicated reading and meant to prevent stripping the threads.

In this case I don't blame the OP for stopping - the teeth sheared due to exceeding their obvious yield strength. I speculate it may be due to the part not meeting GI specs. Very few builders have reported shearing the teeth off. I see it as being one of the "fake" legos - not milspec or even good quality. We'd like to know who's it was.

As for the torque holding things together, it's not so much - the GI prescription is to use anti sieze, and secondly, if torque alone could do the job even all lubed up, then why have the redundant backup of locking the gas tube between teeth on the nut? I see it as a interactive preventative - if it does back off that much and pushes the tube to one side, it will create a stoppage and the rifle gets looked at by the armorer.

Otherwise, the user wouldn't even notice unless they feel the barrel flopping around. Nope, the nut teeth and tube ARE the mechanical lock - because torque alone can't be trusted to do the job.

If someone wants to question it, ask the Armalite design team survivors, they put it there for a reason. And that's why a lot of aftermarket barrel nut makers still include it - because if it can loosen up, it will.

As for locktiting the barrel extension into the upper to fill the slack, the barrel extension itself is clamped to the nose by the machined ring extending out from it, and the barrel nut has a shelf internally to mate. The assembly is clamped to the front of the nose of the upper - all that locktiting the extension in the nose will do is prevent some wiggle under extreme pressure. Which we shouldn't be using against the barrel anyway if a free float is installed.

It's a receiver action technique of no value for the AR, which is a completely different design. Like squaring the nose on the upper, a lot of precision builders don't - it's an extra charge option they ordinarily leave out, which should be testimony enough they trust their reputation of accuracy to guns that don't use it. What they will do is once sighting it in, if they run out of windage or elevation adjustment, they will square the nose to get an otherwise out of spec receiver to meet customer expectations with a minimum amount of extra expense. The object at that point is to get the gun marketable so the labor expense isn't lost.

Goes to those CNC specs - most AR uppers are good enough they don't need fancy gunsmithing tricks because the parts are machined right the first time. It's exactly why so many buy a bolt separate from a barrel with extension and never have headspace problems. It's almost never done in the manual action building area, it's standard and everyone does ignore it in the AR. Again, it's a different design.

Sure, many don't like it when I explain I torqued the barrel nut with channel locks. I seriously considered donning some overalls and a feed mill hat and taking pics - but they were in the wash. :neener: The point is that the nut has no idea what kind of tool is turning it - :rolleyes:, only the operator gives it any consideration. Since I meant for this to be a useful gun, I knew it was going to get it's share of dents and dings. A few scratches on the barrel nut teeth where I would never see them? No big deal. It's a tool, not a safe queen that represents my masculinity.

Take your carbine to a weekend course and see what it looks like before and after. I never had to bother, dragging a Hydramatic thru basic I got the idea.
 
Got the FH and FSB off so I can replace the barrel nut... my taper pins aren't tapered, BTW. .125" at both ends.

Now I can't find my frickin' snap ring pliers which I bought specifically for this job. :banghead:
 
Some were asking how much I've spent on this nightmare....

Looks like $700.

CTR stock, beat up/used buffer tube, castle nut, and sling plate $55 shipped 4/11/13
New Frontier Polymer stripped Lower $80+shipping+$20 FFL fee $115 3/13

Product(s) Shipped Midway USA 5/14

DPMS Delta Pack AR-15 Matte
Product #: 136065
Price Each: $12.29
Qty: 1[/TD]

Del-Ton Front Sight Detent ...
Product #: 163231
Price Each: $1.99
Qty: 1[/TD]

DPMS Front Sight Post A2 Sq...
Product #: 373128
Price Each: $4.09
Qty: 1

DPMS Gas Tube Roll Pin AR-1...
Product #: 384068
Price Each: $2.49
Qty: 1

Yankee Hill Machine Crush W...
Product #: 399121
Price Each: $1.99
Qty: 1

DPMS Flash Hider 3 Prong 1/...
Product #: 487530
Price Each: $8.19
Qty: 1

Model 1 Barrel AR-15 223 Re...
Product #: 777573
Price Each: $145.00
Qty: 1

Del-Ton Gas Tube Carbine AR...
Product #: 919172
Price Each: $12.79
Qty: 1

Del-Ton Front Sight Detent ...

Product #: 945484
Price Each: $1.99
Qty: 1


Total $191.00


PSA 3/3/13


5.56 8620 Bolt Carrier Group with Charging Handle $169.99
Carbine Buffer Assembly $9.95[/TD]


Shipping & Handling$7.00
Grand Total (Excl.Tax) $186.94

PSA 6/12


Palmetto State Armory Gen 2 MOE LPK[/TD]
8436M-8436
$49.95

$49.95


Brownells 12/13 carbine buffer spring (part of separate order, not counting shipping costs) $4.99
Brownells 5/14

100004457
AR-15 A1.5 FIXED BACK UP IRON SIGHT $73.00

AR414 CAR "SKINNY" HANDGUARD BLACK $15.99

Total $96.94

Crappy snap ring pliers from Ace Hardware $5.36
Same crappy snap ring pliers 4 days later from Harbor freight, ON SALE YAAAAAAY $2.14
Borrowed assembly tools/vise blocks from brother


GRAND TOTAL NOT INCLUDING BLOOD, SWEAT, TEARS, AND FECES: $705.18


Ooops add $15 for a new barrel nut.
 
Good news: it runs! 40 rounds of Wolf Gold .223 and 20 rounds of tula steel cased .223 so far. Feeds and ejects and locks bolt open. Ejects about 2-3 O'clock with the brass and 3-4 O'clock with the steel.

Bad:
1. had to crank rear sight waaaay over to the left to zero
2. PSA magazine catch broke at round 55 (I've emailed them to see if they'll send me a new one). The shaft came out of the magazine catch (not the button).

Fun to shoot! Light little thing (by my standards). I'm just glad it runs. :D
 
Status
Not open for further replies.
Back
Top